Because the last cream cheese was good, but not great, I decided to try things somewhat differently this time.
At 5 PM I combined 1 gallon whole milk with 2 cups cultured buttermilk in a large clean stainless steel pot and set on the cover. The plan was to let it incubate for 4 hours then heat the milk to 180 degrees prior to adding 1/4 cups cider vinegar to release the casein.
Instead I let the milk sit overnight on the counter. At 9 AM I started raising the temperature slowly. In about half an hour it was at 180 degrees. I shut off the heat and removed the pot from the stove. I added 1/4 cup cider vinegar and stirred for one minute with a long-handled clean stainless steel spoon. The protein began precipitating almost immediately but I continued to stir. After one minute, I covered the pot and let sit for 15 minutes.
Now it was time for draining. I put a damp "flour sack" kitchen towel into a large colander in a larger bowl in the sink and carefully poured the curds and whey into the kitchen towel. (The "flour sack" kitchen towel is easier to come by than good butter muslin. I got this one at the King Arthur Store.) The draining process was discussed in the previous cheese post so I will skip it here.
After the curds had hung for an hour, I divided in half and put into two glass bowls. To the first bowl I added 1 teaspoon Krazy Mixed Up Greek Seasoning, 1/2 teaspoon each: granulated garlic, powdered onion, dill weed, and kosher salt, 1/4 teaspoon white pepper (because I had it!) and 2/3 cup heavy whipping cream. I stirred the seasonings in well, covered, and refrigerated for the flavors to meld.
To the second bowl of curds I added all the same seasonings PLUS one giant clove of garlic put through a garlic press. After stirring it well together, I put it into the food processor (Cuisinart) for a couple of minutes to "whip", then put back in bowl, covered, and refrigerated. Well, I had a taste...it was really good, really garlicky...just the way I like it!
Tonight I am going to Book Group. I am going to take both bowls of flavored cheese and some baguette slices so the ladies can taste this and give me their opinions. Whenever I attend a function where food can be served, I think "GUINEA PIGS"!! It is very useful to have people tell you what they think...as long as you have a very thick skin. After all, you want their actual opinions, not what they think you want to hear. Those opinions may not be flattering nor comforting, but they will potentially help you make something better next time.
Monday, March 31, 2014

Wednesday, March 26, 2014
Food Today: Quick Strawberry Ice Cream
Last summer our book group met at Britta's house. Sometime before Book Group Britta had purchased a Blendtec blender. That night at Book Group Britta made for us some fresh-tasting strawberry ice cream. In forty-five seconds flat!
That ice cream was so fresh-strawberry luscious, so very delicious, that I began to long for a Blendtec blender. When I looked at the cost of one, I knew it was beyond my capabilities to buy so I tried tamping down that desire.
For years we have had a Bosch mixer and at some point in the last two or three years we finally purchased the blender jar for that mixer. I used it for making mayonnaise and smoothies for breakfast but that was about it. When I looked at the horse power of the Bosch mixer and at that of the Blendtec mixer, I thought I would give the Bosch a run for its money.
Having gone online to find the recipe that Britta used, I was ready to make ice cream when the occasion came up. That occasion was last night. My brother was diagnosed a week ago with a large brain tumor. My sister came to spend time with him from her home far away in the South.
The day for our brother's surgery finally came (after twice being scheduled but with emergencies, his was re-scheduled) yesterday. My sister's son and daughter-in-law coincidently came from New York state yesterday.
After a long day of waiting and anticipating, the surgery was over, (very successfully, according to the surgeon), and we went home. My sister had purchased pizza and calzones for us to eat as the supper hour passed while still waiting, so when we got home we were not starving but some people were edgy for sweets.
My nephew's wife encouraged him to use a box of brownie mix (which was left over from the Oreo Peanut Butter Cupcakes from a couple of weeks ago) and make a batch. She also thought ice cream would be fabulous on the brownies. THAT was my occasion to try out the Bosch with quick ice cream.
Pulling out the Bosch from the pantry I set up to make ice cream while everyone else was reading and the brownies were baking. After putting the ingredients into the blender jar, I set the machine at low, then medium, then high. By the time it was on high for a few seconds it started to make a grinding sound so I thought I should stop it instantly. I did.
When I pulled the blender jar off the machine receptacle and opened the cover, it looked like ice cream. I was sure there would be big chunks of the strawberries down in the jar. THERE WERE NOT!!
There was only delicious lovely luscious fresh-tasting strawberry ice cream in less than a minute! Next time I am going to try blueberry ice cream and see if it is as good.
This is what was left over:
We had plenty of ice cream in our dishes, a couple of us only took small amounts, and there was enough left over for two more dishes. We will make it again.
The recipe is posted on Grammie's Kitchen and Bedtime Stories.
That ice cream was so fresh-strawberry luscious, so very delicious, that I began to long for a Blendtec blender. When I looked at the cost of one, I knew it was beyond my capabilities to buy so I tried tamping down that desire.
For years we have had a Bosch mixer and at some point in the last two or three years we finally purchased the blender jar for that mixer. I used it for making mayonnaise and smoothies for breakfast but that was about it. When I looked at the horse power of the Bosch mixer and at that of the Blendtec mixer, I thought I would give the Bosch a run for its money.
Having gone online to find the recipe that Britta used, I was ready to make ice cream when the occasion came up. That occasion was last night. My brother was diagnosed a week ago with a large brain tumor. My sister came to spend time with him from her home far away in the South.
The day for our brother's surgery finally came (after twice being scheduled but with emergencies, his was re-scheduled) yesterday. My sister's son and daughter-in-law coincidently came from New York state yesterday.
After a long day of waiting and anticipating, the surgery was over, (very successfully, according to the surgeon), and we went home. My sister had purchased pizza and calzones for us to eat as the supper hour passed while still waiting, so when we got home we were not starving but some people were edgy for sweets.
My nephew's wife encouraged him to use a box of brownie mix (which was left over from the Oreo Peanut Butter Cupcakes from a couple of weeks ago) and make a batch. She also thought ice cream would be fabulous on the brownies. THAT was my occasion to try out the Bosch with quick ice cream.
Pulling out the Bosch from the pantry I set up to make ice cream while everyone else was reading and the brownies were baking. After putting the ingredients into the blender jar, I set the machine at low, then medium, then high. By the time it was on high for a few seconds it started to make a grinding sound so I thought I should stop it instantly. I did.
When I pulled the blender jar off the machine receptacle and opened the cover, it looked like ice cream. I was sure there would be big chunks of the strawberries down in the jar. THERE WERE NOT!!
There was only delicious lovely luscious fresh-tasting strawberry ice cream in less than a minute! Next time I am going to try blueberry ice cream and see if it is as good.
This is what was left over:
 |
| Strawberry ice cream made in the Bosch blender jar. |
The recipe is posted on Grammie's Kitchen and Bedtime Stories.
Monday, March 24, 2014
Barbara Walker Learn To Knit Afghan: Square 21
Square 21 is called Florentine Frieze. It is really a very nice square and not very hard. Yet again, one has to pay somewhat attention for a while to get the pattern down, but it is possible to do.
This square is knit with a multiple of 4 stitches plus 1. Techniques include the knit stitch, slipping stitches with yarn in back and slipping stitches with yarn in back, and purling.
Using two colors, one light, one dark, cast on 45 stitches.
There are twenty rows in the pattern repeat, well really, there are 10 rows in the pattern repeat but you reverse colors on Row 11, so...colors change on Row 1 and Row 11. The sky is the limit as far as colors. You could use up scrap yarns on this using any light and dark colors.
 |
| Florentine Frieze, Square 21. Fewer glaring errors than on some of the squares! |
The above picture is the square on the blocking board. It is remarkable at how much difference the blocking of a square makes. I have said it before but every time I marvel at how much better the stitches look and how much closer to "square" each block is after a time on the blocking board. I still feel so smart to have figured out using 0's, 1's, and 2's in 14-inch straight needles for the blocking wires.
Because there are 70 rows in the square you
could have 14 different colors if you chose. I bet you could make
something very interesting. If I had it to do again, I think I would
change every ten rows!
Wednesday, March 19, 2014
Food Today: Oreo Brownie Peanut Butter Cupcakes!
A friend told me about the blog of one of her friends....networking is everything, isn't it! I went to that blog which is called "I Sing In The Kitchen". This particular recipe struck my fancy but made a few changes.
We have a "birthday party" for our women's Relief Society at church this week. I am one of the ladies bringing cupcakes. When I saw the recipe I just had to make it.
In preparation I needed to bring home some Oreo cookies and a brownie mix, treats that are rarely seen around here... I have a very good brownie recipe but really like the ease and moistness of brownie boxed mixes, so I purchased several of them, as well, not knowing how much brownie batter I would need. It turns out that one box (18.4 ounces) of dry brownie mix will make one and a half dozen 2 1/2 inch cupcakes.
I Sing In The Kitchen used mini Oreos and tiny cupcake papers. I chose to use the regular size ones...being a bit slothful.
SO...if I was to give a recipe:
1 or 2 bags of Oreo cookies (I used regular size)
Peanut butter, creamy or chunky
2 or 3 brownie mixes
Cupcake papers (I used 2.5 inch papers)
Frosting
Prepare brownie mix according to box directions. Put cupcake papers into muffin tins. Take a small spoonful of peanut butter and spread it onto one Oreo then top with another Oreo and place in cupcake paper in muffin tin. With a small portion scoop, scoop up brownie batter and carefully release it onto the Oreo stack then put the tin in the oven.
When cooking the brownie Oreo peanut butter cupcakes, my oven took 17-20 minutes to cook at 350 degrees F.. I pulled the pans out when the edges were just a bit soft knowing that they would continue to cook a little a they cooled.
Cool 1-2 minutes in the pan then remove from tin and finish cooling on a rack until completely cool.
Make your favorite decorating icing and decorate the cupcakes as you choose. Since mine are still not cool as I write this post, I do not have photos of icing yet. I place to put a small curlicue or a simple blossom on top. Not being much of a decorator, this will tax my skill and creativity to the max, as it happens!
We have a "birthday party" for our women's Relief Society at church this week. I am one of the ladies bringing cupcakes. When I saw the recipe I just had to make it.
In preparation I needed to bring home some Oreo cookies and a brownie mix, treats that are rarely seen around here... I have a very good brownie recipe but really like the ease and moistness of brownie boxed mixes, so I purchased several of them, as well, not knowing how much brownie batter I would need. It turns out that one box (18.4 ounces) of dry brownie mix will make one and a half dozen 2 1/2 inch cupcakes.
I Sing In The Kitchen used mini Oreos and tiny cupcake papers. I chose to use the regular size ones...being a bit slothful.
SO...if I was to give a recipe:
 |
| Stack two Oreos together with peanut butter in between, or use sweetened cream cheese! |
Peanut butter, creamy or chunky
2 or 3 brownie mixes
Cupcake papers (I used 2.5 inch papers)
Frosting
Prepare brownie mix according to box directions. Put cupcake papers into muffin tins. Take a small spoonful of peanut butter and spread it onto one Oreo then top with another Oreo and place in cupcake paper in muffin tin. With a small portion scoop, scoop up brownie batter and carefully release it onto the Oreo stack then put the tin in the oven.
When cooking the brownie Oreo peanut butter cupcakes, my oven took 17-20 minutes to cook at 350 degrees F.. I pulled the pans out when the edges were just a bit soft knowing that they would continue to cook a little a they cooled.
 |
| Oreo stacks with brownie batter on top prior to cooking. |
Make your favorite decorating icing and decorate the cupcakes as you choose. Since mine are still not cool as I write this post, I do not have photos of icing yet. I place to put a small curlicue or a simple blossom on top. Not being much of a decorator, this will tax my skill and creativity to the max, as it happens!
 |
| Cooked and cooling brownie Oreo peanut butter cupcakes! |
Monday, March 17, 2014
Sewing Today: Project Bag
One of my favorite things to do is to help someone learn to knit. Knitting gives me hours of pleasure and satisfaction when I am physically unable to do anything else. I feel productive as I turn out mittens and wash cloths and blankets and sweaters and toys for others.
Recently I was approached to teach a lovely young woman to knit. Such a delightful prospect! As I was thinking about her and what she might need, I decided to initiate her into the process of becoming a "bag lady"!
It is my opinion that every project needs a bag to keep tools and supplies together. Well, I have many many bags as I seem to start more projects at one time than I can quickly finish. In my own defense I will say that often I am dogging along as fast as I can on one project when someone needs a wash cloth or some other small thing, so I put down the prior project and begin, and usually quickly finish, the needed item. What can I do but put the partially finished item into a bag to wait patiently for my return?
So, I made a little project bag.
Needed items: 2 fat quarters of cotton fabric, one packet of grosgrain ribbon in a color to coordinate. Sewing machine or needle and thread.
1. I sewed both pieces , right sides together, leaving a section un-stitched so I could pull the fabric right side out again. Ironing the right side out fabric is a good idea, especially where the un-stitched section is.
2. I folded the doubled fabric over on the two short ends and stitched a channel where I was going to insert the grosgrain to make the draw string.
3. Next step was to sew up the sides to the point where the casings were. double-stitching a few times to reinforce that spot but not stitching through the casing.
4. Cutting two pieces or the grosgrain that were twice as long as the length of the casing plus about 6 inches, I then threaded the grosgrain through the first side casing and back through the second side casing. When through I tied the ends together, leaving a little slack between the knot and the edge of the bag.
5. Taking the second piece of grosgrain, thread it through the two casings in the opposite direction, thereby creating a drawstring closure for the bag.
The bag was then ready to give to my little friend. It was just big enough that I could also give her a little zippered tool bag with handles for her tape measure, sewing-up needles, needle gauge, crochet hook, small notebook and pencil for keeping notes, etc. I did not fill it with anything but the blunt needle case that I love so much. She will have her own other tools that she will choose and love.
Our first meeting went well. I think she is a natural knitter. We started with Grandmother's Favorite Cloth. This is the perfect useful starting place for a knitter. The knitter learns to cast on, knit, yarn over, increase, decrease, and cast off. Purling is just the back side of knitting so...a perfect beginner project, especially since when you are done you have a wash cloth or dish cloth for yourself or someone else....
After that, the sky is the limit. No need to makes scarves if you want to make gloves...
Recently I was approached to teach a lovely young woman to knit. Such a delightful prospect! As I was thinking about her and what she might need, I decided to initiate her into the process of becoming a "bag lady"!
It is my opinion that every project needs a bag to keep tools and supplies together. Well, I have many many bags as I seem to start more projects at one time than I can quickly finish. In my own defense I will say that often I am dogging along as fast as I can on one project when someone needs a wash cloth or some other small thing, so I put down the prior project and begin, and usually quickly finish, the needed item. What can I do but put the partially finished item into a bag to wait patiently for my return?
So, I made a little project bag.
Needed items: 2 fat quarters of cotton fabric, one packet of grosgrain ribbon in a color to coordinate. Sewing machine or needle and thread.
1. I sewed both pieces , right sides together, leaving a section un-stitched so I could pull the fabric right side out again. Ironing the right side out fabric is a good idea, especially where the un-stitched section is.
2. I folded the doubled fabric over on the two short ends and stitched a channel where I was going to insert the grosgrain to make the draw string.
3. Next step was to sew up the sides to the point where the casings were. double-stitching a few times to reinforce that spot but not stitching through the casing.
4. Cutting two pieces or the grosgrain that were twice as long as the length of the casing plus about 6 inches, I then threaded the grosgrain through the first side casing and back through the second side casing. When through I tied the ends together, leaving a little slack between the knot and the edge of the bag.
5. Taking the second piece of grosgrain, thread it through the two casings in the opposite direction, thereby creating a drawstring closure for the bag.
.JPG) |
| Simple drawstring project bag for knitting, or anything else that needs bagging,... |
The bag was then ready to give to my little friend. It was just big enough that I could also give her a little zippered tool bag with handles for her tape measure, sewing-up needles, needle gauge, crochet hook, small notebook and pencil for keeping notes, etc. I did not fill it with anything but the blunt needle case that I love so much. She will have her own other tools that she will choose and love.
Our first meeting went well. I think she is a natural knitter. We started with Grandmother's Favorite Cloth. This is the perfect useful starting place for a knitter. The knitter learns to cast on, knit, yarn over, increase, decrease, and cast off. Purling is just the back side of knitting so...a perfect beginner project, especially since when you are done you have a wash cloth or dish cloth for yourself or someone else....
After that, the sky is the limit. No need to makes scarves if you want to make gloves...
Friday, March 14, 2014
Food Today: Homemade Cream Cheese and Seasoned Cheese Log!
Today we are having a very large snow storm. It is predicted to last for 36 hours and leave up to 20 inches of snow covering our already-deep snowbanks. Because I was out last night for our Relief Society birthday party (a wonderful affair, by the way!), I stopped at the grocery store to get two gallons of milk so I could make some cottage cheese during the predicted storm when I would be going nowhere.
Yes, I was planning to make cottage cheese but I had not re-checked the recipe so, I changed to making cream cheese/farmer cheese...
The cottage cheese required a twenty-four hour wait after innoculation of the milk, so I had no problem changing my mind on what to make TODAY!
This is what I did:
Poured one gallon whole milk into a large stainless steel pot. Started heating it gently to 175-180 degrees F. In the meantime, since I failed to bring the bottle of buttermilk out of the refrigerator to "warm up", I set the buttermilk bottle into a sink of very warm water to bring it to room temperature (or a little more) within a few minutes.
Once the milk in the pot on the stove was at temperature I poured in 2 cups room temperature buttermilk and 1/4 cup cider vinegar and stirred well for about one minute.
At this point I let the cheese sit for 10-15 minutes. After 15 minutes I poured the curds and whey into a butter-muslin-lined stainless steel colander which had been set in a large bowl to collect the whey.
After draining for a few minutes I pulled the butter-muslin together to tie at the top so I could hang it to finish draining. In my case, I put a wooden spoon through the tied-top and put it through the handle of our microwave oven with the colander and bowl underneath to continue catching the whey that would drip out.
After 30 minutes of hanging, there were no more drips. Just for my own interest I weighed the cheese. There were 24 ounces of fresh new cheese! For $2.89, plus $1.00 for the buttermilk and a negligible amount money for the cider vinegar! Good deal, if it tastes good...
At this point I divided the cheese into two batches in separate bowls. To one bowl I added 1 teaspoon of KrazyMixedUp Greek Seasoning, 1/2 teaspoon each of granulated garlic, powdered onion, dill weed, and Kosher salt, plus 1/4 teaspoon white pepper. Once I mixed this in well, I made a double layer of plastic wrap and formed the seasoned cheese into a log, rolled it up, and wrapped tightly. Tomorrow I will see how it tastes and if the texture is right for a cheese log to use for slicing for baguettes or crackers.
To the other half of the cheese I added 1/2 teaspoon Kosher salt and 1/2 cup heavy cream. I stirred it well then shaped it into a brick on a piece of plastic wrap inside some heavy-duty foil then sealed it up tightly. After refrigerating, I will see how I like it. It may be that 1/2 teaspoon was too much Kosher salt. I probably should have used cheese salt which is very fine and mixes in better, most likely!
A very nice way to spend an hour on a very snowy day! Now to my knitting. Well, Dear One may want a meal at some point....!
Yes, I was planning to make cottage cheese but I had not re-checked the recipe so, I changed to making cream cheese/farmer cheese...
The cottage cheese required a twenty-four hour wait after innoculation of the milk, so I had no problem changing my mind on what to make TODAY!
This is what I did:
Poured one gallon whole milk into a large stainless steel pot. Started heating it gently to 175-180 degrees F. In the meantime, since I failed to bring the bottle of buttermilk out of the refrigerator to "warm up", I set the buttermilk bottle into a sink of very warm water to bring it to room temperature (or a little more) within a few minutes.
Once the milk in the pot on the stove was at temperature I poured in 2 cups room temperature buttermilk and 1/4 cup cider vinegar and stirred well for about one minute.
At this point I let the cheese sit for 10-15 minutes. After 15 minutes I poured the curds and whey into a butter-muslin-lined stainless steel colander which had been set in a large bowl to collect the whey.
 |
| Cream cheese brick |
 |
| Seasoned cream cheese log |
 |
| Cream cheese brick wrapped in plastic then covered with foil for refrigeration. |
After 30 minutes of hanging, there were no more drips. Just for my own interest I weighed the cheese. There were 24 ounces of fresh new cheese! For $2.89, plus $1.00 for the buttermilk and a negligible amount money for the cider vinegar! Good deal, if it tastes good...
 |
| Leftover whey! LOTS of whey!! |
 |
| Seasoned cream cheese log with matzos. |
To the other half of the cheese I added 1/2 teaspoon Kosher salt and 1/2 cup heavy cream. I stirred it well then shaped it into a brick on a piece of plastic wrap inside some heavy-duty foil then sealed it up tightly. After refrigerating, I will see how I like it. It may be that 1/2 teaspoon was too much Kosher salt. I probably should have used cheese salt which is very fine and mixes in better, most likely!
A very nice way to spend an hour on a very snowy day! Now to my knitting. Well, Dear One may want a meal at some point....!
Wednesday, March 12, 2014
Barbara Walker Learn To Knit Afghan: Square 20
This block had me tearing my hair a little bit, but only because I kept starting and stopping due to many other projects and gifts that needed knitting in the between times!
When I sat down to finish it, after a few false starts, tearing back, counting rows, etc, it really ran up rather quickly. There are two rows where you have to use your slip stitches and the rest are stocking stitch. Once I recognized that, my fingers flew through the pattern.
NOTE TO SELF: Having more than one row counter would be a good idea if you are married to row counters! It is hard to go back to paper and pencil. It is also harder to knit if you have to keep counting rows to find out where you are in the pattern --if you have pulled the row counter for another project.
This pattern is called Scale Quilting and requires a multiple of 6 stitches plus one.
Cast on 43 stitches. Purl one row, then knit the set-up row before starting with row 1.
There are twelve rows in the pattern repeat, and despite the obvious error at the beginning of my knitting, it is a rather simple pattern.
It is rare that I have a suggestion for Barbara Walker, in fact, this is the first time, I think, BUT it would be nice if the pattern directions said "insert needle from front under loose B strand of Row 1 (7), and knit TOGETHER with next stitch". There is no "together" in her directions which, if you do not figure it out, you can end up with 50 or more stitches on your needle. Ask me how I know...!
When I sat down to finish it, after a few false starts, tearing back, counting rows, etc, it really ran up rather quickly. There are two rows where you have to use your slip stitches and the rest are stocking stitch. Once I recognized that, my fingers flew through the pattern.
NOTE TO SELF: Having more than one row counter would be a good idea if you are married to row counters! It is hard to go back to paper and pencil. It is also harder to knit if you have to keep counting rows to find out where you are in the pattern --if you have pulled the row counter for another project.
 |
| Block 20 Scale Quilting being blocked |
This pattern is called Scale Quilting and requires a multiple of 6 stitches plus one.
Cast on 43 stitches. Purl one row, then knit the set-up row before starting with row 1.
There are twelve rows in the pattern repeat, and despite the obvious error at the beginning of my knitting, it is a rather simple pattern.
It is rare that I have a suggestion for Barbara Walker, in fact, this is the first time, I think, BUT it would be nice if the pattern directions said "insert needle from front under loose B strand of Row 1 (7), and knit TOGETHER with next stitch". There is no "together" in her directions which, if you do not figure it out, you can end up with 50 or more stitches on your needle. Ask me how I know...!
Monday, March 10, 2014
Barbara Walker Learn To Knit Afghan Project, Square 30
This block was a joy to knit. It is number 30 and is called the Twisted Lattice square. This stitch could have multiple applications.
The pattern is a multiple of 12 stitches plus 10.
Cast on 46 stitches.
There are 24 rows in the pattern repeats. Repeat rows 1-24 twice then rows 1-6 finishing with 54 rows before bind off.
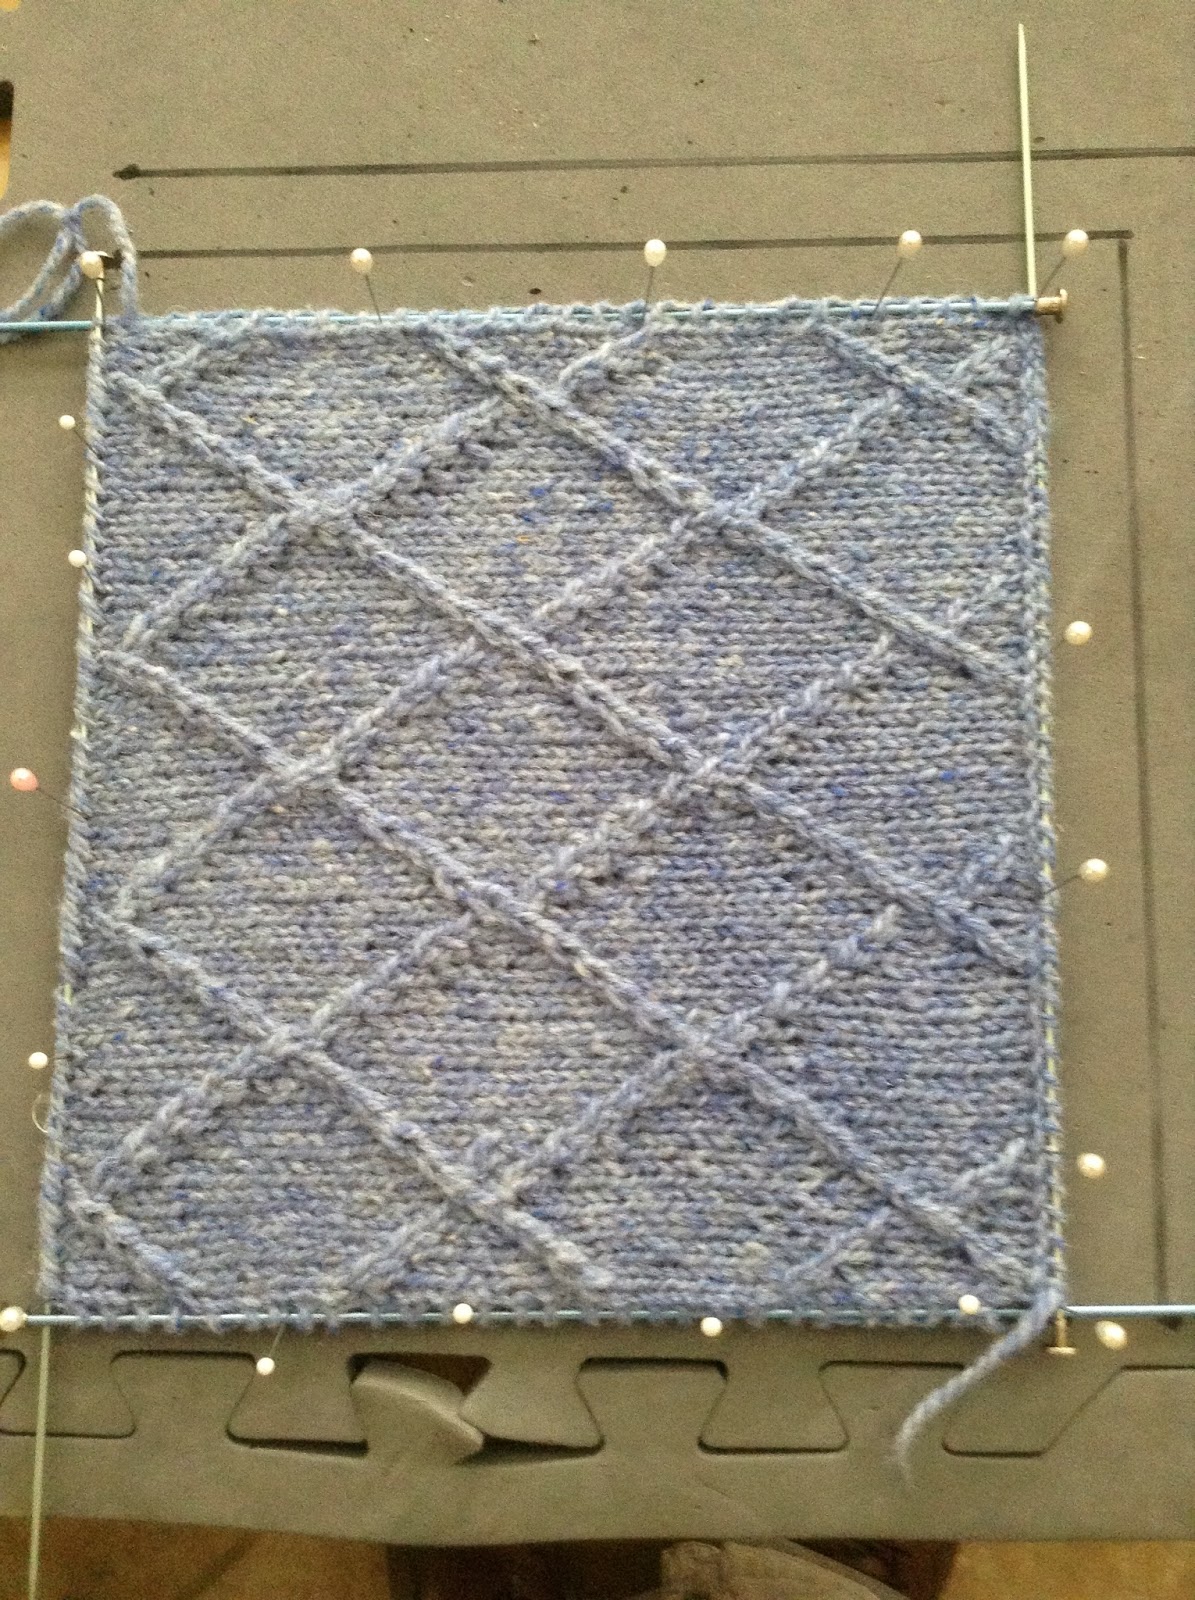
As you can tell, this square is being blocked and is on its side rather than straight up and down. If you turn your head 90 degrees you can see it the way it is supposed to look!
At this stage in my knitting of this project I have decided to go back to where I left off...not being a tremendous fan of slipped-stitch patterns...and will then continue on as Barbara Walker wrote her book. I am sure I will learn many things if I just take them as they come.
Until this point I have used just four colors, two darks and two lights, as Mrs. Walker suggests. Another one of my "semi-sleep" nights was productive in that I have a good-sized bucket of Bartlettyarns already and have plenty of lights and darks, so from now on I will just use up what I have. With good fortune I will use up the whole bucket and can then justify going to Hilda Yates' Yarn Sale again this fall!
The pattern is a multiple of 12 stitches plus 10.
Cast on 46 stitches.
There are 24 rows in the pattern repeats. Repeat rows 1-24 twice then rows 1-6 finishing with 54 rows before bind off.
As you can tell, this square is being blocked and is on its side rather than straight up and down. If you turn your head 90 degrees you can see it the way it is supposed to look!
At this stage in my knitting of this project I have decided to go back to where I left off...not being a tremendous fan of slipped-stitch patterns...and will then continue on as Barbara Walker wrote her book. I am sure I will learn many things if I just take them as they come.
Until this point I have used just four colors, two darks and two lights, as Mrs. Walker suggests. Another one of my "semi-sleep" nights was productive in that I have a good-sized bucket of Bartlettyarns already and have plenty of lights and darks, so from now on I will just use up what I have. With good fortune I will use up the whole bucket and can then justify going to Hilda Yates' Yarn Sale again this fall!
Friday, March 7, 2014
Knitting Today: Updated Blocking Board
One afghan square on the homemade blocking board is such a pretty thing. The job gets done. Having said that, with a pile of 25 or so squares to block, and looking at the size of the blocking board, it seemed like I could put three more squares on the board. The blocking should be accomplished much more rapidly.
In some ways, this does not have to happen quickly because I have perhaps 30 more squares to knit, but...once I started the blocking, I have been so pleased with the results that I wanted more gratification! Why have I not blocked anything all these years? Oh, wait...I did not have a blocking board. AND I did not think it was that important. Now I do.
This morning I found my husband's T-Square and drew three more squares on the blocking board, thus I can now block four squares at once. Nice!
 Since taking this picture, I have gone back to the bedroom and smoothed out the blue and natural block as best I could and straightened out the line on the light blue and dark blue square by adding another row of pins where the straightening needed to be. I am hopeful that both blocks will be more nearly perfect by they time they completely dry.
In some ways, this does not have to happen quickly because I have perhaps 30 more squares to knit, but...once I started the blocking, I have been so pleased with the results that I wanted more gratification! Why have I not blocked anything all these years? Oh, wait...I did not have a blocking board. AND I did not think it was that important. Now I do.
This morning I found my husband's T-Square and drew three more squares on the blocking board, thus I can now block four squares at once. Nice!
Wednesday, March 5, 2014
Knitting Today: The Blocking Board Project
Many knitting patterns end with the words: "weave in ends and block". I always weave in the ends and but usually leave it at that. The Barbara Walker Learn To Knit Afghan project has changed all that.
Recently some friends decided they wanted to knit the same afghan and learn all the stitches. This seemed like such a good idea that I decided to go back to the beginning of the book and read the introductory parts again so I could be a real mentor to these friends. I found two things of particular interest:
1. Barbara Walker seems to encourage knitting a gauge swatch! What?!!! For an afghan square?
In looking at my box of afghan blocks I discovered that knitting a gauge swatch would have been a very good idea. At least one of the blocks will have to be re-knit because it is about 14 by 14 inches instead of the 10 by 10 inches that the garter stitch block is...the garter stitch block (Block #1) being the one by which all other blocks should be measured.
You will notice particularly that the stocking stitch square is rolled up like a scroll!
SO...
2. Blocking really does matter! When I measured the blocks that I had completed they were all over the place in terms of sizes.
So blocking here we come... I have blocking wires. Somewhere stored carefully away. The other night I was in a semi-sleep state (sadly, a rather frequent situation) when it occurred to me that 14-inch straight knitting needles would make great blocking wires for 10 by 10 inch afghan squares!
Having realized this, I went to one of my knitting needle stashes and found a pair of US size 0 needles and a pair of US size 1 needles in the 14-inch length. This made me very happy. Immediately threading the size 0's through one side I realized that even though these are metal needles, I should probably get another pair of size 1 needles as the size 0 needles will become curvey needles instead of straight needles if much stress is put on them for very long! I will have to be very careful which sides of the squares I use to insert those very slim needles...
So, since I needed a blocking board, and did not have the money to purchase one, I looked around the house for something that could be used. Several people suggested pinning the blocks to an extra bed. Knowing myself, and my proclivity for failing to pick up EVERY LAST PIN, I decided that would not work for my family and friends who come to visit and stay overnight.
Some years ago we purchased a very nice elliptical trainer and the pads to go underneath to protect our nice floors. There were several left over so one of them because the blocking board. I marked out 10 by 10, 11 by 11, and 12 by 12 inch squares thinking that one of those sizes would work. It turned out that 10 by 10 was what we needed.
 An essential part of blocking is to dampen the knitted wool for some little time before attaching it to a blocking board. Here I had the block already "wired up" sitting between two damp washcloths. After blocking this square I thought I might want to actually soak the squares in a sink of warm water for a while. That works pretty well, too, but takes longer to dry out.
 This photo shows the block wired and installed on the blocking board. It has not yet had its ends woven in...that will be coming soon!
Recently some friends decided they wanted to knit the same afghan and learn all the stitches. This seemed like such a good idea that I decided to go back to the beginning of the book and read the introductory parts again so I could be a real mentor to these friends. I found two things of particular interest:
1. Barbara Walker seems to encourage knitting a gauge swatch! What?!!! For an afghan square?
In looking at my box of afghan blocks I discovered that knitting a gauge swatch would have been a very good idea. At least one of the blocks will have to be re-knit because it is about 14 by 14 inches instead of the 10 by 10 inches that the garter stitch block is...the garter stitch block (Block #1) being the one by which all other blocks should be measured.
 |
| Box of completed Barbara Walker Learn to Knit Afghan squares |
SO...
2. Blocking really does matter! When I measured the blocks that I had completed they were all over the place in terms of sizes.
So blocking here we come... I have blocking wires. Somewhere stored carefully away. The other night I was in a semi-sleep state (sadly, a rather frequent situation) when it occurred to me that 14-inch straight knitting needles would make great blocking wires for 10 by 10 inch afghan squares!
Having realized this, I went to one of my knitting needle stashes and found a pair of US size 0 needles and a pair of US size 1 needles in the 14-inch length. This made me very happy. Immediately threading the size 0's through one side I realized that even though these are metal needles, I should probably get another pair of size 1 needles as the size 0 needles will become curvey needles instead of straight needles if much stress is put on them for very long! I will have to be very careful which sides of the squares I use to insert those very slim needles...
 |
| Homemade Blocking Board! |
Some years ago we purchased a very nice elliptical trainer and the pads to go underneath to protect our nice floors. There were several left over so one of them because the blocking board. I marked out 10 by 10, 11 by 11, and 12 by 12 inch squares thinking that one of those sizes would work. It turned out that 10 by 10 was what we needed.
Subscribe to:
Posts (Atom)