Recently I became a Michaels arts and crafts store teacher. Last night was my first time to teach at a brand new store. The project was to make a greeting card with a bunch of roses. The roses were created from a circle of colored card stock which were cut in a spiral design then rolled up. This was new to me.
Here is a video on how to do it.
The one thing I did when rolling the paper to make the roses was to begin rolling the paper from the outside (which you need to do) but wrapping it around a cotton swab to help it roll tightly. I would have used a knitting needle except I did not have one handy, if you can believe that!!
On the card I used small adhesive circles to keep the brown paper cone together, then used larger adhesive circles to attach the roses to the cone.
This was a fun project, and pretty quickly done. If you live near a Michaels store, check out their classes. I am going to attend a painting class myself next week!
This card could use some more decoration. At least it seems pretty stark to me. When I make another one I think I will use an embossing folder to add texture to the card. Well, probably will cut a card, run it through an embossing folder, then attach the rose bundle to the embossed card and finally attach THAT to the card base. Also, I think I will make five roses next time...
In case you cannot read the little tag that has been tied to the bunch of roses, it says "Love you bunches". I did not think that up myself...
Thursday, February 9, 2017
Papercrafting: Love You Bunches Card
Labels:
card making,
greeting card,
Michaels store,
papercrafting
Wednesday, February 8, 2017
Frugality: Using What You Have--Salsa Guac
We had four small tomatoes sitting on the table and one beautiful-looking avocado. We had lime juice and red onions. We did not have any jalapeƱos or fresh cilantro. We did have dried cilantro, granulated garlic, white pepper, and sriracha sauce. Because the tomatoes were beginning to speak to me about using them up pretty soon, I decided to make some salsa guac. When I opened the avocado, it was in perfect ripeness. That does not happen often here in the northern climes.
This is what I did:
Chopped the tomatoes finely. Put them in a large bowl.
Diced the two small red onions. Put them in the same bowl.
Harvested the avocado meat, diced it, and put that into the bowl.
Added:
3 Tablespoons lime juice
1 Tablespoon dried cilantro leaves
1 teaspoon coarse salt
1 teaspoon granulated garlic
1 1/2 teaspoons dried ground cumin
1/2 teaspoon white pepper
1 teaspoon sriracha sauce
Stirred it all together. Tasted it and liked it. I added a little more sriracha.
This salsa guac will do in a pinch. It is not remotely as good as all-fresh-ingredients salsa guac, but it worked when I wanted to use up the tomatoes before they went beyond happily using them.
For eating, I mixed equal parts leftover refried beans and salsa guac and added twice as much steamed broccoli, also leftover, stirred it all together and called it breakfast. It looks nasty (thus: no picture!) , but tastes really fine.
This is what I did:
Chopped the tomatoes finely. Put them in a large bowl.
Diced the two small red onions. Put them in the same bowl.
Harvested the avocado meat, diced it, and put that into the bowl.
Added:
3 Tablespoons lime juice
1 Tablespoon dried cilantro leaves
1 teaspoon coarse salt
1 teaspoon granulated garlic
1 1/2 teaspoons dried ground cumin
1/2 teaspoon white pepper
1 teaspoon sriracha sauce
Stirred it all together. Tasted it and liked it. I added a little more sriracha.
This salsa guac will do in a pinch. It is not remotely as good as all-fresh-ingredients salsa guac, but it worked when I wanted to use up the tomatoes before they went beyond happily using them.
For eating, I mixed equal parts leftover refried beans and salsa guac and added twice as much steamed broccoli, also leftover, stirred it all together and called it breakfast. It looks nasty (thus: no picture!) , but tastes really fine.
Tuesday, February 7, 2017
Knitting: Little Gnome Hat
A dear friend sent me the link to a darling-looking hat earlier this week. It is called the Little Gnome Knitted Peaked Hat. Since I was at a rather low spot I spent five hours the next day and knitted up the hat. The next morning I was awake at 3 AM (the cinnamon bun day) so I spent another hour doing the finishing-up work. The hat is cute but I do not see lots more of them in my future.
Here is the hat with the beginning knitting done and cast off the needles.
This is the hat with the back seam sewn up and all the knitting (neck band added after back seaming) done.
This is the completed Little Gnome Knitted Peaked Hat project. Cute, but I will only be making this for precious babies after this time. Well, all babies are precious, but because it took me so long, what I mean is that I will most likely not use this pattern for my use-up-the-stash-as-quickly-as-possible projects.
Here is the hat with the beginning knitting done and cast off the needles.
This is the hat with the back seam sewn up and all the knitting (neck band added after back seaming) done.
This is the completed Little Gnome Knitted Peaked Hat project. Cute, but I will only be making this for precious babies after this time. Well, all babies are precious, but because it took me so long, what I mean is that I will most likely not use this pattern for my use-up-the-stash-as-quickly-as-possible projects.
Labels:
charity knitting,
hat,
Knitting
Monday, February 6, 2017
Munchie Monday: Meatless Loaf
A few days ago Jill McKeever had a recipe video on YouTube that I just HAD to try. I always liked meatloaf when my mother made it and when my mother-in-law made it. I made it a few times, too, and liked it. Since trying to eat a more plant-based diet, I thought I would try this one.
This one tasted fine to me. Jill says it is even better the next day because it becomes more solid as opposed to rather soft when you eat it hot out of the oven and is thus great on sandwiches. I am looking forward to a meatloaf sandwich for breakfast...!
Even the gravy tasted wonderful on the real mashed potatoes.
Sadly, this meal did NOT sell well at our house. I probably will not make it again unless Dear One is away for a few days...something I do not anticipate happening any time soon. Well, even then, I probably won't make it unless a freezer trial comes out well.
The next day was no more successful than the first time. It still tasted good but the texture was too soft for me. Sad. I wanted it to work. Maybe it is time to make a nut loaf...
This one tasted fine to me. Jill says it is even better the next day because it becomes more solid as opposed to rather soft when you eat it hot out of the oven and is thus great on sandwiches. I am looking forward to a meatloaf sandwich for breakfast...!
Even the gravy tasted wonderful on the real mashed potatoes.
Sadly, this meal did NOT sell well at our house. I probably will not make it again unless Dear One is away for a few days...something I do not anticipate happening any time soon. Well, even then, I probably won't make it unless a freezer trial comes out well.
The next day was no more successful than the first time. It still tasted good but the texture was too soft for me. Sad. I wanted it to work. Maybe it is time to make a nut loaf...
Friday, February 3, 2017
Food Friday: The General's Surprise
Always looking for ways to improve our healthy food options, I read a recipe for General Tso's Cauliflower Healthified which somehow showed up in my emailbox. Since I had recently had a chat with Dear One about our menu choices I decided to give it a try. Well, what is not to like about General Tso's sauce?! And cauliflower? You cannot go wrong with cauliflower.
So I made the recipe. The sauce was delicious. The oven baked breaded cauliflower was nice and crisp. The rice was brown.
This is what it looked like on the plate:
When Dear One asked me what it was I told him it was General Tso's Surprise. He ate several pieces before he asked what it was. When I told him it was cauliflower his enjoyment in the meal immediately faded. Funny guy. I said, "You know you love it." He said, "I did until I heard I was eating cauliflower!" Really funny guy.
Well, there was more for me, I guess.
Next time, and there will be a next time, I will not bread the cauliflower. I will just roast it and then douse it in the delicious sauce. It won't be crispy or look sort of like fried chicken, but it will be healthified by me, and much healthier than breading.
So I made the recipe. The sauce was delicious. The oven baked breaded cauliflower was nice and crisp. The rice was brown.
This is what it looked like on the plate:
When Dear One asked me what it was I told him it was General Tso's Surprise. He ate several pieces before he asked what it was. When I told him it was cauliflower his enjoyment in the meal immediately faded. Funny guy. I said, "You know you love it." He said, "I did until I heard I was eating cauliflower!" Really funny guy.
Well, there was more for me, I guess.
Next time, and there will be a next time, I will not bread the cauliflower. I will just roast it and then douse it in the delicious sauce. It won't be crispy or look sort of like fried chicken, but it will be healthified by me, and much healthier than breading.
Labels:
cauliflower,
General Tso's,
Rice
Thursday, February 2, 2017
Food Tip: Don't Overload the Oven!
Today this is just a quick food tip: DON'T OVERLOAD THE OVEN! It leads to poorly cooked, or burned, food.
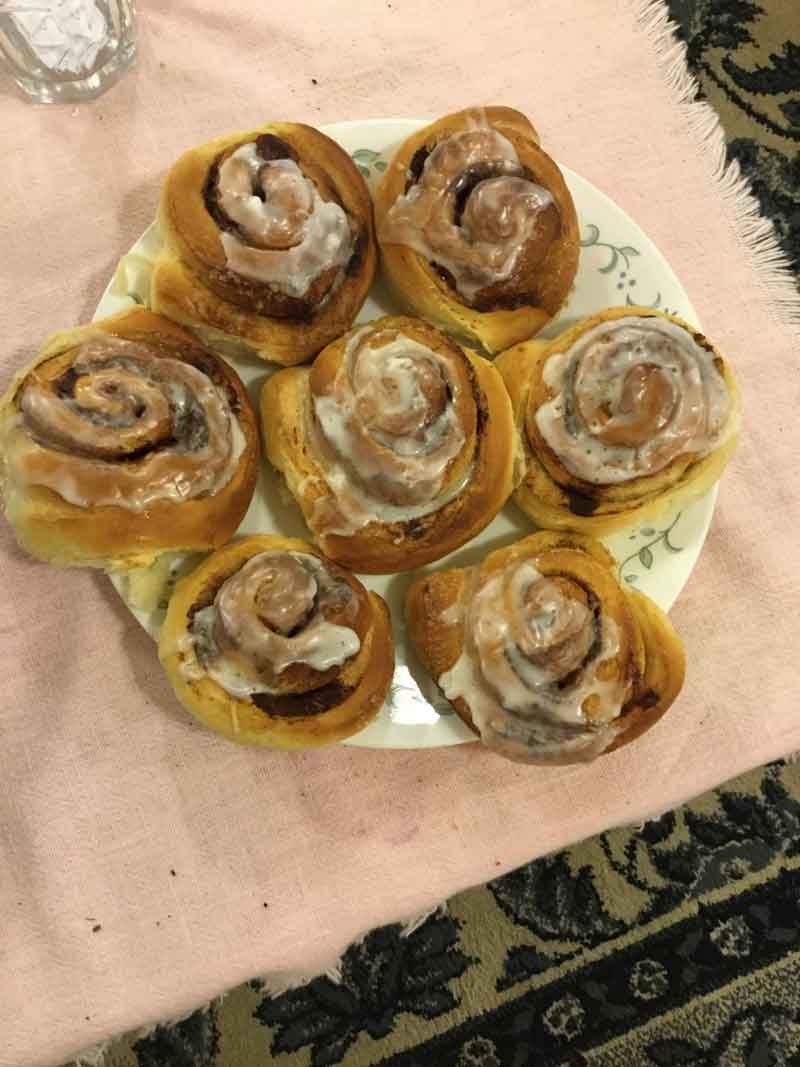
Take for example the cinnamon buns I made recently for our early morning guests.
Since I awoke at 3 AM and did not seem able to drop immediately back to sleep I got up and went through the whole process of making cinnamon buns. By 5:30 there were two pans ready to go into the oven. One was a half sheet pan with fifteen buns on it. The other was a quarter sheet pan with seven buns on it.
Because I was finally beginning to want to go back to bed, I decided I would cook them both at the same time. I put the half sheet pan on the top rack and the quarter sheet pan on the lower rack. Bad idea.
The tops were just fine and the buns in the half sheet pan were barely okay. The quarter sheet pan bun bottoms were just past okay, moving towards burned. Sugar does go from fine to burned in not time flat, so you have to watch anything with sugar in it. Lesson learned? Maybe. Hopefully.
A second bad idea was to set the oven timer for the amount of time the recipe called for the buns to cook. I should have set the timer for five minutes LESS and then checked them. Well, buns are supposed to be nice and brown. I can say that these were brown all right...
Take for example the cinnamon buns I made recently for our early morning guests.
Since I awoke at 3 AM and did not seem able to drop immediately back to sleep I got up and went through the whole process of making cinnamon buns. By 5:30 there were two pans ready to go into the oven. One was a half sheet pan with fifteen buns on it. The other was a quarter sheet pan with seven buns on it.
Because I was finally beginning to want to go back to bed, I decided I would cook them both at the same time. I put the half sheet pan on the top rack and the quarter sheet pan on the lower rack. Bad idea.
The tops were just fine and the buns in the half sheet pan were barely okay. The quarter sheet pan bun bottoms were just past okay, moving towards burned. Sugar does go from fine to burned in not time flat, so you have to watch anything with sugar in it. Lesson learned? Maybe. Hopefully.
A second bad idea was to set the oven timer for the amount of time the recipe called for the buns to cook. I should have set the timer for five minutes LESS and then checked them. Well, buns are supposed to be nice and brown. I can say that these were brown all right...
Labels:
cinnamon buns,
food tip
Wednesday, February 1, 2017
Papercrafting: Antiqued Card
Making birthday cards is so enjoyable. This time I tried to make the antiqued look. I like the card, mostly.
To make this card, using heavy card stock, cut the card to nearly the finished size.
Choose an embossing folder you like and run the card through your embossing/die cut machine. I used a Big Shot...one of my favorite tools.
Choose an ink pad color you like and more or less smush the ink pad onto the embossing folder.
With a baby wipe, wipe across the parts of the embossed card you want to be ink-free.
This is how mine turned out:
I would like to have gotten the blue on all of the background, but that did not happen this time....
To make this card, using heavy card stock, cut the card to nearly the finished size.
Choose an embossing folder you like and run the card through your embossing/die cut machine. I used a Big Shot...one of my favorite tools.
Choose an ink pad color you like and more or less smush the ink pad onto the embossing folder.
With a baby wipe, wipe across the parts of the embossed card you want to be ink-free.
This is how mine turned out:
I would like to have gotten the blue on all of the background, but that did not happen this time....
Labels:
Big Shot,
birthday card,
card making,
embossing folder
Subscribe to:
Posts (Atom)