About The Country Wife Blog

Thursday, December 29, 2022

Ice in South Carolina!

 This past winter weather has been a disaster for so many people.  We pray for all those struggling in the ice and snow and power outages and burst pipes.

When we woke up Sunday morning the rain that had turned out Rubbermaid Roughneck tub on the back deck into a swimming pool for the birds had turned into a giant ice cube.  Dear One suggested I take a picture of it since it is not something that is common here.  This is the first time in three and a half years that the temperature has been this cold.


It is not much compared to Vermont ice, but it is rather impressive for here...!

Wednesday, December 28, 2022

Knitting Project: Spring Ice Trigger Mitts

 Dear One rides his bike every day.  Almost every day.  His hands get cold even with his merino gloves on.  I saw the patterns for Trigger Mitts in the Saltwater Knitting series from Newfoundland.  I ordered two of the books and Dear One chose a pattern he liked.  Of course, the pattern he liked was not the one needed to make mitts his size. So I got to figure out how to change the foundation pattern to work with the design pattern.  It took some thinking but in the end, it worked!

If you go to my Ravelry page you will see my notes.

The book I took the pattern from was Saltwater Mittens by Christine LeGrow and Shirley Scott.  The size we needed was for Grenfell but the design Dear One wanted was Spring Ice...a smaller pattern!  Well, I did the math and figured it out. It really was not a problem.  I just added 3 Salt and Pepper stitches to the beginning of the front  chart and 2 Salt and Pepper stitches to the end of the Spring Ice chart,.

There were multiple problems but I won't talk about them here.  They are done and I expect Dear One will use them tomorrow when he goes for his bike ride. 


Now  I am on to the next project!


Tuesday, December 27, 2022

Our Christmas Fireplace

 This fireplace gives me lots of joy to look at every time I walk into the living room. 

 Previous Christmases the mittens hung down in one long loop.  I thought they might look better if we put a third hook for them in the middle. I got the hook but did not get to attaching it. I came home from one day out on visits and there it was!  Dear One is such a wonderful husband.


 It makes me happy to see the fireplace lit and warming the living room. It makes me happy to see the mitten garland hanging over the fireplace.  The garland reminds me of our children and that labor of love it was to make a garland for each of them for their fireplaces or stairways six or seven years ago. 

Most of all it makes me happy to see the picture of the Savior over the fireplace and remember the awesome gift He is and was to all of us.

We hope you all have had a wonderful joyous Christmas season.

Monday, December 26, 2022

Spiced Cider Jelly and Steam Canning in the Instant Pot!

 More than a month ago I attended a class on jelly-making.  The facilitator was using apple scraps, i.e. apple peelings and cores, to make "apple tea".  She had done the same thing with peach skins and pits as well.  This was such an exciting project that I immediately began planning for next summer when I could get some peaches and make peach tea.  Of course, since I am not planning to can the peaches I will have to get a gallon ziplock pack and put the refuse in the bags then put the bag into the freezer until I have a bag-full.  This is how I make vegetable broth: put all vegetables scraps in the freezer then add water and a bay leaf to the Instant Pot then cook the heck out of the scraps.  Most people who make vegetable scrap broth only let the broth cook for 5 minutes or so. No me.  I put it on for 58 minutes and if I fail to be in the kitchen when the timer is done, I put it on again, just in case...It works fine though maybe a little darker that other broth.

Back to the Spiced Cider Jelly--


At Thanksgiving we made many apple pies and there was a TON of leavings.  My sister kindly froze them then brought the big bag to us before we left North Carolina.  I did cook up the "tea" but had put in a lot of water.  It made more than two gallons.  I made one batch of jelly which was pretty good.  I steam canned it in the Instant Pot.  Worked like a charm.

Fast forward to today:  On my list of To Do jobs for today (along with about a dozen other useful things but almost certainly impossible to accomplish in one day) was to make Spiced Cider Jelly.  I had thought of making jelly as a gift but then realized that there were so many people I wanted to give gifts to that I needed to have started months ago.  Maybe next year.

Anyway, this is what I did:

1.  Purchased 1/2 gallon apple cider from the Food Lion. Then stored it in the refrigerator for almost a week...

2.  Cleaned off the island in our kitchen so there was room to operate.

3. Got out all the ingredients so the work would go smoothly. It is a BAD idea NOT to do this.  Sometimes you are in the middle of a project and it turns out you are missing a crucial ingredient.  Not good.  We had everything.

4. Ingredients needed: 4 cups apple cider, 1 Tablespoon Pumpkin Pie Spice (apple pie spice is very similar but I made a big batch of pumpkin pie spice last year and, surprisingly enough, have made not even one pumpkin pie since then. Now was the time to use it), a box Sure-Jell regular, not low sugar, 4 cups sugar, large pot, 4-5 half pint jars, lids, and rings, ladle, Instant Pot, food rack, wooden spoon, stainless steel teaspoon.

Process:

5. A. Put your glass jelly jars (without lids and rings. Put those on the counter near the rack where they will be used) into the oven on a cookie sheet at 250 degrees F. to heat up.  Leave them until the jelly is ready.

5. B.  Put 4 cups cider in large pot--I think ours in  4 quart size or maybe 6 quart size.  Over medium heat  bring the cider to a simmer.  Simmer a couple of minutes. At the same time put your teaspoon in the freezer to chill.  Yes.  Do it.

6. With the long-handled wooden spoon, stir in the whole package of Sure-Jell and stir until smooth and the Sure-Jell is dissolved.  Let simmer 2-3 minutes.

7. Add 1 Tablespoon Pumpkin Pie spice (or make your own spice going heavy on cinnamon, some ginger, some nutmeg, some cloves) and stir well.  **Next time I will mix the Sure-Jell and the powdered spice together before adding!

8. After the simmering of the cider and Sure-Jell, stir in the 4 cups sugar ONE CUP AT A TIME.  Bring the jelly to a  simmer again and simmer for 3-5 minutes stirring constantly.

9.  As the jelly begins to feel slightly thicker and darker, get out the freezing teaspoon and dip it into the jelly.  Lift it up and look to see if the jelly is coating the spoon a little bit.  If yes, shut off the heat and get ready to ladle the jelly into hot jars. If not, keep heating, but both batches I did were ready after about 5 minutes of simmering after adding the sugar.

10. Remove the jelly jars from the oven and put them on a cooling rack still on the cookie sheet.

11. Using a canning funnel and a ladle, carefully put the very hot jelly into the jars, leaving 1/2 inch space in the jar.  After filling each jar, using a damp cloth or paper towel carefully wipe around rim of each jar then put on the lid and ring.  Screw the lid on but only just.  Do not tighten it as tight as you can.  The smart people call it "tightening to finger tight".  I took their word for it the first time and since it worked, I did it this time, too.

12.  Put the hot filled jars into the Instant Pot which has the trivet in the bottom and 2 cups of HOT water in the Instant Pot also in the bottom.

13. Put on the lid and set to STEAM for 20 minutes.  I think you only need to steam 10 minutes but...well, I did it for 20 minutes just to be safe.

14. When the pressure goes down let the cooker reduce pressure naturally. It will probably take 20-25 minutes.  DO NOT REDUCE HEAT MANUALLY!  If you do, the change in pressure will make the jars eject all the jelly into the water and all will be lost.  DO NOT DO IT.

15.  If you have a jar lifter, use that to remove the jars from the pot and set them on the cooling rack for 12-24 hours to cool completely. That is really pretty much a crock, but do it anyway.  It will NOT take that long.

16. As the jelly and jars cool, you will hear a ping for every jar as the seals complete.  Do not help them seal. Just leave them alone.  (For 12-24 hours...!)

17. If a jar does not seal just put it in the refrigerator and eat it up.  You can also remove the ring and lid, clean off the rim of the jar and go through the whole process again but I would not do that.  There is nothing wrong with eating a little fresh jelly sooner rather than later.  This particular jelly tastes so good it is even good on Ritz crackers.

There was a little more jelly than would go in the five little jars I had so I put it into another jar and let it cool on the counter all by its little lonesome.  I told Dear One it was there.  He was not sure about it but tasted a tiny bit on a spoon THEN he made himself a piece of toast and spread it thickly with new jelly.  You can imagine my joy at this!


Thursday, December 15, 2022

Knitting Project: Mini Nordic Sweaters

 Well the sweaters have been sent so I will now show (a bad picture!) them here on the blog.  These are a pattern by Arne and Carlos and were their Advent Calendar knitting for last year. I purchased the pattern in November 2021 and realized immediately these could not be gifts for Christmas 2021! Duh!

As I began the knitting I changed yarn and needle size.  The first yarn called for US size 0 and US size 2 knitting needles. I made Number 1 with those needles and directly gave up on that as it was just too taxing for my hands.  After another yarn purchase I used US size 2 and US size 4 needles and got along just fine.

While knitting these darling little sweater/gift bags I realized that there twenty-four members of our family starting with Dear One as Number One and me as Number Two SO...I made a chart as to when each person became part of our family and knit that number sweater for them. It was so sweet to be thinking about the person who was going to receive a particular sweater as I was knitting.

The actual yarn called for in the pattern is Rowan's Norwegian Wool yarn which was designed by Arne and Carlos.  It is available currently for $11.75 per ball.  If I remember correctly 18 balls are required for this knitting project.  That was a tad (well, a LOT) too rich for my budget so I chose some Knit Picks Wool of the Andes Sport weight instead.  The two yarns have the same yardage for the same put up in the balls--137 yards in 50 grams...so they were comparable.

The colors in Knit Picks were as close as I could get to the Arne and Carlos Norwegian Wool colors.  Most of them made pretty nice little sweater bags.

The original thought was to get some very nice soft-centered chocolates and put three of them in the sweaters (you started knitting with a closed cast-on--Turkish cast-on was what I did-so the bottom was solid) but I realized that the shipping stress would have smashed the chocolates to bits and destroyed the sweaters so I put a note into the packages suggesting the families could purchase their own chocolates and insert them.

The last thing before putting the sweaters in the packaging was to insert a Christmas tree hook into the back of the neck of each sweater.

This project took me six months and gave me such joy.  I hope the recipients feel that joy and the love with which they were knitted.

This is all the sweaters laid out on the guest bed (on top of a canvas drop cloth I got to cover the table at Church when I do little Gelli printing classes with some sweet children who come to our knitting group each week). The Upper left sweater which is red on white is Number One.  It is way smaller than the rest.  I did NOT re-knit it with the larger needles though some day I might when a few other started projects are finished.

This is one of the sweaters close up.  The original pattern has colorwork on the sleeves as well but by the time I did the first seven of them I knew it would be 2024 or 2025 before they were completed so I chose to knit the sleeves plain.

Merry Christmas!

Wednesday, December 7, 2022

Follow the (Cooking) Rules!

 It is always good to learn new things.  

Sometimes you learn to your chagrin.

For example: I was trying out Rhodes Frozen Dinner Rolls yesterday.  I had had a long day and was exhausted but wanted to try cooking them long in advance of when I wanted them and then see if they were still good that long time later (two days or so).  I remember a dear sister cooking Rhodes Rolls for a Senior Missionary get-together when Dear One and I were on our mission.  Those rolls were wonderful.  At LEAST as good as the Sixty Minute Rolls I have made for years.

Well, this is what happens when you are tired.

The package directions say that you need to put the frozen rolls on a greased pan (I used Silpat instead) and let rise for 3-5 HOURS.  Then bake for 15-20 minutes at 350 degrees F. 

Okay. It was 4:00 PM when I got home with the rolls in the shopping bag.  I decided in my head that 7:00 would be a reasonable time to bake them.  By the time it was 7:00 PM there was very little left of me energy-wise, SO, you guessed it, I put the rolls in the oven.  And cooked them.

They came out lightly beige, not brown but I thought the bottoms had had enough heat so I removed them from the oven.  I hacked into a couple of them, slathered them with butter, and took them upstairs to Dear One who was already into our Come, Follow Me podcasts.  He thought they were fine.  Well, how bad can hot bread out of the oven covered with butter be?!!

I happened to look at the packaging before I threw it away.  The directions actually said something like: Let rise 3-5 hours, OR UNTIL THE ROLLS HAVE DOUBLED IN BULK! They were not doubled.  Barely larger than when I put them on tha pan.

Oh, well. Maybe I will try again sometime and will take a picture of them at that time and show a comparison photo.

There is a verse in one of my favorite books of scriptures that say: "Oh be wise."  I need to be wise more often.

I would love to see photos of other people's frozen Rhodes rolls cooked properly.

Merry Christmas to all if I do not get to my computer again before the holiday!


Monday, November 21, 2022

Munchy Monday: Chex Mix!

 Many years ago whenever we went to my inlaws for Thanksgiving or Christmas my mother-in-law made Chex Mix.  Our family loved it. A week ago Dear One asked me if I was going to make Chex Mix this year.  Well, I had not thought of doing that.  I decided to begin thinking about it.  I looked for a recipe for Chex Mix.  The cereal boxes had recipes.

The recipe rang a bell so I made it.  The cereal box chex mix recipe did not give instructions, only the ingredients.  SO...I made the mix then cooked the recipe at 300 degrees F.  This was obviously too high a temperature.

When I was bemoaning the less than optimal  results of my first effort, our daughter said she had her grandmother's recipe. She sent it to me and I made Mother C's recipe.

Above is the Chex Mix made at the proper oven temperature.

This was Mother C's Recipe:

Chex Mix

9 cup Chex: Rice and corn mixed
1.5 cup peanuts
1.5 cup pretzel sticks broken in half
6 Tbl butter melted
2 Tbl Worcestershire sauce
1-1/2 tsp season salt
1 tsp garlic powder 
1/2 tsp onion powder 

200 for 1 hour. Stir every 20 minutes

Put all the chexs, peanuts, and pretzels/Cheezits in a large roasting pan. Melt the butter and add the seasonings.  Whisk well then pour the mixture over the chex mix.   As far as the butter, I did not want 2 Tablespoons leftover so I used the whole 8 Tablespoons of butter.  Dear One does not like pretzels so I used Cheezits Crackers in place of pretzels.  

The oven at 300 degrees was too hot for the mix so I followed her 200 degree F oven heat.

In the picture on the left below is the Mother C's Chex Mix recipe.  On the right is the Chex Mix from the cereal boxes but cooked at 100 degrees too hot.  Also that mix has Wheat Chex which burned and gave the mix a rather unpleasant taste.  Still...it was not so bad but what some people in our house were able to choke down a good bit of it...!


If you want to make it, you will find it a nice crunchy treat and possibly better for you than the store bought chex mix.

Tuesday, November 15, 2022

Musings: The King's Food is a Bad Idea

 Recently we were studying the Book of Daniel in the Old Testament of the Holy Bible/Hebrew Bible.  I have always loved Daniel and the stories of faith and courage we read.  This time when I read the story of Daniel and his friends refusing to eat the rich food the king was providing for them it taught me a lesson I wish I had learned many years ago.

You know the story:  the chief of the eunuchs was taking care of these captured Hebrew boys who had been brought into the king's court.  When they saw the food that was to be provided for them, they begged off and asked that they be allowed to eat pulse and water and possibly other simple food.  At the end of the ten-day test period those boys were beautiful and healthy and the other young men who had eaten the rich foods and beverages were in rough shape, or at least not strong and full of health as Daniel and friends were.

This story caught my attention this time.  If you know me, you know I have struggled with weight issues ever since the unspeakably difficult things I went through as a young girl.  At that time I put on a lot of weight as a protection. (Actually it did not turn out to be a protection, but I did not know it at the time. I also did not realize that is what I was doing by pigging out on a regular basis...trying to put on a shield of protection.)

To come up closer to today, in July I saw my wonderful healthcare provider who suggested it was really time to go for it on the weight loss front.  She suggested a couple of things including getting little containers that helped with portion control.  She wanted me to come back in a month having taken off 3 pounds. I did order the containers and sort of used them for a while.  When I went back in August I was down 4 pounds.  She was so happy. I was marginally happy because I thought I would have lost a good deal more.  Well, that would only have happened if I had actually used a portion-control way of eating.

Since that time I went through a period of eating out with friends, eating meat of some nature two or three times a week and adding commercial salad dressing to our salads and other fats to our regular diet.  This made the salads even more appetizing.  Moving to the present day/after studying Daniel, I find that I have successfully gained 20 pounds in 3 months.  THE KING'S FOOD HAS NOT BEEN GOOD TO ME!  It has been very delicious and I have enjoyed every single lunch or dinner out with our friends.

Now this has to stop. If I want to be beautiful and healthy like Daniel, Shadrach, Meshach, and Abed-Nego, I need to get a grip, stop it with the luscious king's food, and go back to eating pulse and water.  I take pulse to mean eating whole plants.  Which is funny that I have not been doing this right along.  That is how I lost fifty pounds when we first came to South Carolina.  I won't tell you how much I have gained back...

Now I am starting over.  Right at holiday season...!  Can you believe it?!  If you are a praying person, please pray for me to grab on to self-control, use portion control, and the simple foods that Daniel ate.  I would appreciate the help.

 
This is an example of simple yummy food with a portion controlled system.  This is a burrito bowl.  The bowl is about half full of freshly washed spinach, a half cup of fat-free homemade refried beans, a half cup of cooked plain brown rice, lots of chopped scallions and a few carrot as decoration, though I did eat them.  The refried beans and rice were put on the spinach hot out of the pot.  I mixed this all up and ate it down. It was so good. I was not hungry again for hours.  I hope I am smart enough to make this again often.  Sadly, Dear One ate his but was not excited by it.  Oh well.  I may have to find something else for him, or just wear him down by serving it three times a week! Or some variation of this. If you have suggestions that do not include meat, fish, dairy, or fats, I would love to hear. And mushrooms. He does not care for mushrooms.  If he recognizes them in the food...

Monday, November 14, 2022

Munchy Monday: Instant Pot Corn Pudding

 
Last week Child Number Four came for a very short but oh so wonderful visit.  We had a great time together and got lots of projects done even though he worked at his job during the day.  I wanted to make all kinds of good food for him, but he really only wanted to eat the leftovers in our refrigerator. I get that!  I LOVE to open my sister's refrigerator and eat her leftovers.  She always has such interesting scraps in there; things we never eat here.

The one thing I did make fresh for us was Instant Pot Corn Pudding.  Dear One really got into it.  He might possibly have eaten half the bowl...!  That made me so happy.  Child Number Four seemed to like it, too.  I am thinking of adding that to our regular food rotation.

Here is what I did:

Instant Pot Corn Casserole/Pudding

1 egg
1 box Jiffy Cornmeal Muffin Mix
1/2 cup butter, melted
1 can creamed corn
1 can whole kernel corn, drained
1 teaspoon dried minced onions
1 large jalapeno pepper, seeded and chopped fine
1 cup sour cream
2 cups water for the Instant Pot liner
1/4  cup shredded Cheddar cheese

Beat the egg in a medium-sized glass bowl then mix in the cornmeal muffin mix, the melted butter, both cans of corn, the onions and the jalapeno pepper dice.  Stir in the sour cream and mix well.

Put the trivet in an 8-quart Instant Pot liner bowl and pour in the 2 cups of water. It works most easily if you are using the trivet which has handles on it so you can easily lift out the bowl when done.  There are other ways to do it, though.

Put the bowl of corn pudding mix which you have covered with parchment paper then aluminum foil on top of the trivet.  Attach the cover and make sure the Instant Pot is in the Sealing mode.  Pressure cook for 45 minutes.  When it is done, let the pressure reduce naturally then when the pin drops, carefully lift the bowl out.  It would be good to have mitts or pot holders on your hands.  Be careful not to let the glass bowl slide off the trivet, drop to the floor, smash, and ruin your wonderful pudding. No, I did not do that but I was nervous as a cat that I would.  Next time I am likely to use the liner for the 3 Quart Instant Pot instead of the glass bowl for the cooking unit.  I thought the bowl would be more attractive on the table.

When I took the Instant Pot
cover off I spread the shredded cheese on top the put the cover back on for a few minutes while I set the table.  It melted down beautifully and, Mister, that was one delicious meal.  Yes, it was almost the whole meal that night.  I can tell you that I wanted more.  And more!  But somehow managed to hold off...


Wednesday, November 2, 2022

Cute New Trees At The Temple

 We had two Palmetto Palm trees at the Columbia South Carolina Temple.  One was about six feet tall and the other was way taller.  In the last couple of weeks those two trees were removed and traded in for two Palmetto Palms that are the same size.  This picture was not taken at an angle that shows they are the same size but they are the same height.  They are very cute I think!


When I was outside the temple on my way to the parking lot I happened to run into a member of the temple presidency who told me about these trees.  He also told me that Palmetto Palms are wonderful trees.  When cannonballs hit structures in the Civil War that were made of Palmetto Palms, the cannonballs bounced off instead of splintering like most other wooden structures did. I find that interesting.

Monday, October 31, 2022

Munchie Monday: Quick and Easy Banana Bread with only Three Ingredients or Four!

 Almost always the recipes I find on Facebook turn out to be disasters. You would think I would learn.  This one worked.

Quick and Easy Banana Bread

3-4 very ripe bananas

1 box Spice Cake Mix (about 18 ounce size)

2 eggs

Chocolate chips optional

Preheat oven to 350 degrees.  Grease a 9 by 5 bread tin with butter. Or other solid shortening.

In a large bowl mash the bananas with a fork.  Add the dry cake mix and the two eggs.  Stir well until all the dry mix is incorporated.  Add the chocolate chips if you like.  (Dear One does not believe in chocolate chips in banana bread...!) Scrape into the bread tin.

Bake for 40-60 minutes.  Start checking for doneness at 35 minutes.


This tasted pretty good, but it was best the first day.  It is NOT agreeable to reasonable blood sugar...

Thursday, October 27, 2022

Well I DID Do It This Year!

 Many people know that every October I do a 5K walk in support of the Rett Foundation.  Early this October I went out for a long walk to "practice" for the walk later in the month. I walked 1.83 miles around the perimeter of our complex.  When I finished that walk I was feeling great and it crossed my mind that I should immediately go around again which would make the 5K.  For some reason I did not do it that day and the next day plantar fasciitis came back to haunt me.  Since then I have been struggling.

The end of the month is coming and there are lots of things going on so today was the day.  First thing this morning I went out and got in 0.76 miles before going to the doctor appointment.  Following that I did a few errands then came home pretty fagged out.  I was slouched into the reclining loveseat where I often sit downstairs when Dear One asked if I was going to finish my walk.  I had told him this morning that today was the most reasonable day to complete this event.  

Well, I pulled myself together and went back out.  I put on my headset, got out my big stroller, and started down the sidewalk toward the dam across the alligator pond. Because it is always a struggle to walk, I put on my "I'm Hungry apron" which reminds me of all the good things to eat and which has a very nice set of pockets so I could put a hanky in one pocket and my phone in the other.  I have learned that the app that maps my mileage does not give me credit if the phone is in the stroller and not on my person. Since I was not doing this just for the joy of being outside but had a real need to cover a certain amount of ground, I needed the phone in my pocket.  The only thing I failed to do was get my had out of the closet. Oh well. Next time.

My plan was to do an extra loop about halfway through the walk to pick up some more mileage.  I did that but it was obviously not enough so when I got back to our street, instead of turning right toward our house I turned left and went back to the next connecting street and went a ways away from home.  Finally I turned around and headed home again, pretty sure I would get the mileage it.

When I did arrive home I was just about shot but so happy to have completed yet another 5K.


Here I am in this year's tee shirt, headphones on, red face from the sun and a very good view of the current double chin. Every year I think that double chin, etc.  will not be there next year, but it always is. Well, maybe next year!  This was the 9th Annual Race Away Rett 5K.  Maybe the tenth one will be the charm.  I did recommit myself to whole food eating today.  I am thinking of posting the podcast that buoyed me up in that direction.

Wednesday, October 26, 2022

Halloween Decorations. Finally!

 Well, it has been a long dry spell on The Country Wife Blog!  I am so sorry to have been such a slug.  Many times I took pictures to share but did not make the time to report in.  Today I just have to do it!

About a month ago Dear One asked me if I was going to decorate for Halloween.  I asked him if I had ever in our nearly fifty years of marriage together decorated for any holiday.  He did not say anything.  (I guess I don't consider putting up a Christmas tree -which he does-and hanging the mitten advent garland on the fireplace as decorating.)

Finally tonight I finished the project I started.  This is what I did:

1. Purchased a wreath form from Dollar Tree

2. Purchased two black plastic tablecloths from Dollar Tree

3. Purchased a package of three round knitting looms in small to medium sizes.

4. Purchased some orange yarn.

5. Purchased some brown yarn.

6. Purchased some purple yarn (which I did not end up using since I already had two other shades of purple yarn I liked better...!)

7. Got out the pom pom makers that are hanging in the workroom closet.

8. Got out the glue gun.

9. Tried making a pumpkin on the smallest round loom.  Seemed like a failure at the time.

10. Made two pumpkins on the Brother KX 350 flatbed knitting machine. Also seemed like a failure.

 11.  Made purple pom poms in various shades and sizes.

12.  Put the pom poms together to make a cat. Sort of.  I am NOT a wizard with a glue gun.  Not not not!


13. Cut one black plastic table cloth into 3 inch by about 8 inch pieces (just simply cut across the folded table cloth in 3 inch strips then eventually had to cut the few places that were folded on the edge.)

14. Began tying the black strips onto the two center rounds on the wreath frame. 

15. When the wreath seemed full enough I glued the cat onto the wreath.

16. Used up the last of the plastic strips (quite a few of them were left over) to make the wreath more full looking.

17. Tied, then glued, the failed knitting loom pumpkin at the cat's feet.

18. Tied the failed knitting machine pumpkins to the frame.

19. Decided I had had enough fun with the decorating so then I

20. Hung the wreath on the front door and tied the Dollar Tree witch with the purple headband (thus the purple cat...!) to the door to hang down in the middle.

Some time ago, well, about a month ago, I went to Sam's Club with the commission to get some Halloween candy "before it is all gone...".  I got a bag of 230 pieces.  A little later I found a black bucket in the closet which was right after I went to Dollar Tree (yes, there is a Dollar Tree a mile from our house and right on US 15 so no turning across traffic to get to it!!) and found a black plastic pumpkin/ jackolantern bag which was pretty large. I thought that might work for holding the Halloween candy.  It turned out the the black jackolantern bag  was too small as is so I slit up the sides and it worked.  Sort of. I had to tape the top of the bag to the bucket.  I filled it with the bag of candy.  Before I knew it, all the chocolate candy was gone...!

Two weeks ago we were at Sam's Club again and Dear One picked up 2 bags containing 450 pieces  each of chocolate candies all of which kinds we both like.  After walking around the store a while then sitting in the cafe where Dear One had some pizza and I had a hot dog with several packages of sauerkraut, Dear One looked over at the end cap where the candy was and saw the price.  He asked if it really was that price. I said yes.  He said we only wanted one after all.  Well, my view was that 900 MORE pieces of candy just might be a bad idea.  Of course we did have 150 kids come by last year but still...Anyway, I took one of the bags back to the shelf and deleted it from the Scan and Go app (if you don't use that, you really must.  It is so good not to have to wait in line ever).  Funny thing: within 30 seconds of me putting it back on the shelf a little boy came by and scooped it up!  I guess he likes chocolate, too.


This is the black jack o lantern bucket full of candy (but not much chocolate!).  I had to put my basket of wool roving for spinning yarn on top of the bucket to put it out of sight so perhaps there would still be a few pieces left on the 31st!  The 450-piece bag is behind, unopened, and virtually invisible. I have every hope that we can treat all the children who come by!

So that is the story of Halloween Decorating 2022 at our house.

Wednesday, September 14, 2022

Knitting Today: Completed Mother Hen Kit by Susan B. Anderson

 We have a wonderful granddaughter who loved chickens when she was a child.  A couple of months ago I saw a pattern kit for Mini Mother Hen pattern by Susan B. Anderson at BarrettWoolCo.  It was so cute that I thought of our granddaughter.  I texted to see if she still liked chickens.  She gave me a resounding YES!  So what could I do but order the kit.  It took weeks before I could start but now this bird is completed.

The kit I wanted was sold out.  Several times!  Finally I had communication with Susan.  She told me they could send me a kit that was not quite the regular one. It would have different colors.  I said to go for it!  (As I am writing, it is sold out again!!)


Here is Hennie, the Left-Footed Soccer Chicken, in living color!  Every time I look at her, she makes me smile.  If you want to hear all about her, go to my Ravelry page.  There on Ravelry you will find out how she got her name!

Fun project which makes me want to knit animals.  At least a few animals!


Tuesday, September 13, 2022

Garden 2022: Asian Sweet Potato Problem

 A good while ago I noted that there were still five Asian sweet potatoes in the sweet potato bin. For some reason I had not eaten them and they were a bit soft.  Since I did not want to eat them, and I do love Asian sweet potatoes, I decided to pull up the weeds in the potato bed and plant them.  Just in case!  I had not idea that they would grow but was hopeful.

Well!  They DID grow!  I was so pleased.  Four of the five potatoes came up and began looking really good. 

THEN... I went out to look at them and what did I see? (Not popcorn popping on the apricot tree--which is a song the children in our church love to sing in the spring...)


The photographer who produces shots for this blog is very very not good, but even so, I think you can see what made me very UNhappy!  Well, since they are in the garden I am going to just leave them instead of yanking them up by the necks which was my first inclination.

Who could have eaten them down like this?  Not the alligators for sure.

So, we will see if any good news turns up...

Monday, September 12, 2022

Munchie Monday: Quick and Easy Smoothie

 Tonight I was edgy to slice some onions and zucchini and make a treat for myself.  I asked Dear One if he wanted some.  As you might expect, his answer was, "How about a smoothie?"  Since I have made a few lately I decided to go ahead and do it.

This is the one I made:


The color does not come through very well but it was a nice purple color.

In the blender I put:

1 cup soy milk
1 ripe banana
1 cup frozen mango (I am trying to empty the freezer...)
1/2 cup frozen blueberries

After blending one minute, I used the canning jar filler to pour the smoothie into the container.  Because it was a smoothie it did not pour well which I could immediately see and decided to use that jar filler rather than cover the counter with lovely purple smoothie.  That worked perfectly.

It tasted good to me and to Dear One who used his new stainless steel straw to suck it up. I went back downstairs to finish cooking the onions and zucchini.  I ate it all. I also ate it all without salt.  Patting myself on the shoulder about that!

Friday, September 2, 2022

Food Friday: Vitamix Broccoli Cheese Soup

 Recently I have been watching a lot of YouTube videos on Vitamix recipes.  The main reason for this is that lately I have not been using this expensive fabulous piece of kitchen equipment and thought that needed to change.  ALSO we have been eating more processed and store bought food recently and found weight creeping up.  For both of us. SO a change was needed.

Today I made the first Vitamix whole food meal in a while.

Vitamix Broccoli Cheese Soup

As usual I made a few changes in the recipe.  This is what I did:

2 1/4 cup soy milk with one somewhat heaping teaspoon of Better Than Bouillon Roasted Vegetable seasoning
4 1/2 cups frozen chopped broccoli (in this case a 16 ounce package)
1/8 teaspoon of freshly ground black pepper
1 1/2 cup chunked up extra sharp cheddar cheese

These items were placed in the Vitamix container in the order given.  ALWAYS put the wet/softest ingredients into the container first and graduate up to the hardest or frozen ingredients last.

The recipe called for starting the blender going on the lowest speed and gradually but quickly moving the dial up to the fasted speed.  WELL!! I did this BUT immediately the machine flipped the breaker switch which shut off the electricity to the kitchen so I had to go out into the garage to flip it back on.  Of course, with the truck and the car both in the garage I could not get to the panel so I had to go back into the house to get my keys so I could move the car out of the way.  

That done, I turned the switch left then all the way right  fully engaging it and went back into the house.  I followed the same procedure (starting at the lowest speed and moving rapidly up to the fastest speed) and had the SAME RESULT!  So I went back out to the garage and flipped the switch left then right again and went back into the kitchen.

This time I set the blender at the HIGHEST SPEED FIRST then turned on the machine.  Success this time.  The recipe calls for letting the soup blend for 5 minutes and 45 seconds.  I let it go until 6 minutes had passed.  When I took off the lid, there was that beautiful steaming hot cooked soup ready to eat.

The recipe says this will feed 3 servings so I used our larger soup (Corelle ware) bowls and poured out two servings.  Dear One and I both ate this rather delicious soup.  

Dear One's comment was, "This is not like ordinary broccoli cheese soup."  He was right.  The normal soup has chunks of broccoli and other vegetables, almost always which have not been chopped finely enough for him to not know he is eating broccoli.  This soup was silky and creamy and  maybe somewhat frothy.

It tasted great but was very filling. I managed to eat my whole bowl but he did not. Of course, he had been snacking before lunch which always makes him not as hungry as he needs to be before I set a meal on the table.  This is a habit I cannot break him of.  I have started asking what he has eaten and then deciding whether I am going to make a meal or not.  If all necessary calories for the day have been consumed, there is no point going to the effort of making a meal that will just be extra calories.  In my view...

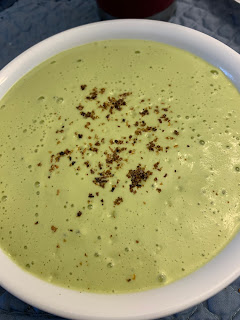
Here is a bowl of the soup:

This bowl of soup was sprinkled with Tajin seasoning, because I like it, and because I thought the picture might be more interesting to look at...

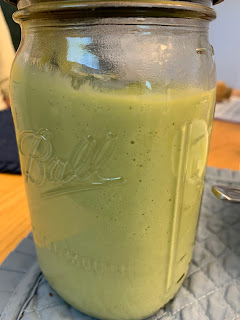
Here is a jar with the leftovers! This is a quart jar.  You know what we will be eating tomorrow!

This was good enough soup.  We will have it again but I will reduce the amount of cheese.  And maybe put in some onions.  Possibly some garlic, too.

Tuesday, August 23, 2022

Early-ish Morning Big Job!

 It has been almost a month since I wrote. I am sorry. I have such good intentions but...

Anyway, good intentions come in many varieties.  I am a terrible gardener...something that happened once we came south.  I was not a great gardener in Vermont, just a lazy one, but we still managed to get a good harvest most years.  Here it is a very different story.

This spring I noticed a little volunteer plant near one of the holly plants/bushes/trees (I don't know holly from Adam.  Well, maybe from Adam, but not from other plants here and how they should be designated) and thought I should pull it up.  I Did Not Do That!  Big mistake.

That plant has been dragging on my mind ever since.  Finally this morning it was only 75 degrees out with a nice fog cover so out I went.  This involved pulling my seated stroller out of the truck bed (where I store it to Dear One's chagrin), getting the four-tined fork,  pink soft garden gloves, and strolling across the lawn in front of the house to find the now not plant but TREE!


Above picture is the junk tree which is leaning toward the house. It is leaning because last week one day when it was cool I thought I would pull it up.  I tried to bend of the top to snap it. It Did Not Snap!  So here is was this morning leaning against the house.


Here is the garden fork trying to get under all the roots.


Finally I pulled it out.  This morning I really needed one of our big sons there who would have made very very quick work of this project that took me the better part of half an hour and caused me to sweat buckets.  Truly, my dress is soaking wet. Oh well. At least no blood was involved with this project.


There is the now-dying tree in all its non-glory. Well, you cannot see all of it but you get the idea.


This is the very handy useful garden fork lying peacefully on the seated stroller after accomplishing his morning task. I am sure he is breathing a sigh of relief. I know I am.


Now on to the next task, though not this morning since as it is I will probably be late to presidency meeting.  I hope everyone learns from my peccadillo: when you see a weed, pluck it up THEN!  Saves a lot of time, energy, and sweat, AND everything looks nice.  Pretty soon the HOA will be on our back if this other weeding job is not done...!

Thursday, July 28, 2022

Knitting Today: The Use-Up-Sock-Yarn-From-Two-Previous-Pairs-Toe-Up-With-First-Fish-Lips-Kiss-Heels-Toe-At-A-Time Socks!

 Just now I finished these socks.  I intended to use up all the leftover yarn from the prior two pairs of test knit socks BUT...I was also knitting them for The Woolly Thistle Sock Spring 2022 which ended today so I only knit a regular length cuff and not a longer cuff.  There is still some of the cuff yarn left.

About The Woolly Thistle: when I learned they were in West Lebanon, New Hampshire I was thrilled. I thought I could be able to invite our angel daughter-in-law and granddaughter to visit the shop and help me with yarn selection choices since I like to feel and smell yarn before purchasing. Especially when it is costly yarn. WELL...it turns out The Woolly Thistle is an online shop only.  A big disappointment for me. Still, I do listen to their shopcasts from time to time PLUS...I "met" Emma Barnaby there and LOVE her channel!  Love it love it LOVE IT!

Fish Lips Kiss Heel in process.

Fish Lips Kiss Heels finished.  I love the way they look with not holes and I love the way they fit.  There is more about this project on The Country Wife page on Ravelry.com.

Another new thing to me besides the heel was the cuff and bind off.

This was the cuff:


For the bind off I used a stretchy bind off that I found but did not find a creator of the pattern.  This is the bind off which works really well for toe up socks.

Knit 2 then return the 2 stitches to the left needle and K2 together through the back loop.  K1 then put the two stitches back onto the left needle and knit 2 together through the back loop.  Continue on with knitting one additional stitch, putting both stitches on left needle and knitting two together through the back loop.  Nice looking and nice and stretchy.  Fits my large legs very well.

To see the cuff, go to my Ravelry page mentioned above.  It is lights out time and fingers are used up for the night...!

Wednesday, July 20, 2022

Emma Woodhouse Socks Test Knit Completed

 Probably six weeks ago I happened to see a podcast called The Woolly Thistle on YouTube.  They had a guest named Emma Barnaby talking about her Jane Austen sock design project.  Emma said if anyone wanted to test knit for her, she would welcome knitters.  As you might imagine, I signed up!

Emma is easy to knit for as far as test knitting.  


This is the lace work pattern on the front of the socks. I particularly liked this because it was pretty easy to memorize.  Emma gives you a chart to follow.

The yarn I used was Patons Kroy Sock yarn which is a wool yarn which I found at Hobby Lobby on a deep sale ($2.24 per ball rather than the usually $7.99.  I am sure they were getting rid of the colors. I purchased three balls each of three different colors!  My aim is to use the yarn on the flatbed knitting machine at some point...)

Vis-a-vis The Woolly Thistle--I was delighted to find that they are in West Lebanon, New Hampshire, a town I used to frequent often when we lived in Vermont. I asked them where they had their shop thinking perhaps I could ask our daughter-in-law to go check out some yarn for me.  You can imagine my disappointment when I found they are only an online store!  I really only like to buy yarn that I have touched and smelled before purchase.

If you would like more particulars about the Emma Woodhouse Socks, I have put up a page on Ravelry.com that you can check out.  

One thing you might be interested to know--they only took 8 days to knit. even with changing needle sizes several times AND they fit me pretty well.  These were knit cuff down with a heel flap and gusset.

Next project will be toe up socks with Fish Lips Kiss Heels.  They are on the needles now...!

Tuesday, July 19, 2022

Knitting Today: Arne and Carlos Advent Mini Nordic Sweaters

 Last year Arne Nerjordet and Carlos Zachrison who are Norwegian (well, Carlos is formerly Swedish) knitting designers put up a wonderful project:  Mini Nordic Sweaters for an Advent calendar.  I knew I could not do that for an Advent calendar but wanted to knit them nevertheless.

What they actually turn out to be are little sweater bags!  The bottom of the sweater is cast on with a Turkish cast on so the ribbing is closed, thereby making a darling little bag to fill with treats.

When I was thinking about making these little guys it occurred to me that there are 24 people in our "immediate" family. SO...I knit one of these for each of them.  Every person will receive one of these mini sweaters with the number of their place in the family. Dear One is number one, I am number two and so forth down to our great grandson who is number 24.  This makes me smile.

It took me six months to get them completed.


Here is a look at the little sweaters in a storage drawer unit in the workroom.  Now comes the part of identifying the recipient and putting them in their Christmas packaging.  As I have said, this makes me so happy with these.  

No, they are definitely not perfect and things have changed since the beginning.  Arne and Carlos had a design on the sleeves as well as front and back of each body.  I thought they looked clutter-y so after the first seven I knit the sleeves plain as you can see in the picture. 

Arne and Carlos designed some yarn called Norwegian Yarn, I think by Rowan but it was prohibitively expensive. At least for us.  I found some similar weight yarn on Knit Picks and matched the colors as closely as I could.  Most of them came out pretty nicely colored but some are less pleasing.  Also, there are multiple errors but I am comfortable with the ones in the finished product.  The mistakes I could not abide I tore out and re-knitted.

So, on to the next project.  Since completing these sweaters I have finished a couple pairs of socks. I STILL have not gotten the workroom together but today did manage to clear off a portion of the desk. Again....


Monday, July 11, 2022

Well, Hello! It has been a while!

 Life has gotten in the way of this blog but perhaps I can do better now.

Today I want to talk about something I learned over the weekend: cooking rice in the Instant Pot.  If you are immediately turning off your ears, please re-think.  I heard Mike from ProHomeCooks.com on YouTube say you could cook rice in 4 minutes.  Four!!  I gave it a try this morning and IT WORKS!!

You do not have to do what I did but the principle works.  

What I did:  we had a two-quart jar of kale, onion, celery, and broccoli salad in the refrigerator that I was thinking might go by if I did not do something about it immediately SO...I made a two layer dish in the Instant Pot.

Put 2 cups water in bottom of Instant Pot liner.  Stir in a little beef base...maybe two teaspoons worth.  When it was well stirred in added two cups long grain white rice and stir well.  Dump all the kale salad on top and start the Instant Pot cooking for 4 minutes on HIGH.

When the timer went off, let naturally release pressure for 10 minutes, then released remaining pressure instantly.  Removed the kale salad which was cooked and happily sitting on top of nicely cooked rice.  Stirred in a little soy sauce to our taste into the rice and enjoyed it.  Including Dear One, though he did NOT want to add a little of the delicious tofu from last night's supper.  He did say, however, that he likes crispy tofu.  Last night's tofu was supposed to be crispy but I let it marinate before pan frying. I should have known better. Now I do.  Pan fry FIRST then add the sauce.

It is so nice that we really do NOT need to cook for 22 minutes as other recipes say.  Thanks, Mike!

Friday, May 27, 2022

Food Friday: Quick and Easy Buttermilk Biscuits

 Dear One loves strawberry shortcake.  If it is not strawberry season, which we are about at the end of here, he loves biscuits with butter or jam. Or even just plain, if you can believe it!

Usually I make biscuits from scratch.  Lately however, I think that I have started to become old because I found some biscuit mix at Piggly Wiggly and thought I would give it a try. I adapted the recipe by changing the milk called for to buttermilk since I wanted to use up what we had.

Quick and Easy Buttermilk Biscuits

2 1/4 cups biscuit mix
2/3 cup buttermilk

Put the biscuit mix in a large bowl then pour on the buttermilk.  Using a spatula, mix until the flour is all stirred in.

Place on a lightly floured surface and fold the dough over on itself about 4-5 times.  You can then cut out the biscuits and bake them in a pre-heated 450 degree F. oven for 8-10 or even 12 minutes but no more or the bottoms will not be happy.

In this picture I dispensed with the folding part and just used a portion scoop (which is about 1/4 cup) to scoop out the dough.

This is what came out of the oven:


If you do the folding before cutting, the biscuits will have nice layers. In the interest of saving a few seconds, I did the lazy man trick and the biscuits were just fine.  This recipe the way I made it gave us seven biscuits.

Tuesday, May 24, 2022

Knitting Today: Number Nine Mini Nordic Sweater Started

As usual, the photograph is pitiful but here is the beginning of Mini Nordic Sweater number 9.


You can clearly see one end of a circular knitting needle with a curve-y beige cable.  That curve-y cable is annoying. I believe the cure is a very hot water bath, but I have not gotten to it.  When I do, I will report how it worked.

In the meantime,  this little sweater is actually a tiny gift bag (though I do not know what sort of gift will be placed therein...probably a hard candy since chocolate may not travel well...).  It starts with a closed cast-on.  The cast on I used was Judy's Magic Cast On.  It took some little while (maybe six minis!) to get it but now I can comfortably cast on every time without having to remove the stitches and start again.

There are multiple people on YouTube who teach Judy's Magic Cast On but I like Judy herself doing it the best.  AND every time I watch this, or even think about this cast on, I think of Cat Bordhi who is the one who introduced it to me many years ago.  Cat Bordhi's death was a real loss to the knitting world and to all who knew her.  I never got to take an in-person class from her, which is a big regret that I have.  I am sure she has a wonderful knitting circle in Heaven.  I will join her there when the time comes! If you can take your knitting needles with you...

One note about these little sweaters:  I have decided to keep the arms plain/without Fair Isle work which is not the way they were designed but-- 1.  I want to get these done sometime this millennium and 2. I really like the look of them so much better.  I hate to use the word, BUT. with only the body in Fair Isle,  the stitches pop so much better without the sleeves all clobbered up with multi-colored stitches.  In my opinion.


Monday, May 23, 2022

Munchie Monday: Biscuit Mix Chocolate Chip Cookies

 Today I was out on errands at the church and other places.  As I was driving home I thought of the biscuit mix sitting on the counter.  Biscuit mix that I saw was slightly past its prime date so I wanted to use it up faster than normal.  I wondered if I could use it to make chocolate chip cookies, a perennial favorite at our house.

What do you do when you have questions?  Go to the internet!  There I found many recipes, almost all using the name brand biscuit mix.  This is what I did (even though it was store brand mix) which was pretty close to the recipe.

Biscuit Mix Chocolate Chip Cookies

Preheat oven to 350 degrees F.

In a large bowl place one stick very soft butter which already had been shortened by 1 Tablespoon for popcorn last night.  Add 1 cup brown sugar and stir very well.  If you want to go to the extra work and dishes, etc, you can get out your stand mixer and really slosh the butter and brown sugar around, but it worked fine in the bowl.  Add 2 caps full of Mexican vanilla and stir until smooth again.

Add 2 1/3 cups biscuit mix and four handfuls of chocolate chips...probably a little over a cup of chips.  Stir well.  Theoretically the chocolate chips will be enrobed in flour and not drop to the bottom of the dough while cooking.

Using a large cookie scoop, make 12 piles of cookie dough on a half sheet pan. I happened to have a Wilton non-stick cookie pan that we purchased on our last vacation for some unknown-to-me-now reason.  With the twelve piles sitting happily there I gently pushed down on the tops so they were about 1/2 inch thick/all the same thickness.

Put in the oven and set timer for 9 minutes.  The recipes I saw said to cook 8-10 minutes but they did not make big cookies. I checked at the timer and they were definitely not ready. Another 3 minutes and not cooked.  One last 2 1/2 minutes and they were ready.  Slightly browned around the edges. 

When cooled mostly, remove from cookie sheet and let cool completely if you can.


After consuming a nice warm cookie, I deemed them okay to take to a friend who might need brightening up then gave a cookie to Dear One.  Who, of course, asked what it was! Instead of giving him a snarky response, I actually told him it was a chocolate chip cookie. I also asked him if I would make him anything else.  He said, "Yes!  A broccoli cookie."  Of all the nerve!  As if...!  Well, if I knew how to make one, I might!  I am up for getting as much broccoli into both of us as possible. I have heard that nitric oxide in the broccoli opens up blood vessels and keeps them supple and healthy. An aging person would really appreciate that, I think.  At least I would.  

In the absence of a broccoli cookie recipe, I will just eat broccoli I steam in the microwave for 4 minutes in the Tupperware or Pampered Chef microwave container that I found a couple of years ago on Amazon.  It turns out it is Pampered Chef.   It is WAY more expensive than when I bought ours!  However, I love it.  I even use it to microwave plain popcorn...fill the bottom of the dish with kernels then microwave for 2.5 minutes or until the popping stops.  You can then use the container as your bowl. One-dish meal!  If you can eat popcorn as a meal.  Which we do sometimes...several times this week.  Lazy slug week...


Wednesday, May 18, 2022

Knitting Today

 For such a small project, it took me long enough to focus on these "chair leg sleeves" and get them done.


Here they are in all their (non-) glory.  This makes two chairs with sleeves on their legs.  Next time I will show a picture of them installed.

Why would you want these simple-to-knit things?  They keep the floor from getting scratched.  Theoretically.

Cast on 16 stitches with worsted weight yarn.

K2, P2 until the length you want.

Knit 2 together around then K1, P1 around.

Finally: run yarn through all stitches, pull up tight and secure.

Done!  Put them on your chair legs.  But not until you have made four of them.

Monday, May 16, 2022

Munchie Monday: Carrots Dogs! Yes!


 A while ago, maybe two or three years ago, I found a carrot dog recipe which was really so good.  Sadly, I did not make a note of which one it was when I added it to my electronic cookbook with the numerous other carrot dog recipes, most of which were trash....

This past week I found a pretty good recipe on Krocks in the Kitchen who got it from Chuck Underwood at Brand New Vegan.  I tried it almost the way he/they wrote it.

The recipe as I made it:

1/4 cup Braggs Liquid Aminos (or you can use soy sauce but I wanted to empty the Braggs jar)
1/4 cup apple cider vinegar
1/4 cup vegetable broth
2 Tablespoons maple syrup
1 Tablespoon liquid smoke
1 teaspoon yellow mustard
1 teaspoon garlic granules
1 teaspoon onion granules
Quite a few carrots, peeled and cut into bun length. Well, a few carrots actually.

For me, the Instant Pot was the right equipment but you can boil the carrots until barely fork tender. before proceeding with the marinating.  I put all the marinade ingredients in the 6-quart Instant Pot and stirred very well.  After adding the carrots and sort of swishing them around in the juice, I set the pot pressurizing for 3 minutes on HIGH.  A Quick Release is then called for.

Gently slosh the carrots around in the marinade then return the cover and let them sit for as many hours as you can stand to, four or five would be great, or even overnight.  If you are going to marinate them overnight, do cover them in a flat dish, and put them in the refrigerator.

No.  You will not think you are eating a hot dog, unless you are a tiny child who has never had a hotdog...but lying to a child is a VERY BAD THING.  Just tell them this is what we are having for supper. 

As you can see, I used a slice of bread with relish and mustard.  Next time I will add sauerkraut.

Wednesday, May 11, 2022

French Bread

 For the second time in a week Dear One has sent me a recipe.  This time it was for French Bread.  I asked him if it was a hint.  He said, "It just looked good."  So what could I do?  I made it.

French Bread

2 cups warm water
2.5 teaspoons sugar
1Tablespoon yeast
5-6 cups flour
2.5 teaspoons table salt

That is it.  That is all he sent me. I guess he thought I had made enough bread that I could take it from there.  I remembered that 40 years ago in one of the Homemaking Booklets we got in Relief Society there was a recipe that I think was called Fabulous French Bread. I had made it many times.  This came in handy when I needed to pre-heat the oven.

This is what I did:
In a large ceramic bowl I placed the warm water, sugar, and yeast and stirred with a wooden spoon.  After five minutes I added 5 cups of flour and the salt on top then stirred in until all the flour was taken up.  It was pretty sticky so I added another handful of flour and stirred again then used my hand to be sure we had all the flour incorporated.

Covering it with plastic wrap I let it rise for one hour.  It was pretty well doubled in bulk by that time. I floured the counter rather heavily and pulled the dough out of the bowl and onto the flour, turning and folding until the top was nice and smooth. Now was the time to shape it into a fat long French loaf which I put on a Silpat covered half-sheet pan. I covered it with a cloth and let it sit while the oven was heating.

 At that point I started the oven heating to 400 degrees F. and went to read a book until the oven was hot.  The bread cooked for 20 minutes, another memory from Fabulous French Bread.  It must have been right because we got a beautiful loaf.  Which did not sit long enough to cool I can tell you!  Dear One was there in a flash, even before the bread was off the tin!

Seeing this picture reminded me that just before putting the bread into the oven to cook I got a very sharp knife out and gave three deep slashes diagonally across the top.  

Very successful loaf.  Doesn't hurt that I had not made any meals today...

Tuesday, May 10, 2022

Knitting Today: Finished Project

 The Seedling Stitch socks I was knitting last week are now finished. I am very happy to have completed them in the time agreed upon by the designer. I like these socks for the most part.  The part I don't like is that they don't fit over my heel.  Well, after soaking for hours I tried them and after pulling really hard, I did get them over my heel but...not going to work as a regular pair of socks.  Sadly.  Not so sadly, our daughter will now get a pair of hand knit socks for the first time in years.


The pattern is an easy one.  The designer is very responsive to questions. The experience was a good one.  The socks took about a week to knit. To read the notes and see some other photos go to Ravelry page.

Now I want to knit another pair with the leftover yarns.  There is certainly enough to knit another pair with the green and black striped yarn. I will certainly use a toe up pattern...