About The Country Wife Blog

Monday, March 31, 2025

Ran Out Of Yarn—If You Can Believe It!

 Today I went to the eye doctor. Love her and nice people there but it is always a significant amount of time invested. I ALWAYS take knitting with me so I don’t get into mischief. I specifically put the purple shawl in the car to work on and brought it into the office with me. After paying the upfront costs I went into the waiting room and pulled out the shawl. I was less than one row across when I ran out of the lavender yarn! 


So annoying since I expected a long wait. All of a sudden I remembered the sock project in the car so I excused myself, went to the car, retrieved the sock bag, returned to my seat and proceeded to knit for another five or six rounds before I was called.

As I was sitting there knitting I began a big fight with myself about buying another ball of lavender instead of only using what yarn I had at home. Checking my calendar I saw that this is the Hobby Lobby yarn sale week, so I lost the fight. I went to Hobby Lobby and bought one ball of  lavender yarn. I will use that up and call the shawl big enough. The second strand will be a mystery…! I really won’t buy any more yarn for this project. I will just slide in partial balls of yarn already in my collection.

Friday, March 28, 2025

First Strswberries of the season!

 Dear One brought this lovely box of strawberries home today!  I have eaten four so far. I was actually planning on eating strawberries for supper. He suggested pizza…


We did not have any ingredients except for crust so off to Food Lion I went.  Came home with pizza plus!!! He is happily munching Chester’s Chili Cheese Fries, some sort of chip-like thing. He will have eaten all his calories before he even gets to the pizza, I think.

Tuesday, March 25, 2025

First Solar Dyeing Project!

 Just finished, more or less, the first solar dyeing I have done!  I am thrilled.  I skeined up a ball of Patons Classic Wool and tied it in four places.  In a quart Ball jar with lid I placed one cup tap water and 1 Tablespoon of vinegar and stirred well. Next I added four or five drops of blue gel food coloring and stirred well.

Adding about half of the damp yarn I dropped on four drops of yellow food color then four drops of red food color then shoved in the last of the yarn.

After carefully filling the jar with water I put on the cover then shook the jar to make sure there was water everywhere.


Next step was to put the jar on the back deck railing in the sun for three days.  I brought it in every night so it would not chill down too much.  Heat is a big part of solar dyeing. I am thinking this summer will be a great time to solar dye!!!

This morning I emptied the jar in the sink and found that the dye bath was entirely clear! That is good news. I then washed the yarn and hung it to dry.   

Here the yarn has just been rinsed.
The yarn is hanging to dry.

I will be happy to see what happens when I knit it into something.  I wonder what I should knit...any ideas?


Monday, March 24, 2025

Monday Marvel!

 Over the weekend I finished the first project on the Ashford 32” rigid heddle loom. I am so happy.

As you know, I am trying to use up the yarn collection this year. This project, a shawl, used up five-plus balls of yarn…blacks and whites.


Every ball was different. Each was listed as bulky weight so I imagined they would weave well together.  Well, they almost did, but I think it was good enough.
Even with the problems, I am happy and will weave other one though maybe with the same type of yarn.


Tuesday, March 18, 2025

All Warped Up And No Place To Go...

 As I have said several times, this is the year I am going to use up the yarn in the house.  This is so I can with good conscience buy more for specific immediate projects.  This is probably a pipe dream, but hey, it is still a good idea. And it really is not a pipe dream because I do not now, nor ever have I, smoked anything of any kind--well, except for that one puff on a cigarette during play practice on the stage at South Royalton High School when I was a sophomore and coughed so much I nearly, or did, throw up.  That put me off smoking forever.  Adding that episode to my lungs being what they are due to all the pneumonia and bronchitis I had as a child...well, smoking has not been part of my life.  And I try to stay away from people who are actively smoking even today as it is still hard on my lungs.

So, that was an odd digression.

Now back to the subject in the title...

Yesterday I got up and started roaring around  getting things done early in the day.  By this I mean that I was downstairs by 9:00 AM having already completed my morning routine and was ready for something else. Well, Dear One would have loved breakfast but I was not interested in that. 

 I want to weave a shawl for the Relief Society closet.  The yarn I pulled out a few weeks ago for this project was all the bulky yarn I had picked up on very serious sale at Hobby Lobby.  These have been waiting for me in a nice flat-bottomed grocery bag from, I think, Harris Teeter (when we go on vacation I like to buy one of that type of bag from whatever store we use to buy our groceries-though on that front I am hoping not to be self-catering from now on, going out to eat has some real pluses to my mind--I know some people like to buy tee shirts to remember trips. Dear One likes to buy hats though they sometimes disappear on him...) so I pulled out that bag and took it downstairs with me.

Last year I had been fortunate enough to find an Ashford 32" rigid heddle loom with the old-style stand that has the little shelves on each side.  The loom was $175 and came with a good variety of parts.  If you don't know about weaving on a rigid heddle loom you should know that they are set up to use stick shuttles to wrap your yarn on for weaving the weft threads.  For the 16" rigid heddle loom, I use a boat shuttle which came with it. That loom and accessories were WAY WAY more expensive than this 32" loom but did have several heddles in different sizes, etc and would have cost a couple hundred dollars more if I had tried to buy everything new.  So this loom seemed like a good idea and was only a four-hour round trip to pick it up.

So...first thing yesterday morning I was ready to
warp the loom--which means putting the yarn on the loom through the heddle slots which will be the warp threads, as in the threads that run north and south in your project.  The weft threads are the east/west threads in your weaving.  Well, last week one day I decided how long the warp threads needed to be to give me the shawl length that I wanted and had measured the kitchen from the end of the island where the warping pegs would go to where the loom needed to be sitting to get that length.  I meant to take a picture of this but was so into warping that I just carried on to the next steps.


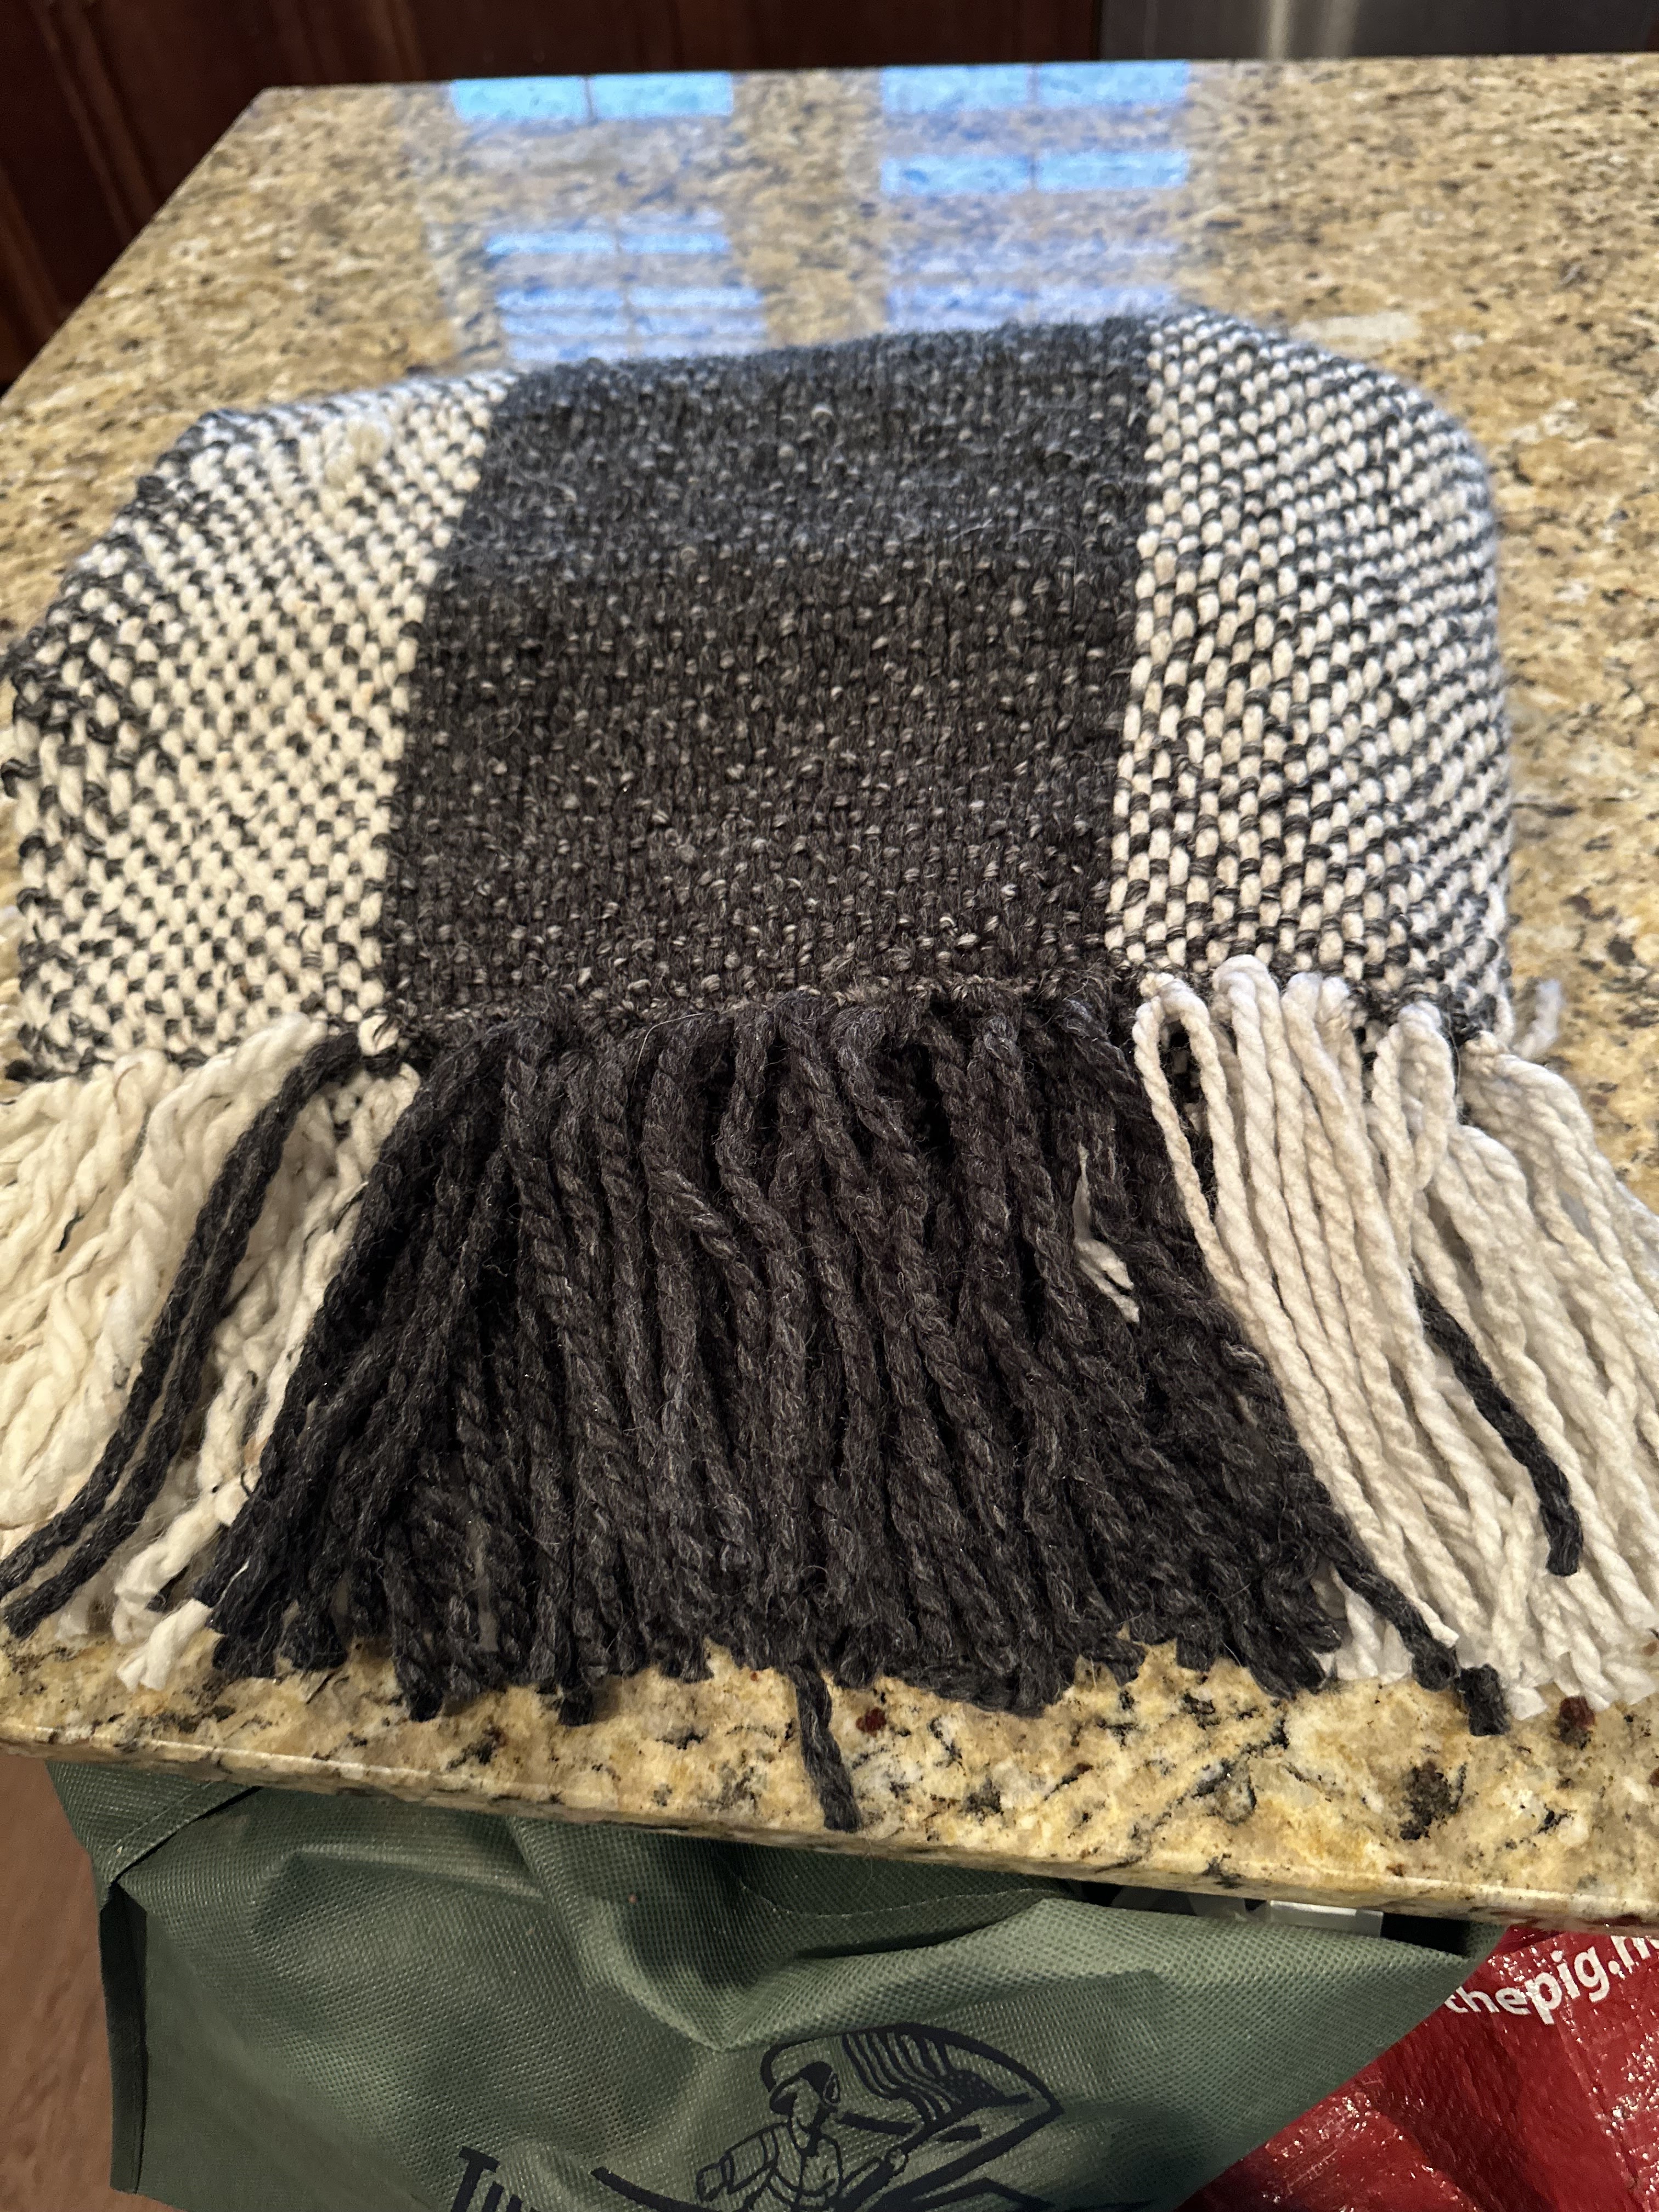
Here is the loom all warped up.  You recall that I said I was using up yarn?!  Those are all five different yarns. The things they have in common are: 1.  They were very cheap on sale...$1.26-$1.86  per ball, 2.  they were colors that I did not think would look terrible going together, but that was not high on my list of criteria for choosing them, and 3. I thought there would be plenty to warp the loom and weave the shawl.  Well, that dog did not fly! 

From right to left in the photo, they were all full skeins. They all except the lefthandmost yarn(that yarn was meant to be weft!) seemed to have lots of yarn in the ball.  Turns out, they were not even close.  Actually, looking at the photo, I guess that is not true...but I did think I had enough of the second and third balls to completely warp the loom.  Math was never my strong point...!

Anyway, I did get the loom warped and ready to go. The next step was to wind the warp onto the loom.  Usually you want to wind paper or some other separator in with the winding on process so the threads do not fall into each other.  This is probably especially important with wool yarns because wool loves to snuggle in together with its neighbor which would make weaving more difficult. This is acrylic yarn which came into being all those years ago to mimic wool yarn and be more price friendly. 

In the photo you can see one piece of rolled paper hanging down.  That is the leftover from the separator/winding on process. I didn't want to cut the paper because I might want to weave a longer length of fabric next time.  On the side where you do not see paper hanging down, the pieces of paper I used were all used up by that point. Actually there were several shorter lengths of paper that I used.

I moved the loom over to my chair in the living room next and started threading up.  Threading up is when you take one of the threads from the slot you had pulled the warp thread through and thread  it into the hole in the heddle to the right of the slot.  This enables you to make a shed where, when you move the heddle up and down, the threads in the slot go one way and the threads in the holes go the other way...up and down.  The space in between those is called the shed which is where you slide the shuttle through.  In this case the shuttle must be a stick shuttle as you cannot "shoot" a boat shuttle through as there is nothing to slide it on like there is on a floor loom which has a little "shelf" for running the boat shuttle along.

So now, finally,  we get to the "no place to go". My plan for the day had been to warp the loom first thing and then when I finished a taxing "fifteen" I would rest in front of the loom and do a fifteen weaving.  If I did all the fifteens I had written in my journal as the plan for the day, and did fifteen minutes in between each of them weaving, I was thinking I might actually get the shawl finished by bedtime. DID.NOT.HAPPEN!

Why did it not happen you ask, because I had not noticed that I did not have a 32" stick shuttle.  What a dope!  If I had checked things out when I first thought of weaving a shawl a couple of weeks ago, I would have known I needed to get one or more.  SO...I went to The Woolery's website and tried to order an Ashford 32" stick shuttle.  Did not have any available.  So I checked out Kromski stick shuttles. They were in stock.  I ordered two.  It was a bit wrenching because I am a brand loyal person. I really like Ashford.  They make good things that hold up.  Things I have: Ashford Traveller spinning wheel, Ashford E-Spinner 3, Ashford 16" rigid heddle loom, Ashford 32" rigid heddle loom, Ashford 10" SampleIt rigid heddle loom (Dear One's project), and multiple smaller accessories for the looms.  Brand loyal with good reason!  These tools work very well.  If I had a problem, Ashford answers emails and maybe even phone calls.  I won't swear to it, but I think I called them once.

When I was looking for the stick shuttles and realized I needed to get the Kromski brand I remembered that I had talked  with Kromski America before I found the first used rigid heddle loom.  I had thought I would purchase one of their looms but then the 16" Ashford fell into my lap.

So now we wait for UPS to come next week sometime, hopefully, then I will get back to the weaving project.  Maybe by then I will have completed a few other pressing projects and will be able to just sit down and spin.  Based on the math problems as I was warping, I am unsure if there will be enough of the weft balls of yarn.  The cream ball is half used. I have two black-ish skeins of the same type of boucle-like yarn but have no idea if there will be enough to finish the shawl.  If not, then I will figure something else out about weft yarn.  I WILL NOT BUY MORE YARN.  I am saying this out loud for my benefit, not yours. I just need to continually remind myself that I have enough yarn,  that I have to use up the yarn in the house NOW!  What a feeling that will be.  I will feel very virtuous if I get there.  No, I will feel very virtuous WHEN I get there.  Hopefully before Christmas.

Monday, March 17, 2025

HandKnit Socks and Compression Stockings!!


 A few days ago I put all my used hand knit wool socks and compression stockings in a bin of water with Eucalan jasmine soap.  This is a no-rinse soap. I like it.  I let them soak for about 30 minutes then drain lightly.  Since I learned that our washing machine has a "Drain and Spin" cycle I have been using it every time I wash the socks.  These socks have been washed, drained, "drain and spin" cycled and now are lying on the towel on the guest bed breathing in the fresh air.  

As you can see, I just went with the photo as is instead of cropping out the "real" stuff!  In the foreground you can see the clippy hair things that I use to attach ends of yarn skeins to keep them organized.  In the background you can see a big pile of pillows I threw off the bed so the socks can complete drying...

One of my favorite hand knit socks has disappeared.  You can tell that my planned organization project has not come to total fruition!

Friday, March 14, 2025

Better Three-Stitch Knit Bobble

 The Golden Hour shawl that I am making for the Relief Society room closet is coming along.  There are seven sections to the shawl.  I am using up yarn! At this point I am working on the second strip which includes two rows of bobbles (which is Section Six!!).  The first strip of bobbles had very ho-hum bobbles.  I saw a video about making bobbles then I saw another one.  Both were making five-stitch bobbles.  This shawl pattern uses three-stitch bobbles.


As you can see, the upper bobbles are rather wimpy-looking.  The lower bobbles really pop out.

Sadly, I did not keep track of the videos I watched.  I was so excited to see the techniques that I just went for them.  Maybe one day I will make a little video showing how I do them.  In the meantime, here is text describing my process.

Knit to the spot where you want the bobble.  The pattern calls for KFBF (knit in the front, then knit in the back, then knit in the front of the same stitch again before taking it off the left needle.  The girl whose video I watched suggested to Knit, Purl, Knit in the same stitch instead before taking off the needle and proceeding with the bobble.  So much better.  Well, a little bit neater anyway.

Next step is to knit back backwards!  Yes!  You can do it.  Go to YouTube and find instructions which may be better than what I say.  Elizabeth Zimmermann is the first person I heard speak of knitting back backwards.  THIS MEANS YOU NEVER NEED TO PURL AGAIN IN FLAT KNITTING!      Such a convenient thing.

Basically what I did was to insert the left needle into the back of the stitch on the right needle, wrap the working yarn around then pull the stitch off the needle.  Slick as a whisker!

Next you will knit back from right to left.  (This is your third row of knitting...(first row:making three stitches out of one stitch, second row: knitting back backwards --or you can turn your work and purl but I don't do that anymore-, third row: just knit the stitches.  Finally you bind off.)

Now "bind off" the stitches:  as in-- insert the left needle tip into the front of the second stitch on the right needle and lift it off over the first stitch on the right needle.  Now with the left needle tip, insert into front of the third stitch on the right hand needle and lift it over the first stitch.  You now have one stitch on the needle having gone from three stitches to one stitch.

The thing that makes the bobble really pop out is next:  take the working yarn and move it between the needle and the bobble, bring it around the bottom of the bobble and behind the bobble  then insert the right needle tip into the next stitch on the left needle and pull the working yarn tight and knit the next stitches until you get to the next stitch for the next bobble placement.  You are basically strangling the little bobble.  It works great.  Maybe soon I will try to make a video if this seems unclear.  Let me know!

Thursday, March 13, 2025

Zipper-Topped Fully Lined One-Yard Project Bag: Easy

A few months ago I decided to start the organization process for all the knitting and other projects going on. I became annoyed at all the plastic bags hanging around and since the Hobby Lobby had a 40 percent off fabric sale that week and zippers for 99 cents, I headed over. I purchased three one-yard lengths of cotton quilting fabric plus three colorful 22" zippers and took them home.

First thing I did was cut off about a 3" piece of fabric across the top of the fabric with the fabric still folded.
one yard fabric with 3" cut off top


Second: I cut off the open end of that strip about 6"-8" long.  The part that still had the fold in it was the perfect piece to make a handle.  With right sides together, sew along both raw edges at one-quarter inch.  Turn and press, then, using a thin dowel, I pushed the folded end through then pressed the strap flat. (On other bags I have left out the pressing step, but if you want a nicer-looking bag, press it.
on the right you see the two raw edges pieces and on the left the folded piece for the strap

Third:  Fold in the fabric on both bottom and top raw edges to make a nice fold then press.  Pressing here makes it easier to sew in the zipper.  I have done it without pressing, just using pins, but this does not look as nice.  You can fold in however much you want but I usually fold in 1/4" to 1/2" which gives plenty of fabric to attach to the zipper.
edges folded in and pressed

Fourth:Hold the closed zipper up to  short side of the bag, then with the zipper about 1.5" to 2" in from the left edge/zipper pull side of the bag-to-be,  unzip the zipper a few inches then cut off the zipper tape just past the metal stopper.  Place one of the two short pieces of fabric folded over the end of the zipper tape then sew straight across with a 1/4" seam.  There will be excess fabric on both sides of the zipper tape. Leave it for now.  Do the same for the other end of the zipper tape--cut off the excess zipper table about two inches in from the end then fold the second piece of fabric over the end of the tape (it is easier if you do not pull the tape apart at this point!) and stitch across at 1/4" seam allowance.  I usually stitch, back stitch, then stitch across the zipper one more time so there are three rows of stitching securing the zipper to the fabric.
zipper cut off ready for fabric extension
fabric extension pinned to zipper ends


zipper with extensions sewn to fabric
excess zipper extension fabric being removed

FifthTime to sew in the zipper. Now is the time to cut off the excess fabric so that the fabric extension piece is the same width as the zipper tape.  Take one end of the fabric piece with the nicely pressed folded-in fabric and lay the zipper face down on the fabric with the little zipper fabric extension lined up with the edge of the large folded fabric.  Carefully sew along the zipper tape using a zipper foot.  OR you can do it extremely carefully with your regular presser foot but be prepared to kick yourself for not taking the time to find and attach your zipper foot. I will assume you know that when sewing in a zipper you cannot sew past the zipper pull...you have to sew to a few stitches before the closed zipper pull, leave the needle in the fabric, then raise the presser foot and carefully move the zipper pull back the way you had been sewing to get it out of the way, then put the presser foot down again and continue sewing to the end of the zipper fabric extension.


SixthIf you want to topstitch along the zipper, now is the time to do it easily.  Once your have sewn in the other side of the zipper you will have to open the zipper fully in order to topstitch.

Seventh: You are now ready to sew the other side of the zipper. Bring up the bottom of the big fabric piece and pin the zipper the same way you did the first side, with the zipper facing down.  You will probably notice at this point that you are making a double thick/lined project bag as easily as anything!  You will be pinning the second pressed folded-in edge to the zipper and the zipper pull will now be on your right...  Go ahead and stitch the same as before.


here the second bag end is pinned to other side of zipper ready to sew in


Eighth:  With the outsides of the bag held together, unzip the zipper about half way across. Take your little strap that you made in step two and, with the two ends together, pin them about 2"-3" down from the zipper with the folded over end of the strap well to the inside of the bag.  Feel free to let those two ends extend outside of the bag.  You can trim them off later.  Pin down the length of the bag, until about three inches from the bottom.  At that point, put your thumb in the bottom of the seam and push up to make a little pleat 1-1.5" at the bottom and pin in place.  Pin the other side of the bag with the zipper fabric extension folded together then pin down the bag and make another little pleat at the second bottom edge.  This becomes boxing for your bag without all the measuring and cutting, etc.

the ends of the strap are  almost ready to be trimmed off

these are the pleats in the bottom of the bag for boxing...always pin together then stitch across at least twice

Ninth:  Sew along both edges at 1/4" to 1/2",  whatever pleases you.  Backstitch at the top then at the bottom, stitch over the "boxing" pleat at least twice.  I do it three times.


here is the nice "boxing" pleat completed. I like them.


Tenth:  Turn your bag right side out and admire your new fully-lined zipper-topped project bag in the cool fabric you chose!  It is ready to use.  Well, add a key ring to the zipper pull and something to pull (I used a clippy thing because it was handy and useful.)
q

 PS After you make a few bags, you can make one in about 30, unless you are fastidious about pressing, then it will take a little longer.

Wednesday, March 12, 2025

Cute Tiny Crocheted Carrots

 A few weeks ago I saw a crocheted carrot. I thought it was darling and decided to try one.  It was made from a granny square...one of the simplest of crochet projects...just a magic ring, chain stitches, single crochet stitches, double crochet stitches, and slip stitches.  Could not be easier once you know how to do all those basic stitches.  A bit of a learning curve when you start but I think we can learn about anything we really want to, though it may take a great deal of effort sometimes.


Here is a picture of a single carrot with two little treats inside and a bunch more filled carrots in my first ever zippered clear vinyl pouch!  Pretty happy with the pouch even though it is far from perfect.  There are more in the future!  Happy enough with the carrots.

The first carrot I made was about five inches square.  It was too big and open to put treats inside so I went down a couple hook sizes --to a 3.5 mm crochet hook--and made these 3" squares.  They worked like a charm.

To see the whole pattern, in case you want to make some spring carrots, go to my Ravelry project page.

Tuesday, March 11, 2025

Lock Out Annoyance!


 Saturday morning I leapt out of bed early, something I NEVER do on Saturday, because a friend who has been working towards baptism for a year and a half was ready for baptism and I did not want to miss it.  I thought it the ideal time to get rolling again on the newest health kick by walking over to church.  If I walk really fast I can get there in 18 minutes.  If I saunter and don't build up a sweat, something to be deplored when going into company, it takes me about 23 minutes.

Because I did not want to get lathered up, I walked out our front door with my headphones on listening to the latest of the Nick Hawkes book series I had been reading (The Syrian Stone) and happily locked the door behind me and started up the driveway pushing my nice purple "stroller".  I had barely stepped onto the driveway when I realized I did not have my keys. I also did not have my purse.  Even worse, I did not have my phone.  They were all sitting sedately on the dining room table where I had placed them before un-garaging the stroller from the front window.

Rats!  And I mean, RATS!!!  I rang the doorbell a hundred times...well, not that many but many times, knowing absolutely that it was going to do me no good as Dear One was upstairs at the back of the house (the pond side of the house) watching the Saturday morning news or some other thing that caught his attention.  No luck with ringing the door bell so I started banging on the door.  A lot.  Really loudly.  I knew that would not work either, but I kept it up for a while, hoping to hear his feet in the hallway.  No such luck.

At that point--five or eight minutes into this fiasco, I decided to walk around to the back of the house and knock on the sliding glass door on the deck.  Tried it.  Nothing happened.  Kept trying it. Still nothing happened.  I happened to glance toward the pond and our blueberry plants and saw the water hose!  Great idea!

Carefully got down the steps of the deck and walked down to pick up the hose.  The water was on so I started spraying water on the upstairs window beside his recliner.  I kept changing the water pattern and finally got one that seemed pretty solid.  I kept after the window,  getting closer, and all the while water was running down my arm and so pleasantly running into my armpit and drenching my nice church dress.  I gave it up, shut off the hose and walked back around to the front of the house ready to give up and just sit on the front porch in a snit.

Just as I got around to the porch the front door inched open!  I blasted through the door, grabbed my purse, moved my stroller back into the house, thanked Dear One for opening the door, then said I would have to take the car since by now there were only about ten  or twelve minutes to get to the baptism, and I flew out of there.

The church parking lot only had six cars in it so I did a U-turn and drove over to Bojangles for a quick  breakfast burrito.  I have learned that blood sugar goes up even if you don't eat first thing in the morning, and I had had not one tiny taste of food.

Came back to the parking lot and found about ten cars in the lot so I quickly swallowed the last of that burrito and went on it, hoping that I had sucked all the remaining breakfast from my teeth.  It was 10:02.  I walked in with a new friend who I really like.  We sat together and chatted until 10:35...when the baptism  program finally started.  I have no idea why it was so late starting.  I also realized that I would have had time to walk over after all.  Oh well.

Maybe the next time I plan to walk will work. I had decided to walk over Sunday morning, but it was raining.  I don't mind a little mist, but walking to Church in the rain, certain to sit in wet clothes for two hours is not on my list of desirable activities.  The sun was shining when we were ready to leave but by then we had been away from home for more than four hours and I was bushed.  (We had opened the FamilySearch Center after Church meetings for the first time.  Maybe half a dozen people stopped in to chat.  It wasn't genealogy but it was current family history and so sweet to be there to listen.

The beautiful blossoming tree photo is something I have recently seen. I think it was Saturday when I was on my way to Church from Bojangles but I won't swear to it.

Monday, March 10, 2025

Monday Morning Sights

 Early in the morning you can see some lovely sights.  A recent morning I thought I saw the sunrise then lifted the blinds in the room and took this photo.


It was so wonderful to see the sun come up a few moments at a time and shine on the tree closest to our house.  How I love the morning!

Friday, March 7, 2025

Food Friday: DIY Angel Cake with Confetti

 For years and years our family celebrated birthdays with either a No-Bake Lime Cheesecake or a Confetti Angel Cake with strawberries and whipped cream.

This year I could not find the Confetti Angel Cake mix at the Food Lion (and was too much of a lazy slug to go to the work of making the cheesecake...maybe next birthday!) Since I was pretty much at the end of my rope when I got to that aisle of the grocery story, I just got a regular angel cake and made some DIY changes to make the "confetti angel cake".  It worked!


This is how I did it:  in the Bosch mixer I placed the package of angel cake mix and 1.25 cups of filtered water and whipped for nearly two minutes.  When the time was up I dumped in 3 Tablespoons of Sprinkles and stirred them in. Using an angel cake pan I dumped in the batter, gave the pan a solid tap on the counter then put in the pre-heated 350 degree F oven on the lowest rack for 33 minutes.  The top was only mildly browned so I returned to oven for about 5 more minutes then removed the pan, turned it bottom side up on the counter then let the cake cool for 1.5 hours.  When the cake was completely cool I used the slim sharp knife to run around the outer rim of the cake pan then the inner tube and let the cake fall onto a plate.  Here is the cake after the first slice was cut for the birthday boy.

We serve this cake with sliced, sugared strawberries and topped with sweetened whipped cream.  So yummy to those who have a sweet tooth!

Wednesday, March 5, 2025

Emotional Support Chicken #8...a Giant!

 Since Dear One received his moose on Monday I have been knitting up a storm.  Three days, quite a few partial balls of yarn, and a full bag of fiberfill...and a giant Emotional Support Chicken is ready to hop into a box and head west.

Here she is:


This chicken was knitted using two strands of worsted weight yarn held together and using US #10 knitting needles.  This is the largest chicken yet. I hope its recipient likes it.  It made me happy to knit it.  I can say that the comb is the best one I have made so far.  This is acrylic yarn rather than the wool scraps I have used for every other chicken I have made.  It was a little taxing on my old hands but worth the effort.

Tuesday, March 4, 2025

A Darling Bull Moose!

Yesterday I arrived home from a foray out of the house...though at the moment I cannot remember why I had ventured out...and checked the mailbox for a parcel that was supposed to arrive over the weekend and did not.  There was nothing in the mailbox.  I asked Dear One if there was any mail...sometimes mail comes in when I am gone and is not easily visible...!  He told me a couple of ads came in.  There was a box at the table with a brown something wrapped in plastic.  He said it had his name on it but it was clearly mine since it was yarn.

WELL!!!  Wrong on all counts!  I could not remember ordering anything brown yarn, though I really do love brown yarn and fabric.  As I started to take the plastic off to unroll the brown yarn (I would rather spin brown yarn!), I noticed the word "moose" on the label and instantly I remembered the adorable moose our daughter-in-law had given our oldest son for Valentine's Day...and handed the package to Dear One to continue opening it.  He was mystified.  I pointed out that our son frequently sends birthday gifts and the lightbulb went off!

Here is that darling bull moose Dear One received as a birthday gift from our oldest son. 


Here he is outside on the front porch.  I wonder if we will have a name soon.  Bullwinkle is a bit...cliched...I suppose.

You will fall over dead if I tell you the next thing...but I have to let you know again what a kind loving generous man I have been married to for almost fifty-two years.  He said to me after seeing his moose and holding him for a moment, "You need to make a chicken for our son."  I believe I will!