About The Country Wife Blog

Showing posts with label quick and easy. Show all posts

Tuesday, March 25, 2025

First Solar Dyeing Project!

 Just finished, more or less, the first solar dyeing I have done!  I am thrilled.  I skeined up a ball of Patons Classic Wool and tied it in four places.  In a quart Ball jar with lid I placed one cup tap water and 1 Tablespoon of vinegar and stirred well. Next I added four or five drops of blue gel food coloring and stirred well.

Adding about half of the damp yarn I dropped on four drops of yellow food color then four drops of red food color then shoved in the last of the yarn.

After carefully filling the jar with water I put on the cover then shook the jar to make sure there was water everywhere.


Next step was to put the jar on the back deck railing in the sun for three days.  I brought it in every night so it would not chill down too much.  Heat is a big part of solar dyeing. I am thinking this summer will be a great time to solar dye!!!

This morning I emptied the jar in the sink and found that the dye bath was entirely clear! That is good news. I then washed the yarn and hung it to dry.   

Here the yarn has just been rinsed.
The yarn is hanging to dry.

I will be happy to see what happens when I knit it into something.  I wonder what I should knit...any ideas?


Thursday, March 30, 2023

Easy Strawberry Jam

 When Heavenly Father wakes you up before your alarm and says it is time to get rolling because there are things to do, places to go, and people to see, well, you just better get up and get rolling.  This was one of those mornings.  I am very glad I heeded His prompting.

It would be unwise of me to share all the things I did this morning because I am such a bad example of so many things, but suffice it to say that the kitchen, which was a disaster area, was rearranged in such a way that I could work on the strawberry jam project.

This is how it went:

On Monday I picked up strawberries that had water damage in a weekend storm from a local farm.  They needed to be hulled, sliced, and used immediately.  In this case I put them in the refrigerator after hulling and slicing to wait until Tuesday for processing. Which turned out to be Thursday...but they still looked happy early this morning so I went ahead with strawberry jam.

Since I was going to can the jam so I could share it with our family later this year (hopefully there is some left...) I got out a sheet pan and placed the glass canning jars on the pan without lids and rings. I placed them in the oven at 250 degrees F so the jars would be hot and sterilized when I was ready to fill them.

Next step I got out the 8-quart Instant Pot and placed the trivet inside the stainless steel liner bowl and filled it with water to the trivet level. I also got out a cooling rack where I would put the hot jars when they were removed from the Instant Pot. 

At this point I put the Instant Pot going on the Sauté mode so it would begin to heat up. I did NOT want the pot to be cold when the hot jars were put inside. I had visions of exploding hot jam completely ruined...

Now it was time to make the jam.  The recipe I was following includes pectin because it takes less time and the jam will potentially be a little more firm.

The sliced berries went into our large stainless steel pot and were mashed soundly with the potato masher.  Just prior to doing that I had put 1/4 cup sugar and 1/4 cup (most of a packet of Sure Jell regular pectin) into a bowl and stirred well. At that point I stirred in 1 cup plain water and made a slurry. Now that the slurry was prepared I mixed it into the mashed strawberries.

The burner was turned to medium high heat and I used a long-handed wooden spoon and started stirring CONSTANTLY until the pot came to a full boil.  Now it was time to put in the remaining (3 3/4 cups) sugar carefully into the berries, stirring continuously.  It occurred to me to very slowly pour in the sugar so as not to create any splashing...

Stirring until the mixture came to a FULL ROLLING BOIL, then kept stirring for one full minute then shut off the burner and let the pot rest for 5 minutes.  Pulling out a bowl from the cupboard I used a perforated flat scoop to skim off the probably-delicious foam from the jam pot.  It did not really need to be done but it does make the jam in the jars prettier.  PLUS I thought of making some fresh baking powder biscuits for breakfast, whatever time that turned out to be...The strawberry scum would (and did!!) taste good on hot biscuits. (Breakfast was at 10:45 today...)

Removing the hot jars from the oven I put them on the cooling rack still on the pan then carefully ladled the very hot jam into the jars using a stainless steel canning funnel so the sides of the jars did not get sticky.  Once the jars were full I wiped the rims and threads with a wet paper towel then put on the lids and rings and set them carefully into the Instant Pot on the trivet which was happily waiting for the jars, the pot steaming with hot water!

To steam can in an Instant Pot you need to press down the "steam" button on the cover top so that steam can escape out of the pot then set the Steam mode to 20 minutes which was how long I wanted the jam to can...overkill because we are so close to sea level but...overkill is almost always a good idea, I think.

You don't really want to walk away from the Instant Pot until the timer starts going down. (I waited until the display showed 19 minutes left then went upstairs for a nap...) This will not happen until AFTER the plug (or whatever it is called)in the cover has risen.  Only then will the steam be hot enough to do the correct job.  This is something I learned today.


Here is the result, minus the bowl of foam that was skimmed off.  THAT is now happily greasing our inwards!  The biscuits were light and fluffy and there was only a small batch so we could not over-indulge.

You will note the "interesting" appearance of the jam.  I believe the solids part of the jam rose to the top of the jar and the bottom part appears to be strawberry jelly.  I think it will still be good but then, we will not know for a while...!  I think when you make freezer jam or refrigerator jam this will not happen.

++++++

Easy Homemade Strawberry Jam (with Pectin)

  • Author: My Homemade Roots Total Time: 0 hours Yield: Approximately 6 Pints
  • 4 pounds of strawberries
  • 1 cup water
  • 4 tablespoons low or no-sugar needed powdered pectin
  • 4 cups of granulated sugar, divided

Instructions

  • Wash and hull and the berries. Add them to a large bowl and crush them with a potato masher. Stir water, pectin, and 1/4 cup of the sugar into the berries.
  • Pour the crushed berry mixture into a large, deep-sided saucepan or Dutch oven, and heat over medium-high heat, stirring constantly. Bring the jam mixture to a boil, then add the remaining sugar. Stir continuously and boil hard for 1 minute.
  • Remove jam from the heat and allow to cool for 5 minutes. Skim off any foam.
  • If you are canning the jam, ladle jam into hot clean jars, allowing 1/4-inch headspace. De-bubble and wipe the rims clean. Place lids and bands on each jar and adjust to fingertip-tight. Process in boiling water bath for 10 minutes, adjusting for altitude.
  • For freezing, allow the jam to cool for another 10 minutes, and then ladle it into freezer-safe containers, leaving an inch or so for expansion. Freeze for up to 12 months (but the quality is best by 6 months.)

Find it online: https://myhomemaderoots.com/easy-homemade-strawberry-jam-with-pectin/


Friday, March 24, 2023

Food Friday: Quick and Easy Quesadillas

 We like quesadillas in our house.  We do no eat them often but when we do they bring a smile to our faces.


Here is a plate of naked quesadillas made two ways.  The left-hand quesadillas were made in the microwave.

On a microwave safe plate place a small flour tortilla.  Sprinkle on a little grated cheese.  Top with a second flour tortilla. Put into microwave and cook for 30 seconds.  Remove from microwave and cut into pieces. Done.

The nicely browned quesadillas on the right side of the plate were made in a skillet.  This particular batch did not burn,.  Burning is the bane of my existence.  In our house there is a difference of opinion of what constitutes "nicely browned" and "burned".  Being the cook, I am the one who is right, of course, but "the other" objects to what is considered "burned".

To skillet cook quesadillas put one flour tortilla in a hot/medium hot skillet.  Sprinkle on some cheese.  Add a second flour tortilla.  Stand over the pan and watch it like a hawk. In about one minute carefully flip over the tortilla sandwich, trying very hard not to spill any unmelted cheese.  Cook watching carefully the second side then flip again. Flipping multiple times is often necessary to get the cheese melted and stuck to the inside of the tortillas...

The microwave treat is easier and never burns.  If you want the nice crisp tortilla of the regulation skillet quesadilla,  add the microwaved tortilla to the skillet and let it crisp up on both sides but watching every second to make sure it does not "burn"!

We like them both ways.

PS A naked quesadilla is two flour tortillas and grated cheese.  Really great quesadillas include salsa and whatever else you like inside and greatly increase the risk of "burned"...but so tasty when done right.

Monday, April 11, 2022

Munchie Monday: Quick and Easy Corn on the Cob in the Microwave

 On Friday I found some actually fresh Butter and Sugar corn on the cob at the store. I picked up three ears and brought them home. I had lots of other stuff in the bag on top and, after about seventy-leven stops, I finally got home. I took the "refrigerate immediately' things out of the bag and put them in the refrigerator.  On Saturday I finally finished emptying the bag and found the corn.

This is how I cooked it:

Rinse off the corn, in the husk.

Put the corn in the microwave with husks still on. 

Microwave for increments of 3 minutes.  Since I put 3 cobs in at once I knew it would take more than three minutes so I tried it for 5.5 minutes.

With a hot mitt, pull corn out of the microwave and place on a cutting board.  

With a sharp knife, cut along the bottom end, half an inch or so from the outside end.

With the end off, and the oven mitt on, pull the husks and silk off from the silk end and compost or throw out if your HOA does not allow compost piles....

Eat your beautiful fresh corn on the cob.


Here is the corn ready to eat.  You can see how much of the bottom you need to cut off.  There is no need to "silk" the corn since it slides off with the husk.

Really do use a hot mitt as the corn is HOT!

Friday, February 11, 2022

Food Friday: Quick and Easy Microwave English Muffin

 As I was dragging myself out of lethargy this afternoon, I happened onto a recipe on Facebook. It was a microwave English muffin.  Very few ingredients. It was supper time so I thought I might give it a try.


Here is the completed muffin with raspberry jam on top. I gave the first one to Dear One who was hoping for some sort of sustenance tonight since I had not provided any so far in the day due to Relief Society business.

Since I cannot find it on Facebook anymore this is what I did:

In the 8-ounce bowl for the Vitamix I put

 1/3 cup old-fashioned oatmeal (dry), 

1 Tablespoon ground flax seed meal, 

and 1/2 teaspoon baking powder. 

I blended this into a fine flour-possibly 30 seconds.  

Put that mixture into a cereal bowl and added 

2 Tablespoons unsweetened applesauce,

 1 Tablespoon plant milk (soy was what I had in the refrigerator today), 

and a dash of salt.  

Mixed it well then placed in a ramekin, smoothed the top, and microwaved for 2 minutes. After pulling out of the microwave I let it cool for 5 minutes, then slice, covered with jam, and served Dear One.  Then repeated the process for myself. I thought they were pretty darn tasty and next to no work,  Of course, now I need to go to the thrift store to find another ramekin so I can make two at a time...


This is the one ramekin we have in the house...

Just now I asked Dear One his opinion.  He said, "Soggy." I told him that was the wrong answer!!  Next time I will toast them in the air fryer.  Having said this, I do think this is a pretty tasty way to get our oatmeal inside our bodies...


Monday, January 17, 2022

Munchie Monday: Three Ingredient Flat Bread!

 Today I saw a video that showed how to make a "quick and easy" flat bread.  I was thinking burrito in a big way and since we had the ingredients, plus some leftover refried beans in the refrigerator, I decided to make this flat bread.

Well...this did not turn out the way I was expecting!

The person in the video used whole wheat flour but said you could use any kind of flour you have on hand, including almond flour.  Since I did not have any whole wheat flour ground up and we DID have two bags of almond flour for some reason, I used almond flour in place of the whole wheat flour. I do not recommend it.

The recipe I made was:

1 cup almond flour
1 cup warm cooked and mashed sweet potato
1/4 teaspoon salt

Mix all together.  It will  be somewhat sticky.

When I started mixing the dough I put the cast iron skillet over a medium flame to heat.  Using extra almond flour on the counter I rolled out the flat bread then plopped it into the hot skillet.  The girl on the video said to cook two minutes then flip and cook two more minutes.

This is the first two flat breads! It looked burned but did not taste burned.


This is not what I was thinking we were going to get!  I did eat a few of the crumbs and they tasted really good, so I tried again.

This time I got out our cast iron tortilla press:

To be successful making tortillas in this press you need to split open a gallon-sized Ziplock bag to line the press.  Put in a ball of the dough between the Ziplock "sheets", close the lid, and give it a press.  Take out the flat bread/tortilla and slap it on the griddle.

This did not work the first time because the dough ball was too small.  The tortilla was so thin I could not get it off the plastic so back to the drawing board.  The second time I ALSO put flour on the bottom of the plastic.  That worked better but the final flat bread I put more almond flour on the plastic then even  MORE almond flour on top of the dough ball before pressing. This worked out better.


This is how the "burrito" turned out!  More like a burrito plate!  AND we needed a fork to eat it because the flat bread was so tender.  It tasted great!  To me.  Dear One said he would prefer not to have so many "interesting" meals, just plain old store-bought tortillas.  Now, this is disappointing, but since I love him, I will honor his request. To some extent, at least!

 This does not mean I will stop trying. I will just make regular flour tortillas which I make and cannot keep ahead of his eating of the hot off the griddle tortillas!  I can make the interesting ones for myself and let him try them if he chooses...

Thursday, December 9, 2021

Quick and Easy Tree Ornament, Sewing Project

 The other day I found a red and black plain metal tin that I immediately loved and thought I would fill with chocolates and give in the big Christmas stocking I knit on the knitting machine.  I was in Hobby Lobby at the moment and was passing by the fabric area.  THERE WAS THE SAME FABRIC!  So I had to buy it to make a stocking ornament.

After exploring YouTube a bit I found orangebettie.com who had a very easy pattern for a lined stocking ornament.


This is the ornament.  It probably took 30 minutes from start to finish.  If I wanted to make more I could do assembly-line and get lots more made in a short time.  If I wanted it to be perfect, I could press it at various junctures, but chose not to get up from the sewing machine.

This makes me happy, even though it is not perfect.  And I did not hand stitch closed the  few stitches needed in the white fluff.  Oh well.

Tuesday, November 9, 2021

Quick Knit Simple Pocket Doll

 Many years ago I had the blessing of knitting a few pocket dolls for a charity near home in Vermont.   Recently I met a darling little boy who was nearing his first birthday. I wanted to make him something and the pocket doll came to mind.

The actual pattern can be found on Knitting4Peace.org.

This is the one I made: (you cannot see this really but the hair is gray in case he was missing his grandpa...)

In general these are the instructions:

Cast on 32 stitches on US 4 double pointed needles.

Knit 4 rounds in shoe color.

Change to pants color and knit 12 rounds.

Change to belt color and knit 1 round.

Change to shirt color and knit 12 rounds.

Change to face color and knit 10 rounds.

Change to hair color and knit 4 rounds  then start the decrease rounds starting with K4, K2tog around.

Every other round at this point is plain knitting then K3, K2tog; K2, K2tog, K1;  K2tog. 

The final round is a plain knitting round and you will have 12 stitches.

Now comes the part where you should go look at the real pattern for the finishing work!

The yarn I used for this doll was worsted weight cotton yarn since it needed to be able to be thrown into the washing machine regularly.

The doll, including finding the yarn, and all finishing work took about 2 hours.  No.  Less than two hours.  My plan is to make a few more and send them to Knitting4Peace as a thank you for the pattern.

Have fun with this.  K4P has many other patterns as well...something for everyone who wants to contribute

Monday, August 30, 2021

Munchie Monday: Quick and Easy Chicken Soup

 Late this afternoon I learned that I friend was sick.  I had the impression I should make some chicken soup but it was so late in the day I decided to get a rotisserie chicken to make it.  This is what I did:

Quick and Easy (and delicious!) Chicken Soup

In the 8-quart Instant Pot I put 2 quarts of homemade vegetable broth along with
3 bay leaves
1/4 cup dried onion flakes
1 Tablespoon rubbed sage
Heaping spoon (probably a little more than a tablespoon if I had measured it) Better Than Bouillon Roasted Vegetable paste
1-plus teaspoon granulated garlic
1/2 teaspoon crushed rosemary
1/2 teaspoon ground thyme

I set these ingredients going on the Sauté feature and headed to Food Lion where I was in hopes of finding a rotisserie chicken still available.


(To facilitate stability as well as keep my hands off shopping carts, I use this stroller with a flat-bottomed reusable grocery bag to do the shopping.  This helps in several ways, including but not limited to, not buying a million extra ingredients because they won't fit into the bag!  It IS possible to put enough heavy stuff in the bag so that it is rugged to carry, but that is what makes the stroller such a help!  On this trip I only got the rotisserie chicken, a big bag of baby carrots, and some cans of tomatoes and also pineapple tidbits for another meal. I was in and out of the store in ten minutes and back at that house before the 30-minute Sauté feature was complete!)

There was a beautiful rotisserie chicken, in fact several to choose from.

1 Rotisserie chicken, skin removed and meat removed from bones and chopped fairly fine.  (Not the skin just the meat!). There was a LOT of meat so I did not use it all. To my view, the broth is the best part of any soup, especially chicken soup.

Put the bones in a strainer basket that fits into the Instant Pot.

Put the meat in the broth that had been simmering while I was away then  chopped up very finely two handfuls of baby carrots in the Ninja Express and put them in the IP on top of the meat.


Found an almost empty bag of whole kernel corn in the freezer and added it to the pot with the meat, etc. then put the basket of chicken bones on top.  It fit perfectly into the pot on top of the other ingredients.  The bones were not covered with broth so I put in 3 cups of water so they were submerged.

Since everything was already cooked except the carrots I set the pot on HIGH pressure for only 20 minutes and began cleaning up the kitchen then watched part of a YouTube video on a knitting concern I had.

When the timer went off I reduced heat manually with the little red steam escape valve which pushes the steam out to the side instead of straight up at the ceiling.  I tasted the hot broth.  It was SO GOOD.  At least to me.  At that point I put in perhaps a cup of leftover macaroni and cheese Dear One had had for his supper since I felt there needed to be some sort of starch in the soup.

After putting it into a jar I headed out to deliver it as quickly as possible as it was already after 7:00 PM and I wanted to be home before dark.  Not a fan of driving at night.

It made me happy to make this soup and give it to our friend.  I hope it was a blessing to the family.


Friday, March 19, 2021

Food Friday: First Time Trying Arepas!

 When our daughter returned from her mission in Venezuela she brought home a number of recipes.  I remember one of them was Arepas.  I totally forgot about them for years BUT this week I was watching Kim Campbell on Plant Pure TV on YouTube.  She made arepas!  They popped back into my mind immediately.  Since they are made of cooked corn flour, I thought they might be better for us.  So I tried them.

You need to use arepa flour. I found Pan flour in the Hispanic section at Food Lion.  This is a finer grind of flour than the Maseca Flour or Masa Harina flour that you use for making tortillas.

What I did:

Heated up 2 cups water so it was quite warm but not hot since I needed to put my hands in the bowl.

With the water in the bowl I should have added a teaspoon of salt but failed to do so. Then I sort of sifted in the Pan a little at a time and stirred with my fingers to keep the lumps to a minimum.  Eventually all the Pan was added and I more or less kneaded the dough into a smooth ball.  Sort of like Play Doh.

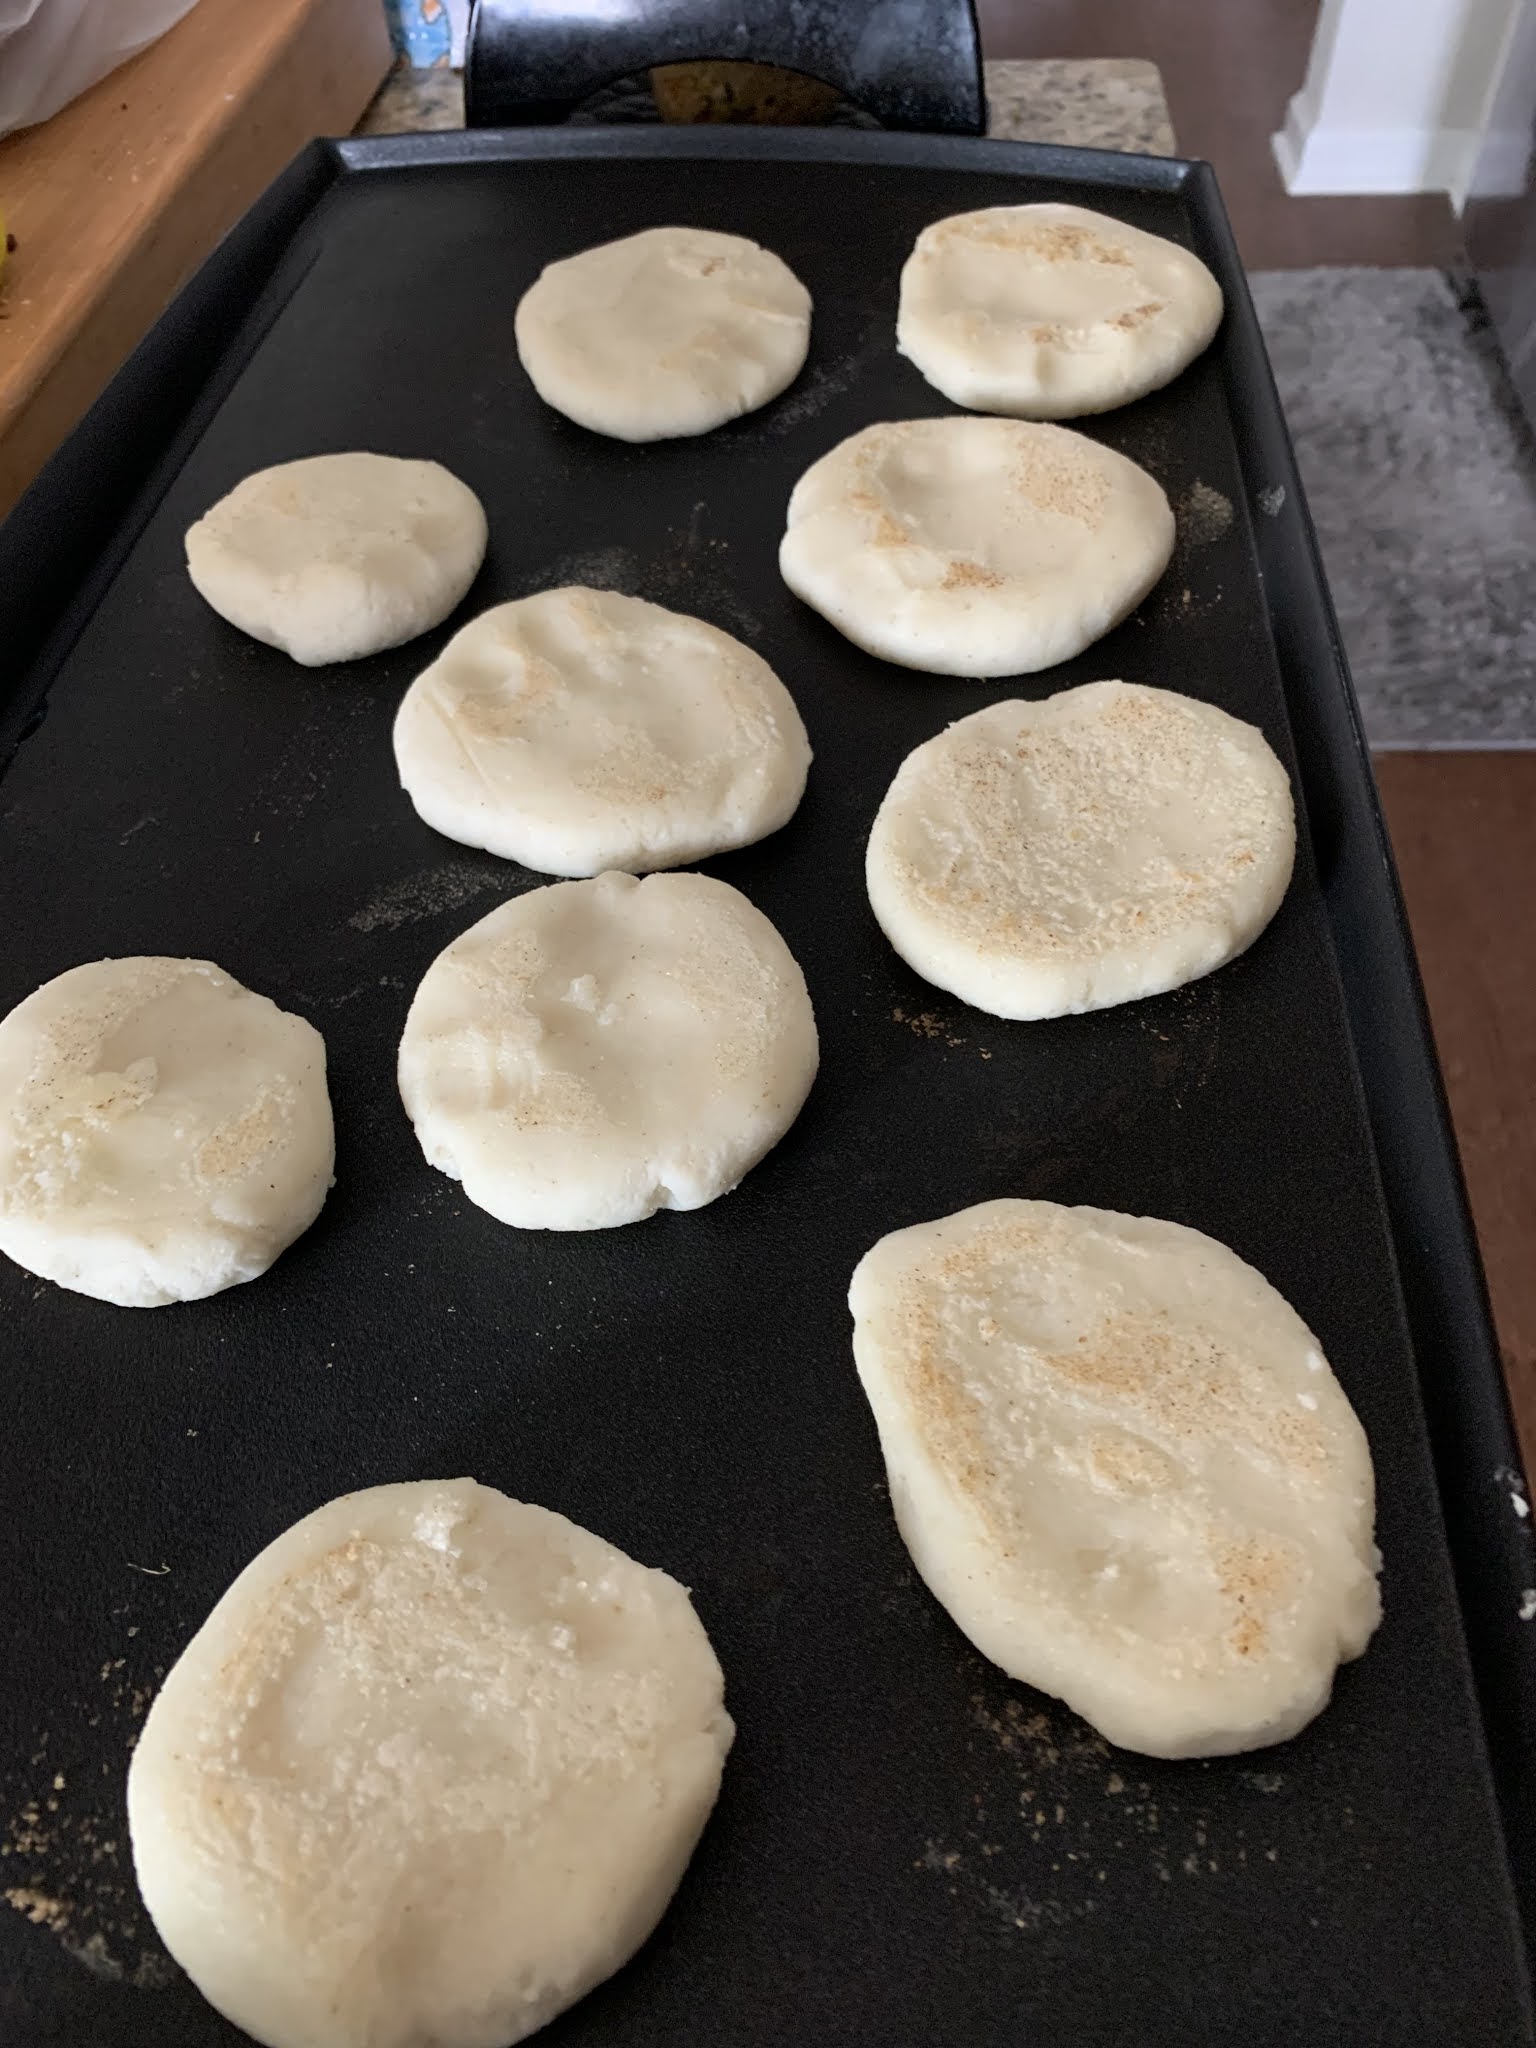
At this point, because I was anxious to get rolling, I divided the dough into balls, pressed them into about 1/2 inch thick rounds then placed them on a 350 degrees F. electric griddle that my sister kindly gave me last year.  (I LOVE that griddle.). I understand you can cover the bowl with plastic and let the Pan absorb more of the water.  I did not wait for that.

Let the arepas cook for about 5 minutes then flip them over for another five minutes.  Put them into a 350 degree F. preheated oven for about 15 minutes so the inside will cook a little more and they puff ever so slightly.

When they are cool enough to hold, using a knife, put a slit in them and fill with whatever you like, I put beans and rice in the first one.  The second one I put in strawberry jam.  They were both good.


This a picture of one of the arepas with beans and rice inside...

Dear One said they were too bland.  My fault for failing to put in salt. He did not try one with a filling.  They look a lot like English muffins.  I think that put him off.  He LOVES English muffins!   Oh well.  More for me.  I did confer with Dear Daughter and learned that indeed a little salt is VERY beneficial when making arepas.  She made of bunch of them, too!

And it does seem to help the blood sugar, I am happy to report.  Even with the jam.  Of course, I did not eat a dozen of them...


Friday, February 5, 2021

Food Friday: Boring Quick and EASY Breakfast

 Today was more oatmeal.  

1/3 cup dry old-fashioned oatmeal
1/2 cup seedless grapes, chopped very fine (in Ninja Express)
1/4 cup blueberries
1 heaping teaspoon Inulin (a pre-biotic that is very low glycemic and quite sweet, if you like that kind of thing...Dear One does)


Mix all these together, except the Inulin which you sprinkle on top.  Dear One pours milk over the cereal. I eat it dry.  It is not that dry since the grapes are pretty well ground up!

Yummy.  Good for you. Quick and easy.

Monday, December 21, 2020

Munchie Monday: Last Minute Holiday Treat-Sweet!

 We love the Chex Mix we have for Christmas every year.  Another favorite is "People Chow".  I am told it resembles Puppy Chow. (It is so long ago that we had a puppy that I don't remember...almost 48 years! This puppy, Abinadi, was a wedding gift from my father, but by the end of that summer that dear little dog of my heart was run over.  Never had another.  We moved on to cats...) This recipe is quick and easy to make and tastes okay.

People Chow

6 Cups Crispix dry cereal (or better yet: Cheerios)
1/2 stick (1/4 cup) butter
1/2 cup creamy peanut butter
6 ounces chocolate chips (about 1 cup, but weigh to make sure...)
2 cups confectioner's (powdered) sugar

In a medium-sized saucepan over low heat, melt the butter, peanut butter, and chocolates, stirring constantly, until the chocolate is all melted and smooth. If you absolutely cannot wait as long as it takes to melt the chocolate safely on low heat, turn the heat up to medium but DO NOT leave the stove and stirring.  Be ready to yank the pan off the stove at a moment's notice when you think it might be starting to burn. It is better to have the melted chocolate be a little chunky/unmelted than to let it burn. I know.

In a large bowl place the cereal.  Pour the chocolate mixture over the cereal and stir until all the cereal is well coated.

In a 2 gallon plastic zipper bag, or even a brown grocery bag, pour the confectioner's sugar.  Dump in the coated cereal, close the top, then shake until all the sugar is covering the outside of the chocolate-covered cereal pieces.  Pour into a large pan to let dry.  

Store in a closed container.


This is likely to be a hit at parties.  It certainly is a hit among the small fry.

Monday, July 13, 2020

Munchie Monday: Quick and Easy Pickles

Robbie from Robbie and Gary Gardening on YouTube made some zucchini pickles the other day.

She took some fresh dill and placed it in the bottom of a clean pickle jar then inserted some spears of zucchini to fill the jar.  Next she poured in bottled water to fill the jar.

When the water covered the spears of zucchini, she poured the water out into a bowl and added salt and stirred until it was dissolved.  She then poured the water back into the jar and placed the lid lightly over the top and put the jar into a container so in case there was bubbling up, the bubbles would be contained.  In two days she had pickles which she then put in the refrigerator to enjoy at her leisure.

Well, that seemed like a good idea to me.

The only problem we had was that we only had dried dill weed in the house and no convenient access to fresh dill so I soldiered on with the dried dill.

These are the two jars of pickles as we started them.  We are hoping for the best. In addition to the dill weed, I put garlic cloves in the jars. Well, I am hoping for the best.  Dear One likes sweet pickles.  Maybe we will try them sometime.

Today I checked the jars of our pickles and find that they have begun bubbling.  I had planned to leave them there on the shelf and check them on the third day, so I will wait one more day then try a bite!

Friday, May 8, 2020

Food Friday: Quick and Easy Instant Pot Spanish Rice

Dear One has been asking for Spanish Rice.  I happened onto a recipe that used the Instant Pot.  I am all for Instant Pot, so I gave it a try.  The following is my take on the dish.  Below you will see even more changes than what I noted in the recipe!

Instant Pot Spanish Rice

2 cups long grain brown rice, uncooked
1 1/2 cups vegetable broth or water
2 teaspoons Better Than Bouillon
1 15-ounce can diced tomatoes with juice
1/2 finely diced red peppers
1 teaspoon granulated garlic
1 teaspoon granulated onion
1 cup chopped cilantro

Put everything in the Instant Pot.  Stir well.  Cook on HIGH pressure for 25 minutes then let release pressure NATURALLY.

Quick and easy to put together.  No muss, no fuss about timing as long as you set to HIGH pressure.  When it is done releasing pressure it is ready to eat.

Leftover Spanish Rice in a pint widemouth mason jar.  I prefer glass for storing food.  Works great and preserves better than plastic containers.


It was really okay but Dear One felt it was lacking flavor though it was really quite edible as is.  He just thought we could do better.  I probably won't put in the 1 cup of cilantro next time, either, since I did not enjoy that particular flavor as much as I thought I would.

NEXT TIME:  We will put in 1-2 teaspoons chili powder, 1 teaspoon ground cumin, and one onion finely diced (Dear One does NOT like to bite into a cooked onion.  Or a raw one, for that matter.  He does not get all huffy about it, but he does not enjoy them, so why not just chop them finely in that fabulous little Ninja Express chopped my sister gave me?  It works so great.) since onions add a lot of great flavor.  The granulated onion is better than nothing, but does not give a real big pop of flavor.

There will be a next time, maybe even over the weekend.

Monday, March 23, 2020

Munchie Monday: Quick and Easy "Ann's Breakfast" Oats

Not too long ago I think I mentioned this breakfast but here is a photo.  Probably I told you that I learned of it in Jane and Ann Essetstyn's YouTube channel one day but these oats are not in this particular oat video.  Another one of their oat YouTube videos is fabulous with Essy teaching us the value of oatmeal.  Oats are really important to our health.  I eat them most mornings.  I am thinking of eating them for supper, too, especially on days when I am worn to a frazzle.  So quick and easy.


Quick and Easy Oatmeal

This is 1/4 cup dry old-fashioned rolled oats, 1 Tablespoon ground flax seed, 2-3 Tablespoons Grapenuts, and sliced grapes.  Probably 10-15 grapes.  That was a lot of grapes.  Plus a few blueberries.  Next time I will put in fewer grapes.

After stirring this up in great shape, I took a bite.  It was really good.  Not at all objectionable.  Dear One still likes almond milk on his rolled oats.  He does not eat the rolled oats dry!  It took about two bites to get used to the "dry" oatmeal.  So good.  I bet it would be even better if I added ground cinnamon...!

Friday, March 20, 2020

Food Friday: Air Fryer Roasted Cauliflower (Quick and Easy)

Today I found some cauliflower that was on the "past due date" rack at Piggly Wiggly.  I brought home three packages.  Most of it I put in the Instant Pot (which turned out to be a mistake because I went back to a knitting project and did not quick release the pressure as I needed to. That cauliflower was total mush, so I turned it into mashed cauliflower!  Can't waste.) and the rest I decided to roast in the air fryer.

To air fry cauliflower, break it up into small florets in a large bowl.  Sprinkle a small amount of Braggs Liquid Aminos and about a teaspoon of granulated garlic over the top.  Toss well then put in a pan in the air fryer.  We have the Ninja Foodie Air Fryer Oven so we just used the tray that comes with it.  I set it cooking on the Air Roast at 400 degrees F. for 15 minutes.  It worked great.  Other air fryers need experimentation to figure the timing.


This is what it looked like.  It was so good.  Dear One did not get a chance at it, though!  Using only the Braggs and the garlic was a risk but it panned out wonderfully well.  No oil.  No added salt,  there is naturally occurring sodium in it.  I don't really know that that means but I do know that some plants have sodium in them.  Like celery does not really need salt on it as it seems salty already.

Monday, March 9, 2020

Munchie Monday: Quick and Easy Vegan Mayonnaise

Years ago I tried some vegan mayonnaise at great expense.  I was revolted and threw it away, not something that I have done more than three or four times in my entire life!  I love mayonnaise.  Well, I don't LOVE mayonnaise, I just like the things that are made with mayonnaise.  Mostly.

In thinking back, I first became enamored of mayonnaise when I was in high school and went to babysit the children of one of my heroes. I did not know his wife much BUT before they left she gave me carte blanche with their refrigerator and cupboards.  The kids were already asleep and I had a book ready to dig into.  I happened to find a big bag of luscious salty Wise potato chips.  I had just heard about "dip" (you need to realize we lived in the sticks of Vermont where trendy just did not exist at that time.  I had not yet even had pizza, if you can believe that!) and found a bottle of mayonnaise in the refrigerator which looked more or less like the dips I had seen at a function.  I dipped in.  It was love at first sight.  How very, very sad.  That took me firmly onto the road to poor health that I am trying to get off now.

Having said the above...(and hypocrite that I am) when I saw a recipe for vegan mayonnaise that only used a bowl, six ingredients, and an immersion blender, I really just had to try it. It was SUCCESS!!!


This vegan mayonnaise was very quick...maybe a minute, maybe a little more...and it turned out very good with the one exception I will tell you.

This recipe started at LovingItVegan.com.  I just went there to grab the URL and almost totally got deflected from this blog post!!  The first thing I saw was a recipe for vegan peppermint patties. Next was moist cornbread and chocolate mousse and, and, and...Well, you get the point. I yanked myself away to write this post, but you might want to go see Alison's work!  I know I will go back there.  I mean "Shamrock Shake" and "Vegan Crepes"?  What is not to like?!!

Vegan Mayo the way I made it: (note-ALL ingredients need to be at room temperature!  Don't fail on this warning.)

1 cup vegetable oil
1 Tablespoon olive oil
1/2 cup unsweetened soy milk
1/2 teaspoon salt
2 teaspoons white wine vinegar
1 teaspoon maple syrup

Put all these ingredients in a medium bowl (I used my Pyrex 4-cup measuring bowl) and blend with your immersion blender until thick and ready to go.  Really, it does only take a minute or so.  All other mayonnaise recipes I have ever used called for dripping in the oil one drop at a time so the mayonnaise would not "break" when added to the egg.

This worked so well.  The original recipe called for 1 Tablespoon maple syrup.  That was WAY too much for my taste even though I do love maple syrup.  After all, I am from Vermont, the home of the best maple syrup!!  At least, my father used to make many gallons of that liquid gold every late winter/early spring which we used liberally on our Sunday morning pancakes my whole growing up years.  Our son now makes maple syrup on a different scale.

May I say that I will probably not use any maple syrup in the mayonnaise the next time I make it.  I do not see the need for sweetness in everything...except in communication with family and friends! 

This recipe is one of those "try it, you will like it" sort of recipes.  The only caveat is that if you were thinking that this mayonnaise was going to be good for you, disappointment will set in almost immediately when you realize that mayonnaise is oil.  Any other white guck you make without oil is not mayonnaise, does not taste like mayonnaise, and is really an abomination.  The only way to make this, or any, mayonnaise healthy is to rarely eat it.  Because I liked this so much, I realize it will not be something I will make again until we are having a function that requires mayonnaise on it.

Having said this last...this is so worth it!

Friday, February 28, 2020

Food Friday: Quick and Easy Delicious Natural Peanut Butter

Many times since we got the VitaMix I have seen videos on making peanut butter, almond butter, and cashew butter.  Today I saw another peanut butter video and the stars aligned!  (I needed a large container to put some fresh granola into and the peanut container seemed a good size and was almost empty.)   The alignment included going to the store to find another similar container of dry roasted peanuts.  I could not find any what were unsalted so I took what I could get.  After making the peanut butter we have two empty containers which is what I needed for the granola!

To make peanut butter, you need either a high speed blender or a food processor. I used the blender so I cannot tell you about making peanut butter in the food processor.

Place 4 cups dry roasted peanuts and 3 or so deglet noor dates in the blender jar.  (If you want a sweeter peanut butter you can add more dates.  As it happens, 3 of these small dates did not really make any sweetness that I could discern.  No problem. I am not really a sweets person.  Not that I won't eat a nice thick rich brownie if it falls onto my plate, but...I am more of a savory, salty person.  In several ways.  Don't ask.)

Start the blender at 1 and move up to 10 quickly.  You will need to use your tamper to push the peanuts down into the blades.  It takes just about 2 minutes to grind up the peanut butter.  In the VitaMix you feel like you are killing the machine but it really is just smiling there at you when the peanut butter is done.


Here is the creamy delicious peanut butter.  Dear One was not instantly enamored of the idea of homemade peanut butter, but when he had a taste he immediately made himself a peanut butter sandwich. I call that success!

Friday, February 7, 2020

Food Friday: Quick and Easy Breakfast

This really is a quick and easy breakfast.  It may seem slightly weird at first but it takes perhaps two days to get into it.

Jane (and Ann) Esselstyn have a YouTube channel with many healthy plant-based recipes.  I really enjoy watching them prepare food that I am confident will help heal my wretched body.  Well, not wretched, really, but the body I have not taken good care of for almost 70 years.

They have had several videos on oatmeal.  We have made some of those recipes.  Now we just use this quick and easy variation on their recipe.


This is what I do, and Dear One buys into it, too! 

Out comes the bowl.  Into it goes a big handful of dry old-fashioned rolled oats.  Next a few shedded mini wheats (NOT the sugary ones for me.  I cannot saw the same for everyone in the family...!) and a big spoonful of Grapenuts.  One small banana is chopped, or half a large banana, and thrown on top with a big handful of fresh blueberries...or frozen ones if we have no fresh ones.  Pour on unsweetened plant milk, stir and eat.  This took perhaps five minutes to prepare.

Yesterday I remembered I wanted to put on some cinnamon and flax meal.  The flax meal was readily at hand but the cinnamon was not...SO I put in some quickly visible homemade pumpkin pie spice.  NOT A BRILLIANT IDEA!!!  It made it very difficult to eat this otherwise healthy quick and easy breakfast.  I did manage to choke it down, but never again!  I think it was the cloves that made it so difficult to eat.


Monday, February 3, 2020

Munchie Monday: Quick and Easy Hot Fudge Sauce

Homemade hot fudge sauce is so easy to make and tastes far better than any sauce you can buy at the store. In my opinion.

You need a double boiler to make this but you can figure out one by putting a large bowl on top of a pot of boiling water.

In the top of the double boiler place:

1/4 butter
4 ounces unsweetened chocolate

Stir until both are melted.  Add:
3/4 cup granulated sugar

Stir until the sugar is dissolved.  Remove from heat.

Add:
3/4 -1 cup heavy whipping cream
1-2 teaspoons vanilla extract
Dash of salt

Stir well then pour over ice cream or whatever else you want to douse with lovely hot fudge sauce.

If you do not use it all, place in a glass jar in the refrigerator then warm up when you want serve it again.  OR...just use a spoon and spoon it right into your mouth...!  It is that good.  In my opinion.