About The Country Wife Blog

Wednesday, August 31, 2016

Tip: How To Peel Hard-boiled Eggs

Probably everyone in the world knows how to peel hard-boiled eggs perfectly.  I did not know.  Today I tried something different. It worked!  Six hard-boiled eggs perfectly peeled.

Hard-boiled eggs, straight from the shells.  No Photoshopping!

This is what I did:

Boiled the eggs.  Ran cold water over them for about a minute so they were not too hot to hold.

(This is the tip.)Gently cracked the large end of the egg on the counter then carefully removed the shell rinsing in the cold water as I worked.  Every.Single.One.Was.Perfect!  It has never happened before. I always raunch up the eggs and lose half of the white.

Now if I can only remember the next time...

  I think I will hard-boil eggs every day for the next week  to prove that it really works AND that I can remember to do it!

Tuesday, August 30, 2016

Handwork: The Lace Doilie Pink and Green Quilt

Years ago I saw some wonderful crocheted doilies at a store near home.  Some were pinks.  Some were greens.  Some were ecru.  I thought they would make a nice accent to a quilt I wanted to make.

I found burgundy, pink and two green fabrics that went with the doilie colors.  Yay!

The outer (invisible) sashing is light green then dark green.


Taking a large square of each of the fabrics, close to ten inches across, I appliqued--by machine--the lace onto the squares then cut the fabric/lace across in both directions.  I then set them together with smaller squares of fabrics.  Sashing around the central medallion then another round of the leftover lace/fabric squares made a nice quilt.  There were thick sashings around the outside so the quilt became 120 by 120 inches. 

Detail on the lace doilie applique.


Finally we have a king-sized bed and can use it without tripping over the overhang!

Monday, August 29, 2016

Munchie Monday: Another Food Failure

Friends gave us some zucchini and yellow summer squash.  I thought I would try again to make zucchini chips.  Well, it was failure number two with the zucchini chips.

What I did:

The last time I made them they turned out pretty salty.  I thought this time I thought I would use soy sauce instead of salt...flavor and a little saltiness.  I also used some olive oil and some granulated garlic.

There was enough for two  half-sheet pans...actually, three but I only had two, so that is what I used.  One was lined with aluminum foil.  The other one had a Silpat liner.  I put them into a 350 degree F. oven for 30 minutes.  No where near ready so I put them in for another 30 minutes.  Still not ready.  Since I had to go out, I turned the oven down to 225 degrees F and left for an hour.

After all this time,  a tiny portion of the two sheets were crispy.  The rest were not even close.  Adding liquid to the mix was a bad idea!  These taste okay, though.

Second Zucchini Chip Failure.


I may try one more time. After I get a second Silpat mat.  The chips that were on the aluminum foil stuck terribly.  The Silpat mat released them perfectly. 


Friday, August 26, 2016

Food Friday: Quick Easy Restaurant-like Salsa

Salsa goes well with many things besides corn chips.  Baked potatoes, scrambled eggs, stew, mashed potatoes, just about any casserole.

Here is a very quick and easy one.  The original recipe is here
The little tin with invisible label at the bottom of the photo is the tinned jalapenos.  It was Ortega brand, I am pretty sure.

What you need:

  • 1 can fire roasted tomatoes
  • 1 can Rotel tomatoes
  • 3 cloves garlic which you have peeled
  • 1 cup fresh washed cilantro (about ½ a bunch or less if you are not such a fan of cilantro)
  • 2 Tablespoons canned chopped jalapenos
  • 1 large white or yellow onion, chopped
  • 1 teaspoon cumin
  • 1 teaspoon salt
  • 1 teaspoon sugar
  • ¼ teaspoon pepper
  • 1 Tablespoon lime juice  (I used lemon juice but it was still good.  Don't forget the lime, though. )
  •  
  • Put all the ingredients in a food processor and pulse until you like the consistency.  I did it in a blender and had a more mushy consistency than I like but it still tasted very good.
This salsa is more of a mush.  Next time I will use the food processor instead of the blender. If you like chunky, this was a failure....


Thursday, August 25, 2016

Harvest 2016: Tomato Harvest is Coming In!

This year we planted mostly heirloom tomato plants:

Amish paste tomatoes--not sure if these are heirloom.  We planted four of these plants.
Brandywine
Ukrainian Purple
Mortgage Lifter
Black Krim

We planted one plant each of the Brandywine, Ukrainian Purple, Mortgage Lifter, and Black Krim.  They grew pretty well.  None of them had a lot of set fruit though we had quite a few blossoms.

We have started the harvest.

The Brandywine are the big red ones at the bottom.  Amish Paste are on top with the Krim and Purple filling in.  The Mortgage Lifter has already been consumed.  Only two set fruit there, to it would have had to have been a VERY SMALL mortgage...maybe a chicken house...?


The fruit all taste wonderful.  There is nothing like a warmed-by-the-sun tomato sliced, lightly salted on a piece of toasted whole wheat bread.  It is even better with a thin coating of mayonnaise on the toast under the tomato.  I could eat these for every meal.  What am I saying?  I DO eat these for every meal, especially breakfast.  Along with a few leaves of kale.  Yummy!

Sadly,  some tomato disease has gotten most of these plants.  I have not figured out what it is yet.  I know hybrid plants are bred not to have some of the diseases that heirloom plants can get.


Tuesday, August 23, 2016

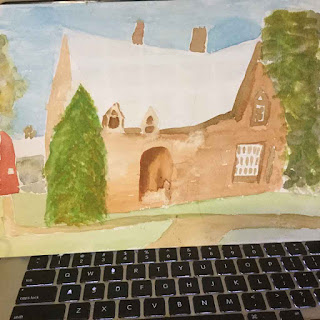
Watercolor Painting: The Morrill Homestead. Sort of.

The second painting I started at the Jennifer Brown class was a painting with more colors.  There was a puzzle on the wall of the Morrill Homestead.  I attempted that.

Not very successful, but still, you can tell it is a house with shrubbery around it, I think.  And outbuildings.

Same story on the keyboard: not part of the painting.  Sorry for the distraction.  Have not learned how to use Photoshop Elements yet.

Monday, August 22, 2016

Munchie Monday: An Almost Depraved Chocolate Treat!

We had a Church social over the weekend:  a barbecue which the men handled.  We were asked to bring a salad, side dish, or dessert.  I asked Dear One what we should make. He said, "The Usual".  Just to clarify/make sure communication was happening, I asked what the usual was.  He told me "the Chinese noodles".  Okay!  I could do that.

So I made Orchid's Cool Tangy Noodles.  A triple batch and put them in a nice big round see-through plastic bucket that whole almonds came in at the Coop store near here.  I put in more of the green rings from scallion tops than usual but people still ate up the noodles.  Especially the grandchildren!

Dessert was also on my menu. Potluck meals sometimes have too little of some foods so I always like to bring a savory AND a sweet.  I found a recipe for a great dessert.  If you worry about chocolate overload, don't make this.  If you worry about sweets addiction, don't make this.  If you worry about sugar destroying teeth, don't make this.

But if you want to make it anyway, this is what to do:

Make one batch of chocolate chip cookie dough.
Get one bag of Oreo cookies.  I used Double Stuffed Oreos.  Any family-sized bag will do.
Make one batch of brownie batter. I used Duncan Hines brownie mix...I think 18.2 ounce.  Homemade would work, too.  I was lazy.  Plus I like the way brownie mixes always turn out the same.
Get out a 9 by 13 pan.
Cut a large piece of aluminum foil to cover the bottom, sides, and enough go over the edges of the pan to use as a "lifter" for when the bars are cooked.

These two I saved at home in case there were no leftovers.  There were no leftovers!  The front bar is on its side so you can see the Oreo center.


1.  Put the foil in the pan.
2.  Spray with non-stick cooking spray then set oven pre-heating at 350 degrees F.
3.  Spread the chocolate chip cookie dough in the bottom of the pan.
4.  Lay out the Oreos next to each other to cover the entire top of the pan of cookie dough. (There were enough left over for Dear One to have a breakfast treat...!)
5.  Spread the brownie batter over the top, spreading to entirely cover the Oreos and underlying cookie dough.
6.  Cover with more foil.
7.  Bake at 350 degrees F. for 30 minutes.
8.  Remove foil from top of pan then return to oven and cook 30-40 more minutes.
9.  Remove from oven and let cool completely.  If you want nice looking bars, this will take about an hour.
10.  Lift the bars from the cooled pan of treats and cut into SMALL cubes.
11.  Enjoy one bar and drift off into chocolate oblivion.

Friday, August 19, 2016

Food Friday: Barbecue!

Another YouTuber I like is Jill McKeever who is a plant-based eater and cooker. She is a little kooky but just fabulous.  She mentioned Soy Curls.  I had never heard of them but went crazy and ordered some from Butler Foods immediately.  Soy curls are cooked soy beans that are mashed then extruded somehow then dried.  I would be interested in learning exactly how they do it, but I have a picture in my mind...

For supper tonight I followed, more or less, her recipe for Barbecued Soy Curls.


This is what I did.

One 8-ounce bag soy curls
2 Tablespoons tamari
2 Tablespoons liquid smoke
2 cups water, more may be needed

Put the tamari, liquid smoke, and 2 cups water in a medium-sized bowl.  Stirred well then added the soy curls.  Since the soy curls were not totally covered, I added another half cup of water.  Let set aside for 10 minutes or until done getting the rest of the ingredients ready, whichever takes longer.

In another medium-sized bowl place:

2 cups catsup
3 Tablespoons chopped garlic
1 chopped onion--I used yellow onion this time.
1 Tablespoon oregano
2 Tablespoons molasses
1 Tablespoon liquid smoke
1/2 teaspoon ground dry mustard
1 teaspoon Kosher salt

Mix all these ingredients well.  Taste.  If it needs more of anything, now would be the time to adjust seasonings.  This is barbecue sauce.

The chopped onion and garlic should probably be FINELY CHOPPED but they are also okay if you are in a hurry and only chop them up somewhat. If you don't like chunks of onion or garlic in your food, opt to give it some more time and finely chop them. 

After at least 10 minutes the soy curls will be re-hydrated.  Drain them in a strainer then add to the barbecue sauce bowl and gently stir until everything is coated well.

At this point I put the mixture into the stainless steel inner pot that goes with the new Instant Pot.  I turned the pot to Saute and stirred off and on until the mixture was hot, then cancelled the Saute function and turned it to Slow Cook, moving the temperature to High then decreased the timer to 1 hour, covered, set the cover to steaming, and let it go.

After the hour was up I removed the cover and stirred up the barbecue.  I warmed a flour tortilla and put one-quarter cup of this barbecued soy curls on it, rolled it up like a burrito, and was in heaven!  So great to have a bean meal that was satisfyingly chewy!

When Dear One came home from his hike (I might add here that he only went halfway up the mountain instead of his usual summitting.  It was way up in the 90's on the thermometer, and ALSO in the 90's humidity-wise.  I thought he showed remarkable sense in turning back before he had heat prostration.) this barbecue lunch went down well. I will not say how many he ate but more than I at first served him!  That was good.

If you do not have an Instant Pot, I believe you could put these soy curls and their sauce in a casserole and bake it for an hour on 300 degrees F.  Maybe check it after thirty minutes to be sure nothing untoward is happening.


Thursday, August 18, 2016

Some Garden Harvested: Zucchini Chips

What a lovely thing to find a zucchini ready to harvest!  I brought it into the house two days ago, intending to make it into spiralized zoodles with some sort of sauce.  That did not happen the first day nor the second day.  Now something had to be done or the zuke would begin to lose integrity.

Out of the blue there was a recipe for zucchini chips in my email.  I have lost it so I cannot give credit but this is what I did which is not exactly what the original called for.

I washed the zucchini then cut a bit off both ends.  I then sliced it up.  Sadly, my slices were rather uneven. I do remember that the original cook used a mandolin.  I do not have such a thing so the knife was my tool of choice.

After slicing them, I put about half a tablespoon of olive oil on a sheet pan then laid the zucchini circles very close to each other, touching, actually but not overlapping.  I then brushed then with another half tablespoon of olive oil, sprinkled on a very little bit of coarse kosher salt, granulated garlic, and black pepper.  I actually hit it rather hard with the black pepper.  That was not the best idea I ever had.

The one zucchini made two sheet pans of chips-to-be.  I put them into a pre-heated 225 degree F. oven and let them crisp up for 2 1/2 hours.  The original recipe said 2 hours, I am pretty sure.  I went off up to the work room and left the guys to dry out/cook/roast.  After a while I went to where Dear One was watching NetFlix and asked if he had heard the timer beep.  He said he doesn't hear it when he is in the room next to it, so he certainly had not heard it two rooms away.  As I went down the stairs I could hear it ringing.  SO...it had been AT LEAST 2 1/2 hours!

You can see that the thin inner part of the chips stuck to the pan.  Oh well.


This was not one of my more successful baking projects.  The thinnest ones had sort of laminated themselves to the pan.  The thicker ones were intact when I picked them off the pan.  They all did taste rather good but really, they were overcooked.  I think I will try this again if I get more zucchini.  The original called for a Silpat mat or parchment paper.  I do have a Silpat, but did not get it out.  I think I will next time.  Even the thin chips should not stick to that.

Wednesday, August 17, 2016

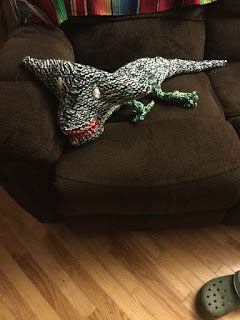
Handwork: B's Knitted Dinosaur

Two weeks ago I spent a lovely two days with the local grandchildren.  B, the youngest, asked me if I had brought my knitting.  I had because I was expecting to help 9-year-old C with his hat knitting project.  B then asked if I would make him a dinosaur.  Well, how could I refuse that sweet request that was accompanied with a very merry smile?!

So, we made a trip to see Grandpa, and I picked up some yarn that could be used for a dinosaur.  I had found a pattern on Ravelry and was pretty sure I could accomplish it.  The pattern was for a Diplocaulus,  not a dinosaur I had ever encountered before, but what the heck!  I could give it a try.

Because this looked like a smallish creature I decided to use a double strand of worsted weight yarn (I have a LOT of that weight and am trying to use it up...) and some size 11 needles.

Diplo lying across the couch cushion.  He is a big guy.  Almost as long as B is tall.
It was a fun project.  I brought the finished 'saur to B at Church.  He dropped what he was doing and gave me the most glorious huge happy smile and reached for the Diplo. I am so happy I did it.  An elderly lady friend saw it and asked if I could make HER one!  Isn't that the nicest thing!

A few minutes later I had returned to the front of the chapel to prepare for teaching Sunday school.  B came up, put his arms around me and gave me the sweetest kiss.  What a lovely little boy.  Even if his mom reminded him to do it, though he might have come on his own hook.


Feet and body detail.  Of course the short front legs are an error but I did not feel like trying again...

Tuesday, August 16, 2016

Watercolor Painting: Purple Mountains

Several weeks ago Dear One asked if I had seen the watercolor painting class advertised on the Listserve.  With his encouragement (he sent me the description) I registered for the class, a two-hour class with artist Jennifer Brown.  Last week was the class.

Jennifer is a very positive teacher. She was encouraging to all of us, starting us off with some brushwork studies then a couple of other exercises then asked us to start a painting.  She  had told us that we need to be very aware of values, perhaps more aware of values than of colors.  She showed us some famous paintings that gave us the idea.  Some of those old guys have a reverse-L of dark value then some light and medium values then back to dark values.

This is my first effort.  It is also a sample of going too far, or rather, not letting well enough alone!

Try to disregard the computer keyboard in the foreground. That is NOT part of the painting!!!

Monday, August 15, 2016

Munchie Monday: COLLARD Chips! Yes, Collard Chips...

We all love kale chips, right?!  Well, I do, though I realized recently that what I like most, besides the crunchy, and sometimes chewy-ness, is getting the salt fix.  I have also recently found that the salt is not doing happy things for my health so I wanted to try something new.  This is it!

Collar Chips!


One bunch collards
1 Tablespoon olive oil
1 teaspoon Montreal Steak Seasoning...or just salt, pepper, and granulated garlic to taste.

Preheat oven to 350 degrees F.

Wash and pat dry the collards.  Tear the leaves off the stems into large-ish bite-sized pieces.  Place on a half sheet pan and drizzle the 1 Tablespoon of olive oil over them.  With very clean hand, massage the oil onto the collard pieces until they all have a sheen of oil on them.

Sprinkle the one teaspoon Montreal Steak Seasoning all over the top of the greens.  It helps if you had already measured out the seasoning...especially if you did not wash your hands after massaging the collards,  something I don't really advocate.

Massage the salty mixture into the collards then place sheet pan in the pre-heated oven.  Let bake for 10 minutes then pull out and turn the pieces of collards over.  Set timer for another 3 minutes and check again.  Pull out the pan and flip again.  I ended up cooking them for 19 minutes total.  After the 13 minutes a few of the smaller leaves were crispy and ready to remove, which I did.  After each 3 minutes I pulled out more chips.

These were really good...even with way less salt than I usually use.

The only glitch is that I left them on a cooling plate, helping myself several times during the day, BUT it was TERRIBLY HOT AND HUMID weather so by the time night came, these were not crispy anymore.  They were chewy.  Well, I like chewy, too, so there was no problem for me.  That may vary for you...


Friday, August 12, 2016

Dr. Michael Greger of nutritionfacts.org and author of How Not To Die published in 2015, says that eating one cup of legumes per day will lower heart rate and blood sugar levels.  I am taking him at his word.  We are eating legumes daily.  I love them.  Some of the burger recipes I have made have been less than scrumptious.  This one is pretty good!

Barbecued Black-eyed Pea Burgers

1 can cooked black-eyed peas, drained (or 1 3/4 cups cooked)
1 medium yellow onion, diced
4 cloves garlic, minced
1/4 cup organic barbecue sauce
2 tablespoons coconut aminos, soy sauce, or tamari
1 tablespoon vegan Worcestershire sauce
1/2 teaspoon thyme
1/2 teaspoon smoked paprika
1/2 teaspoon oregano
1/4 teaspoon onion powder
1 1/4 to 1 1/2 cups rolled oats, panko, or dried bread crumbs
  1. Put all ingredients except the oats (or bread crumbs) in the food processor. Pulse a few times, just enough to break up the peas a little but not puree them. Stir in 1 cup of the oats. Check the consistency. It should be moist but not wet. Add more oats to achieve the right consistency.
  2. Refrigerate for at least 15 minutes.
  3. Preheat oven to 375F. Line a baking sheet with a silicone baking mat or parchment paper. Form burger patties on the prepared surface using about 1/2 cup of mixture per burger. Bake for 25-35 minutes. Burgers will be hot throughout, but don’t let get too dry. Allow to cool for a few minutes on the baking sheet before serving.
Nutrition Information
Serving size: 1/6 of recipe Calories: 108 Fat: 2.7g Carbohydrates: 18.6g Sugar: 3.4g Sodium: 311.3mg Fiber: 2.2g Protein: 3.2g
 
Black bean burgers, portioned with a scoop.
What I actually did with this recipe:
 
We did not have any black-eyed peas in the house but we DID have some more black beans from the Instant Pot initiation experience.  I used two cups of those black beans.  We had one large red onion, so I chopped it up finely.  I used soy sauce, regular Worcestershire sauce, and old-fashioned rolled oats.  The barbecue sauce was Sweet Baby Ray's.
 
I did not put the mixture in the refrigerator for 15 minutes.  Not that I did not want to, I just failed to see that on the instructions.
 
Black bean burgers smushed by a clean wet hand and ready to cook.
As usual when measuring, I used my 1/2 cup portion scoop for these burgers.  The recipe made exactly 6 burgers.  Dear One ate one and thought they were all right.  I will make it again, though there is one more bean burger recipe I want to try first.  That one has jalapeno peppers in it.  We shall see.
 

Thursday, August 11, 2016

Putting Up the Basil Harvest

This year when BJ's had their three-pot special on basil at the store near us, I quickly purchased a set.  When I got home (and the garden prepared)  I patted the basil plants out of the pots one at a time.  Carefully separating the plants, I set them in the ground.  There were 18 plants!  I thought a lot of them would probably die.  But they did not!
Yes, I don't mind the small holes.  One thing I learned:basil is pretty fragile and turns black quickly if bruised. I don't think that affects the flavor...

Now we have basil to harvest.  And preserve!

Going to our faithful YouTube I found many many videos on taking care of basil.

This is what I did:

Washed out the sink in good shape.  Added 2-3 inches of cold water and a good-sized glug of white vinegar.  (A glug is a real measurement term.  Really.  In this case it is probably about one-quarter cup.)

Dropped in all of the basil I had cut and let is sit for 15 minutes.

Basil drying on the plate before microwaving.

Laid a towel on the counter and after shaking off as much water as possible, places the basil on the towel then blotted it off with another dry towel.

After letting the basil air dry for about 2 hours I placed a lot of leaves on a microwave-safe plate and microwaved for 2-2 1/2 minutes.  (I started out microwaving for 1 1/2 minutes but every time I needed to go to 2 1/2 minutes so I went up to 2 minutes, then checked.)

Basil after drying 2 1/2 minutes in the microwave ready to cover and put into the freezer.

When the time was up, the basil was nice and dry so I crumbled it up somewhat and put it in a freezer container. I will store it in the freezer.

Tuesday, August 9, 2016

Nifty DIY Watercolor Postcard Block!

I just love that Lindsay Weirich!  She is so creative.  She is so generous with her ideas.  She really helps me is so many of my crafty pursuits.

Today I will show you the nifty watercolor paper (postcard size) block she made a while ago.  Usually I take a piece of plexiglass and attach my postcard sized (actually one-quarter of a 9 by 12 sheet of 140-pound watercolor paper) watercolor paper with tacky tape/the blue painters' tape.  It works very well. It also gives you a nice white border around the painting...at least it does if you put the tape down very firmly so no paint can seep underneath. (Run your fingernail around the inside edge closest to where you will paint.  That should do the trick.  Just remember not to leave the tape on for very long after the painting dries....but DO leave it on until the painting dries.  If you leave it, or are not careful pulling up the tape, it can tear your paper.  Especially cheaper ones.  Ask me how I know...)

After painting a ghastly pond scene today I decided I had time to make the block of watercolor postcards so off I went to the workroom.  (This might be a good time to say that as this year is my year to get organized ---and it is more than half done.  The year, sadly NOT the organizing, I am sorry to say.  Anyway, I just now decided that I will get the workroom in order--where have you heard that one before?--and move ALL my crafty work to the workroom and leave the kitchen and dining room table area to be company ready.  Yep, that is the plan.  Can she do it?  Oh, I think she can.  Can she stick with it?  That is debatable....)
Block already glued.  You can see the bumpy hot glue.  That is no problem, just unsightly.

In the workroom I pulled out my old one-heat-level glue gun which was ready to go with a big fat long new glue stick protruding from the end.  I turned it on to let it heat up.  Now came the trick of finding where I put all the binder clips.  The first three places I looked did not have them BUT  in the third place I looked for the binder clips I DID find the hard rubber roller...what the heck is that thing called?--anyway the thing you use to roll paint over a gelatin sheet to then make prints for other projects.  Anyway, I have looked for that roller for weeks.  Now here it is. 

Having found that roller, I got out the homemade gelli sheet I made three months ago so I could make some prints. There, beside the gelli sheet, was a nice sturdy binder clip attached to the rolling rack where I have a lot of stored stuff!  Nice.  Now I am ready to roll with the postcard block AND the gelli prints!  Bonus!!  Wouldn't it be great to be organized so I could IMMEDIATELY find my stuff??  Yes, it would.

To make your block is a very simple thing:  hold your sheets of paper together with the binder clip--preferably at the top edge, making sure they are nicely aligned.  Run the hot glue all around the edges getting very good coverage.  If you have a third or fourth hand, one of them can spread the glue evenly along the edges.  If that is not your good fortune,  just do the best you can.  Do NOT put glue under the spot where the binder clip holds the paper together.  That is where you will insert your knife, or whatever, to remove a finished painting from the block. 

See where the binder clip held the paper together. There is no glue there.  This is where you will separate the sheets after finishing a painting.  It works great!

Simple. Quick. Easy. Done!


Monday, August 8, 2016

Munchie Monday: Rhubarb Dream Bars

The garden is doing well this year.  I kept the blossoms cut off the rhubarb so now in August we still have usable rhubarb.  I do think I will have to stop harvesting soon to give the plants time to regroup for winter, though.

This chopped rhubarb makes me happy.


Rhubarb Dream Bars

2 cups all-purpose flour
3/4 cup powdered sugar
1 cup butter
4 eggs
2 cups sugar
1/2 cup flour
1 1/2 teaspoons salt
4 cups rhubarb, finely chopped
Combine 2 cups flour, powdered sugar and butter.  Mix well and press into a greased 9″ x 13″ pan.  Bake at 350 degrees until golden brown, 10 to 15 minutes.

Beat eggs, sugar, 1/2 cup flour and salt until well blended.  Add rhubarb;  mix.  Spoon mixture onto baked crust.  Bake at 350 degrees for 45 minutes more.  Cool and cut into bars.

Crust ready to cook.
++++++++

The above recipe is where I started.  What I actually did:
I changed the butter to solid coconut oil to make the crust layer with the flour and powdered sugar.  I had some pastry flour which I wanted to use up, so I did.

Rhubarb topping ingredients mixed and ready to put onto cooked crust.


For the eggs, I used 1/4 cup ground flax seeds stirred into 3/4 cup cool water which I combined well and set aside.  For the sugar, I only used 1 1/2 cups of sugar since 2 cups seemed like a lot.


For the rest,  I followed the recipe until the bars had cooked for 45 minutes. I did not think they were done so I cooked them another 10 minutes.

Rhubarb Dream Bars, ready to cut and eat.


They taste rather nice.  I think Dear One will enjoy them. Son #4 thought they were very edible.

Friday, August 5, 2016

Food Friday: Spicy Thai Noodles

Looking for vegan meals one day I found this recipe:


This might serve 4 people.


12 to 14 ounces rice noodles (broken in half)
1 batch (about 2 cups) Spicy Thai Dressing (see below)
1½ cups mung bean sprouts
1½ cups shredded carrots
1 cup Napa cabbage, shredded
7 ounces baked seasoned tofu, thinly sliced (optional)

Cook the noodles, drain, and set aside.

Make the sauce.  

Gently mix together all the ingredients together in a large bowl.

Place the mung bean sprouts, carrots, cabbage and seasoned tofu, if using, in a bowl and mix together. Add the bowl of vegetables and tofu to the noodles and toss well to mix. Slowly add in the Spicy Thai Dressing to the mixture until you have the desired amount of dressing. Serve warm or at room temperature. Let each person add chopped cilantro for garnish, if desired.

Spicy Thai Dressing

½ cup lime juice
1 cup sweet chili sauce
¼ cup rice vinegar
2 tablespoons soy sauce
2 tablespoons cold water
½ bunch cilantro, thoroughly washed and drained  (wash it three or four times.  There is always more sand than you expect...)
1 large garlic clove
2-inch piece of ginger, peeled with a spoon (if that does not make sense, take a regular spoon and run the tip of it over the ginger.  It will easily remove the skin for those times you want no skin...)

Combine all of the ingredients in a blender or food processor and process until the ingredients are mixed well.


If you are not fond of cilantro, leave it out altogether or perhaps substitute parsley or basil. I did not realize that I did not care for cilantro that much until I made this sauce.  (I really do cilantro in homemade pico de gallo...) 

I did not have any rice noodles, bean sprouts, seasoned baked tofu, nor energy to shred the carrots and cabbage.  I just put some of the sauce over a bowl of sautéed zucchini noodles.  It was okay but would have been better without the cilantro.  In my opinion.  I did NOT try to inflict this upon Dear One.  I prefer to choose more important issues.....

Thursday, August 4, 2016

Gardening Brings Sweet Pickle Relish

When we came out of Church on Sunday there was a bag of cucumbers on the hood of our car!  That was a nice surprise.  There were enough that I could not eat them all before they became soft.  I found a recipe for Sweet Pickle Relish.

Today I went to our garden and picked the next few almost-ready-to-eat cucumbers and weighed the gift plus ours.  It was one ounce below the amount called for in the recipe.  That was good enough for me!  Onward and upward with the pickle relish!!!

This is the recipe:

3 pounds Pickling Cucumbers or 4 pounds of Large Cucumbers
1 Large Sweet Onion
¼ cup Pickling or Kosher Salt
3 cups White Vinegar
¾ cup Sugar
4 cloves Garlic, Minced
2 teaspoons Dill Seed
2 teaspoons Mustard Seed
2 teaspoons Celery Seed
½ teaspoon Turmeric

This is what I did:
Washed the cucumbers then sliced off both ends.  (I don't know which of the ends is bitter so I took some from both ends.)    
Cut the cucumbers in quarters lengthwise then scraped out all the seeds with a spoon and tossed the seeds into the compost bucket.

Cucumbers ready for the food processor.

Cut the cucumbers into 1-2-inch pieces and put into the food processor bowl.
Peeled and chopped the onion into similar sized pieces. (I had used up the sweet onion on a barbecued black bean burger for lunch so I had to use one medium and one small red onion.  We shall see if that was a good idea...)

Pulsed the food processor until the vegetables were the size I like relish to be...8-10 pulses.

Measured the chopped cucumbers and onions.  It was just about exactly 6 cups.  Placed them in a large stainless steel pot and added the salt.  Stirred well then covered and set aside with the timer running for two hours.

In the meantime into a small bowl I measured the sugar, dill SEED, not WEED, mustard seed, celery seed, and turmeric.  
Finished relish, still steaming in the pot.

OH RATS!!! I also used up the garlic on the barbecued black bean burgers!  Can you believe it!!  So I used one Tablespoon of granulated garlic.  We shall see if THAT was a good idea, too.

After letting the cucumbers and RED onions soak with kosher salt for two hours, I drained them well in a sieve then pushed hard on them with my hands to get the vegetables as dry as possible.

Next put the vinegar, sugar, and spices in the same large stainless steel bowl which I had rinsed, then brought them to a rolling boil.  Stirred in the cucumbers and onions and brought back to a full boil then reduced heat to medium low/simmer.  I let them simmer for 15 minutes then set the timer again for 5 more minutes and stood over the pot stirring almost constantly. I wanted to get as much of the juice to evaporate as possible.

The last step is to let the relish cool and store in a jar in the refrigerator for up to a month.  If you don't think you can eat it all in a month, the process in a hot water bath for 10 minutes to seal the jars.

We had some very mildly-flavored black bean burgers in the refrigerator.  I had not had my full complement of legumes for today so I put one burger in a bowl and covered with relish.  It is pretty good!

Wednesday, August 3, 2016

Spinning Fiber: Using The Yarn

This going to the spinning group thing is a mixed blessing!  I love going to spin with the nice people.  I love working with the fiber.  I don't love that there are not more hours in the day when I feel like spinning, washing, carding, skeining, knitting up projects.

Since our last spinning group meeting, I have progressed on the hat project BUT only a few inches. I had hoped to have it mostly done before the next meeting, BUT (again!) I will not be there since Spinning is this week!

Where I am on the hat band....


Added to the quick time frame between meetings, I managed to do some wretched thing to my arm which is making needlework not so much fun.  Maybe I will complain to my doctor when I see her this week.  She always has good ideas that help me.

Tuesday, August 2, 2016

Watercolor Painting: The House By The Side Of The Road

There is a wonderful poem that my mother could quote by heart and which my father loved.  He was surely a man who lived in a house by the side of the road and acted as Sam Foss suggests in this poem.

The House by the Side of the Road  by Sam Walter Foss

    THERE are hermit souls that live withdrawn
    In the place of their self-content;
    There are souls like stars, that dwell apart,
    In a fellowless firmament;
    There are pioneer souls that blaze the paths
    Where highways never ran-
    But let me live by the side of the road
    And be a friend to man. 

    Let me live in a house by the side of the road
    Where the race of men go by-
    The men who are good and the men who are bad,
    As good and as bad as I.
    I would not sit in the scorner's seat
    Nor hurl the cynic's ban-
    Let me live in a house by the side of the road
    And be a friend to man....

     ....Follow the link above to read the full poem.  It is inspirational, at least to me.

    Why do I bring this poem to your attention?  This is why....In the fall of 2014 I had the blessing of attending a watercolor painting class taught by Ed Kadunc.  It was at Court Street Arts in Haverhill, New Hampshire.

    The following is one of the paintings that Ed coached me through.  I like it.

    The house by the side of the road...

    You will notice the picture is framed.  You will notice it was not a good photograph.  Sorry.  I am learning to take pictures but am not there yet!

    This painting hangs on the wall of a dear friend.  She is a watercolor painter of long years' duration, except that for many years her paints and brushes laid dormant.  In the last year or so she has picked up her art materials again and has such joy in her work.

    She asked to see my paintings.  She loved this one so I gave it to her. Immediately she framed and hung it.

    That makes me very happy.

Monday, August 1, 2016

Munchie Monday: No-Bake Cereal Cookie Bars

Dear One is always on the prowl for a sweet treat, or something else to eat in a pinch.  Several weeks ago I found a recipe for No-Bake Cereal Cookie Bars.  I found them on "I Sing in the Kitchen" blog.  Feel free to go there to see the (her) original recipe which came from Taste of Home website, I think.

The way I made these cookie bars:


4 1/2 cups Rice Krispies
2 cups old-fashioned rolled oats
2 cups Corn Flakes
1/2 cup flaked coconut
1/2 cup coconut oil
scant 1/2 cup honey
16 ounces miniature marshmallows
1/2 cup M and M's

In 8-10 quart bowl measure out the Rice Krispies, rolled oats, Corn Flake, and flaked coconut.  I large saucepan melt coconut oil then, over LOW HEAT,  stir in the marshmallows until they are completely melted.  Add in the honey and stir well.  (Actually, this last bit is NOT how I did it.  It did not read the recipe thoroughly so what I did was put all the marshmallows in the pot, then the coconut oil, then the honey, and stirred like a son of a gun for more than 5 minutes to get it all melted and combined.  The wrong way worked. I bet the right way would work better...)

Pour the marshmallow mixture over the cereals and stir very well until every bit of cereal is coated with fluffy sugary mixture.  Add in the miniscule amount of M and M's and stir again.  Have ready a 15 by 11 (half-sheet pan) that has been well-greased, pour in the mixture.  Using VERY WELL GREASED CLEAN HANDS mush the cereal mixture into the pan until evenly level.  

I thought I would be smart and smush it a lot more M and M's onto the top to make them more fun.  Well, that did not work very well.  I think if you want more chocolate in the bars, you should add them with the rest of the ingredients....

After cooling 30 minutes on the counter, cut into 36 small cookie bars.  They really are pretty small. You could make them bigger if you like sugar highs.  If I make them again, I resolve to make the effort to go to the cellar for more old-fashioned oats instead of  putting in more Corn Flakes. I also will NOT put in honey.  Too sweet.  There is enough sugar in the marshmallows.  At least, that is my plan.  As it turns out, I added too much honey (this is from looking back at the recipe which called for 1/4 cup honey, not 1/2 cup honey.  Oh well)


When Dear One came home from his daily kayak paddle he had a bar.  He said, "They are pretty soft."  Well, they were, so I put them into the refrigerator.  Most of them are stored in plastic containers in the freezer with waxed paper separating the layers.  Want to have some treats available with small fry come to visit Grammie...