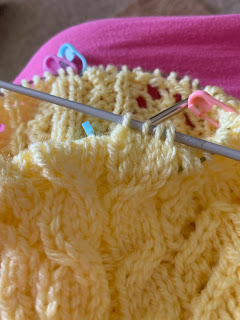
While working on the Hatsie test knit last night late, I discovered I had not crossed a cable. Yikes! Well, I went to bed after that to see if I could get some fresh eyes and fingers this morning. Yes turned out to be the answer...
This morning I worked on that cable mistake.
The first thing I did was find two double pointed needles in a good size. I did not have my needle gauge but thought they were the correct size. After the fact, it turns out they were one size smaller. Oh, well. They worked great.
Now on to the project.
This is the cable cross error discovered:
As you can see, I failed to cross the cable six rounds below. First thing to do: remove the stitches from the circular needle I was using with the rest of the stitches securely away from the "fix".
Next: unravel down to the round where you need to cross the stitches:
Insert a double pointed needle into the stitches where the cross needs to happen.The four stitches are placed on two different dpns so the cross will be able to happen.Making the cross--as you see, it has been accomplished prior to this photo.
Making cables in knitting is simply changing the order in which you knit the stitches. In this particular cable, the first two stitches the you came to were held in back with the second two stitches were moving to be knitted first.
Maybe a better way of saying this is that there are 1,2,3,4 stitches for this cable. The pattern will instruct you to do a left cross or a right cross. In this case it was a left cross so you put the first two stitches (1, 2) on a cable needle and hold them in the back of the work. The second two stitches (3, 4) are then stitched before stitches 1 and 2. Because I am a loose knitter, and since this is only 4-stitch cable, I just insert my needle into the two stitches that need changing of position, let the other two needles drop off the needle momentarily, change their positions and put them back on the needle. You then have the four stitches ready to knit the cable in the correct order. With a tiny bit of practice, it works like a charm and no cable needle is needed.
Now that the cross/cable has been made it is time to start picking up the stitches from the loose floppy yarn that is behind your needle as you can see in the above photo. After picking up each round's four stitches, be sure to adjust the tension so they will be pretty stitches. You do this by gently tugging on the new stitches on the needle.
The rows of unraveled yarn have now disappeared into nice neat rows of stitches and the repair is ready to go back on the circular needles on which the hat is being knitted. You can easily see that the cable has been crossed properly and the stitches neatened up.
The stitches are now on the circular needles and ready to continue on knitting with a sigh of relief and a note-to-self to pay more attention next time. Or maybe a better note-to-self, don't try to knit in the middle of the night...!
The hat is finished. It was designed by a nice lady named Naama Ido who invited me to test knit the pattern to help her get it ready for sale. It was a fun and easy knit.


No comments:
Post a Comment
Please feel free to comment here: