About The Country Wife Blog

Showing posts with label Paper crafting. Show all posts

Thursday, November 2, 2023

Fun Paper Crafting: Envelopes

 Another thing I really like to do with my hands is to make cards and envelopes.  Last year I decided I wanted to make a birthday card and pretty envelope for each of our sisters in the church.  It is now November and I have accomplished that goal. Having said that, I just made the last 40-plus cool envelopes.

These are the completed envelopes.

This year most of the envelopes have been made with an Envelope Punch Board by We R Memory Keepers.  I have purchased five or more of them over the years.  I do use aluminum foil to try to sharpen their blades but eventually they still seem to wear out/become dull.

 
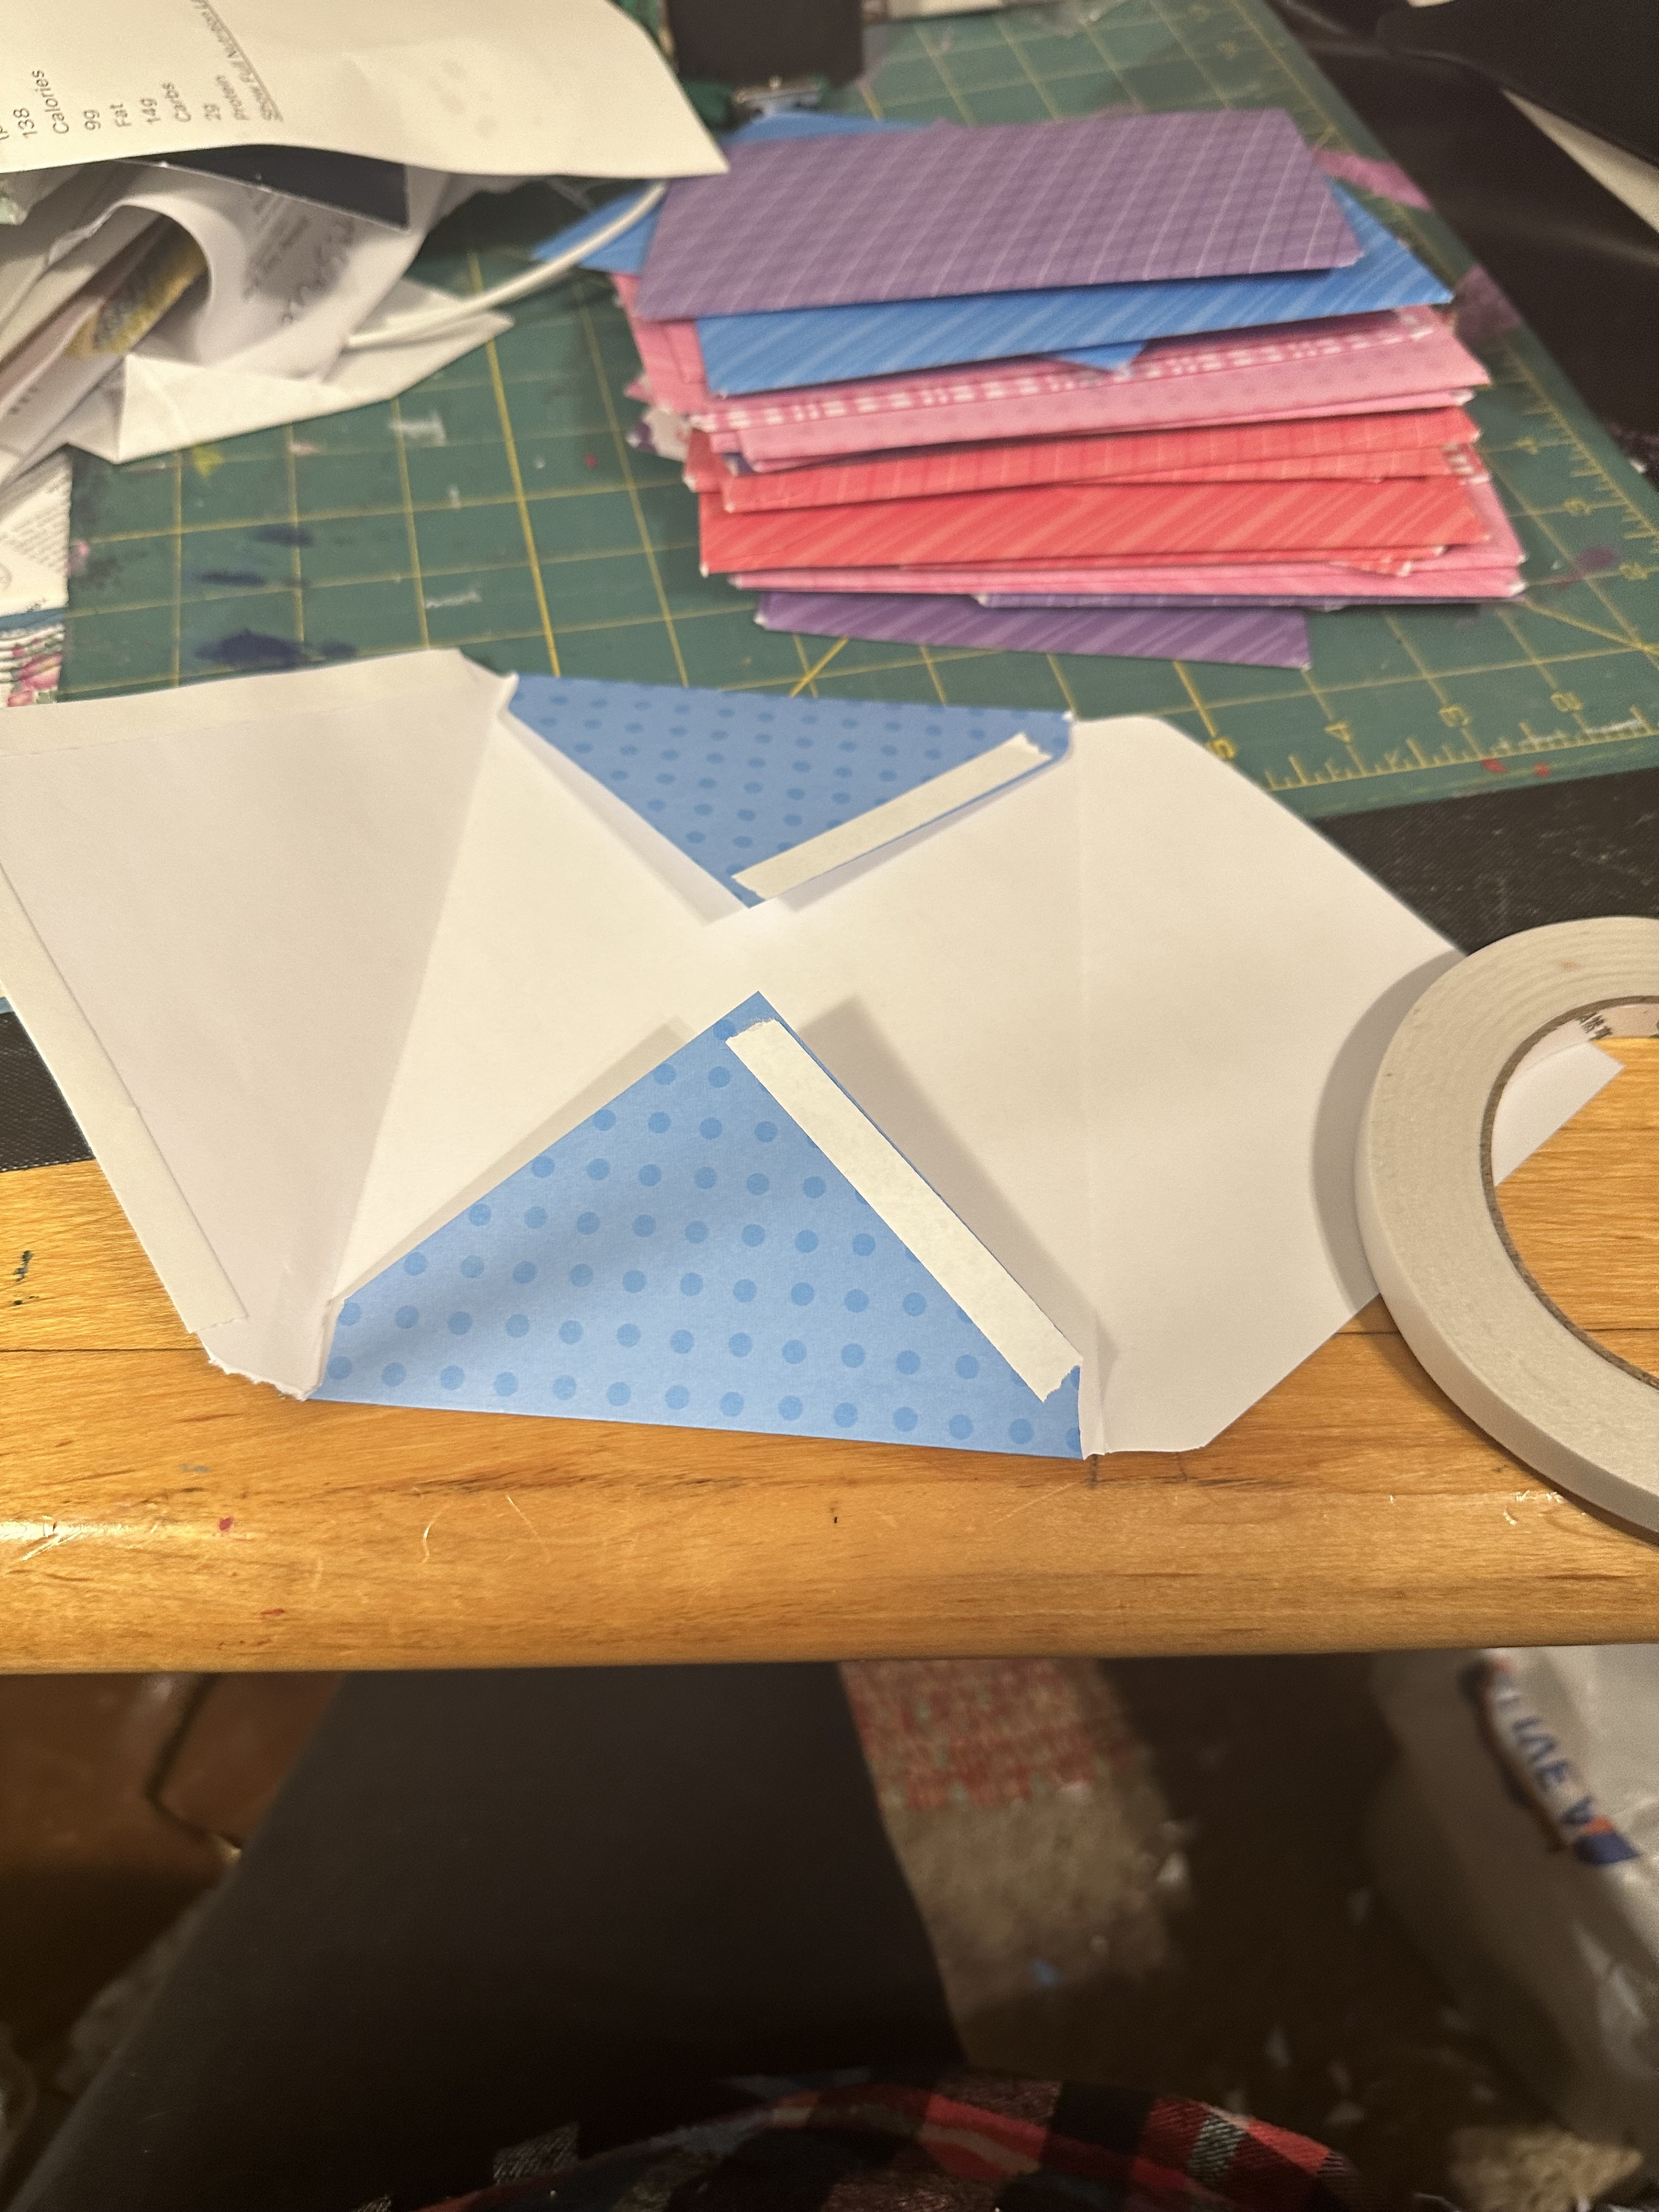
There are several steps to making these envelopes.
1. Cut paper to 8.5 by 8.5 inches
2. Use the punch board to make the cuts and score lines
3. Fold on the score lines
4. Add the double-sided tape
5. Pull off the tape protector on the bottom end of the envelope and fold up

The envelope is then ready to have a card inserted.
  
Such an enjoyable project and it makes me happy to see the pretty envelopes.  Many of the envelopes this year were floral patterns.  This last batch is not floral but still pretty.


Thursday, February 6, 2020

Fun With Paper And Chocolate

Those rosettes I made a while ago were so fun to make.  I made a few extra then made some more. I found a pattern on how to make a "heart rosette" which I tried with small success.

The kind ladies who took me in when we arrived here in South Carolina have a monthly Girls' Night Out.  I have felt so welcome and loved.  Consequently, I want to share the love back to them.

Since it is February and Valentine's Day is coming right up, I decided to lay in a little chocolate and make rosette flowers...with chocolate centers!  On the face of it, this was a great idea.  At least in my opinion.

The idea was to put the rosettes on some sort of stick and put them in a vase to put on the table at the restaurant.  It sort of worked but was not great.


You can see the box they were ready to travel in. You can also see that I made a large rose.  That was such a great idea until I had an issue with hot glue.  MAN, is that stuff HOT!!!  A large blister arose on my index finger.  Dear One recommended popping it!  Can you believe it?!!  Not a chance.  (I scratched my skin several years ago and developed a very bad infection that took heavy duty medicine to kill the thing, so I did not want to take the chance. ) Anyway, the burn, that put an end to the rose project!

Our grandchildren love Dove chocolate so I got a bag of it plus a bag of heart shaped chocolate.  When I got it home and ready to make the rosette flower centers with the chocolate I had a piece of each kind.  It was so awful I wanted to cry.  The Dove chocolate had peanut butter flavoring.  The heart-shaped candy had some nasty strawberry flavoring.  Such a disappointment.  Well, it was now the night before so I went through with it and made the centers, installed them on the rosettes, then attached to the skewers...which would probably have worked better if they were heavier-duty.

Since the chocolate was so bad I stopped at the store on the way to the dinner and got more good Dove dark chocolate and some plain milk chocolate hearts.  The bowl was almost empty when we left after dinner and most everyone was kind enough to take home another of my imperfect projects so all in all it was not a total failure. You can see why I love these ladies!


This picture shows the heart-shaped rosette. I thought they were pretty cute but I used heavy card stock so they were difficult to manage.  Live and learn.

Tuesday, January 14, 2020

Paper Crafting: Gum Holder Gift Box

Another of my favorite YouTubers is The Paper Pixie.  She showed me some really nifty also quick and easy gift box holders for gum.  A perfect stocking stuffer or just plain anytime gift.

This was my take on the project:


Pretty quick and easy and really fun to make.  Even more fun to pass out to friens.

Friday, December 20, 2019

Quick and Easy Paper Rosettes

While working on Christmas gifts I decided to break out in a new place and wrap the presents in Christmas paper.  Eventually I decided I would actually add bows the the packages!  Since we did not have bows that I liked, I decided to make rosettes as package toppers.

To do this I cut 12-inch paper into 2-inch strips.

Each of these strips of paper were scored at 1/2-inch intervals all the way across the paper.

Then comes folding in accordion folds--the first one started with a valley fold and the second one started with a mountain fold.

The two strips were glued together. I used permanent strong double-sided 1/2-inch tape.  At this point you have a circle of accordion folds.  By putting your hands around them, you can squish it into a rosette.

In the meantime you will have started your hot glue gun heating.  With the top of your rosette facing up,  put a good-sized glob of glue in the center and hold it together until it cools.  I actually put a small square of paper on top to hold it then flipped the rosette to the back side, added another dab of hot glue then immediately put on a square of paper there.  At this point I flipped over to the front side again and held together firmly until the rosette was happy.


Now for the label on the front...I punched out a nice scalloped oval from an E K Tools punch.  This worked very well. I put the name of the recipient on the center of the oval.


These make me happy.  You can cut out any size strips to make the rosettes.  I think smaller ones might be a little more difficult to hold together while hot gluing them, but I have not done it so I don't really know. 

This was just regular scrapbook paper but makes a very solid rosette.


Wednesday, December 11, 2019

Middle of the Night Projects

Another night waking up around 11 o'clock.  Since I could not go back to sleep, I decided to do something productive.  This time it is making the Christmas cards.  This year they are all different.  The idea is the same for each of them but because of the process, they are all unique. Not necessarily good...!

These card fronts are Gelli prints.  The replacement masking fluid pen that I ordered from Amazon is what I have been using to make the stars.  No two stars are the same...the result of ineptitude and inexperience.  The "inks" are Gelli Cosmic Blue and Liquitex Phthalocyanine Blue.  The Gelli plate is 5' by 7".  Interestingly enough, the Liquitex paint is VERY staining!  The brayer is now totally blue, unable to change back to the pink it has been ever since I started using that particular brayer.


You will notice the stars are VERY different!


This following star is my preferred star design BUT so far it is not easily duplicate-able...


Now, with a good batch of cards ready, shall I go downstairs and start in on gingerbread cookie dough?  Don't know.  May try sleeping again.

It really has been pleasant to sit here peacefully working and listening to train whistles in the distance.  The train tracks are about a mile away.  Sometimes the train stops at the intersection on US 521 and just sits there.  I got to learn more about the roads in the area when I tried to go around the stopped behemoth.

Tuesday, December 10, 2019

Paper Crafting: Two Birthday Cards

Making cards for boys and men is different.  Making cards for girls and women is easier. At least for me.  It takes much longer to think of what to make.  Here are two from this week.

The first is for a man. This entailed a Gelli print as well as die-cutting and folding.  Oh, and gluing.  I need to learn how to use glue better.  Seriously.  Still, I think the card, well, both of them, are okay.  They are just not good and certainly not great.  Maybe next time.


One of these dies is that one I said I would never use again.  I guess I cannot stand having the die get the better of me, so I tried again.  This one went better...so I will probably try again.  It would be useful to get it right.

This next card is for a ten-year-old grandson.  I hope he likes it.  Kind of hokey and still the wet glue problem...BUT...he is such a sweet agreeable boy that he will probably like it anyway, even with is multiple flaws.


This is the front of the card with ten smiley faces.
This is a pop-up card with the balloon bouquet opening up when he opens the card.  In retrospect I should have made the balloons much larger.  Next time.

Wednesday, December 4, 2019

Busy Paper Crafting Morning

This morning while I was listening to scriptures, not studying, just listening to and enjoying the story, I did a bang-up job on paper crafting.  Moving on from Thanksgiving cards to Christmas cards, I found some Dollar Tree cards that I liked and brought them home.  I wanted to make tiny gifts for the kind ladies who "took me in" when we moved to the area.  Each month we have a Girls' Night Out so, with the double purpose of using up our remaining few pieces of Halloween candy and making a gift, I got right to work.

NOTE TO SELF AND OTHERS:  Sometimes mass production has its flaws.  I guess if you had a Quality Assurance agent working beside you there would not be as many problems, but, if you, like me, work alone, well...sometimes errors are also mass produced.

For example:  in this nifty little box, there is meant to be a thumb hole to help open the box.  Knowing where it was supposed to be placed, I cut them all at once.  When I began the gluing process, there was a problem.  I folded up the bottom of the box first...where the thumb notch was housed.  When it came time to close up the box, the thumb hole was on the INSIDE not the outside of the box, thus it was totally worthless and a true indication of the ineptitude of the maker.  Oh well.
Nice thumb hole, just where it should go.
So...all of a sudden it occurred to me to glue the top of the box first.  What a lucky inspiration!  Now all the boxes fit properly together. I do not know what the difference is because they are all the same size, I just know it worked for the last half of the boxes I made.
Box folded and thumb hole ready to go.  The other boxes do not have the thumb hole showing...
Now for the table decorations for the Christmas party...

In Relief Society an announcement was made that there was going to be a table centerpiece contest at the ward Christmas party.  I passed by the sign up sheet.  I am not at all good with that sort of thing.  When we went to my sister's house for Thanksgiving, I had a change of heart because some ideas came to me.  Even more came to my sister, so now I decided I will do it.

Since we will be sitting at rectangular tables seating eight people, I now know how much space there will be for the centerpiece.  As part of the evolving plan I decided to make little favors for each place-setting.  This is what they are...little green pyramids with a treat inside.  I am pretending they look like trees...!

The idea for these came from Linda Parker at her YouTube channel.    She gives all the information but I will duplicate it here.

Cut card stock 7 7/8" square.
Score at 2 5/8" and 5 1/4" in both directions.  Also make a little mark at the 4" spot on all four sides.
Next score from the 4" mark diagonally to the score at 2 5/8" and 5 1/4" which will make a little triangle.
Score lines barely perceptible.
Cut off the four corner squares and set aside for some other purpose.
The only cutting necessary is to cut out the four corner squares.

Fold on the score lines.
One each pyramid-to-be I fold back one of the squares/triangular sections so I won't forget to cut wider flaps on that side.

On three of the four sides, cut the paper at about 1/4" then also make a cut almost to the corner, which is to remove some of the bulk for when you fold up the box.
You will notice that three of the triangles have 1/4" flaps but the bottom one has about 1/2" flaps.

On the side opposite the side you did not cut yet, punch two holes with a paper punch. I used a 1/4" punch.  (That is really too large unless you are using wider ribbon.)
Now, on the side you did not cut yet,  go ahead and cut a wider tab.  I cut close to half an inch wide, then cut notch at the top of the triangle as you did with the others.
When you pull up on the ribbon and slide the little flaps into the final sides, the box becomes a pyramid.  Glue is only needed on the very first triangle's sides.  Very handy!

At this point insert a piece of ribbon in the side opposite the wider-cut notched piece.  Put glue on both sides of that triangle and attach to the triangles on either side.
When that glue is dry, if you are using wet glue, or if using dry glue or hot glue, insert the treat inside the box-to-be, pull the ribbon in the opposite side, close up the box using those wider tabs to make the final side of the pyramid, and tie off the bowl.

Done.  And fun!
Eight boxes ready to go and the party is not until the 14th!  I hope some disaster is not awaiting me.  Usually I am way behind the eight-ball.  The white box above was made from foam-core I got at Dollar Tree and has cards in various stages laid out.  Very convenient.


Wednesday, November 27, 2019

Paper Crafting Boxes Made From Greeting Cards

Paper crafting, paper crafting!  So much fun.  Makes such a mess.  Makes me so happy to make something to give away and make people smile.

We had some leftover Halloween candy. I wanted to make a little treat for the sister we minister to.  I saw on YouTube a video on making a notebook with a Christmas card.  That was pretty interesting.  I even found some notepads to use, but it was going to take more time than my mind could handle.

This got me started thinking about other boxes.  I thought of the Lipstick Boxes I made one time for something, maybe Mother's Day, but they would not have worked with the leftovers.  Then I thought of the hinged boxes that I had made at one time.  The lipstick boxes and the hinged boxes are somewhere here on the blog if people want to search for them.

In this case I purchased a few Thanksgiving cards and cut the front from the inside.  The first cards I had were about 5.5 by 8 inches.

To make the hinged boxes I took the front of the card and placed it face-down in the score board and scored at 1 inch on all for sides.
Box with wet glue on the bottom and Dollar Tree clips (six came in a bag).  You can see a lipstick box in the background about which I had changed my mind.

Next I measure how much length there was in the middle on the long side and subtracted 1 inch.  The remaining measurement gave me the placement of the rest of the score marks.  In this case, I scored at about 3.5 inches and 4.5 inches.  You will recognize that this will give you three one-inch sections and two longer sections.

Fold up on the score lines and burnish carefully.  Cut on all the short lines.  Leave the two long sections alone at this point then put small notches on the other tabs.
Notice the little thumb-hole in the top of the box.  Wait to do it until you have the bottom done, and before you but the final glue on the top.  Use a circle hole punch and only put it about 1/3 of the way on the punch.


Now you are ready for the adhesive. I began using glue BUT the glue I had was taking forever to dry so I began using the dry adhesive tape.

On this model the thumb hole was inadvertently put on the inside of the bottom. Oh well.
.
Now on to some 4.5 " by 6.75" cards.  We still need 1-inch scored all around.  The only difference will be how much space there will be in the two "wells".

This shows the score board, the nifty little very sharp scissors, and the box-to-be with all the cuts made, including notching all the tabs.  You notice that the large sections are NOT notched.


Update: on this card the new score lines were at 2 7/8 and 3 7/8 inches...but if you are going to make these, I suggest cutting a piece of scratch paper the size of your card then scoring that.  Maybe make two or three of these...!  That way you won't spoil the cards with improper score lines.

Wednesday, November 20, 2019

Small Paper Crafting Project: Covered Notebooks

The ladies in our Relief Society are putting together boxes of gifts for the young missionaries.  One of the things we are doing is to contribute top-bound spiral pocket notebooks. I loved that idea and wanted to make some.  My first effort was to make one from scratch.  It turned out that I did not have the most important tool I needed...the hole punch.  This made me remember fondly the industrial paper punch/binder I left in Vermont.

To make a long story shorter, I decided to take some already-made notebooks and cover them with pretty papers.  Even here there was a learning curve!  It turns out that beautiful heavy card stock is NOT the thing to use.  At least not on this iteration.

The final time through I used regular "Recollections" paper (the Fashionably Chic 6 inch by 6 inch pad that I got at Michaels) and was successful.


1. Choose the paper.
2. Remove the binding coil from the notebook.  Save it carefully.  Too bad to have it roll under the table and get stepped on...
3. Cut the paper to the correct size.  In this case the notebook was 3" by 5" so the paper was cut 4" by 6".
4. Place the cover face down on the paper then fold up the paper, long sides first, then short sides.
5. Cut a triangle off each corner of the paper about 1/8 inch away from corner to reduce bulk when glueing.
6. Using DRY glue, put glue on all folded edges. I used double-sided tape until it ran out, then a glue-runner.
7. Press the long glued edges to the back side of the cover and press down well.  Glue down the top and bottom of the decorative paper to the back of the cover. Press well.
8. Use another piece of the same (or coordinating) paper that is about 2 1/2 inch by 3 3/4 inch and dry glue down, covering completely the back side of the cover.
9.  It is handy if you remember which end is the one with the punched holes for the coil binding.  Either way, now take the back cover and lay it on top of the front covered cover and use a paper punch to punch out the holes for the coil to be re-inserted.  I used a Japanese screw punch to make the holes.  I am too cheap to buy a Cinch machine...but also, I don't like their binding wires, so this punch worked for me.
10.  Re-insert the coil you took off at the beginning.  Remember to press it together so the coil stays on the notebook.

You could repeat this process with the backs of the notebooks, but I chose not to after the first two did not work as well as I had hoped.

To make the back covers a little bit more interesting, I punched a flourish out of white card stock, wrote a scripture reference and Merry Christmas on it then wet-glued the flourish onto the bottom of the back cover.  Not classy or anything, but more interesting than nothing, and the scriptures are good ones...! In my opinion.
You can see that I started out covering the backs BUT they were kind of nasty.  Not so nasty that I didn't give them to the missionary box.  Some missionary will probably not mind too much.